maya aztec and inca civilizations pdf

Mesoamerican and Andean societies‚ including the Maya‚ Aztec‚ and Inca‚ represent remarkable achievements in pre-Columbian America‚ documented in numerous PDF resources․

Overview of Mesoamerican and Andean Societies

Maya‚ Aztec‚ and Inca civilizations flourished as complex societies‚ each leaving a distinct cultural imprint․ Accessible PDF documents detail their advancements in agriculture‚ governance‚ and religion․ These societies‚ though geographically separate – Mesoamerica and the Andes – shared traits like sophisticated calendrical systems and intricate social hierarchies‚ offering valuable insights into pre-Columbian history․

Geographical Locations

PDF resources pinpoint the Maya in Central America‚ the Aztec in central Mexico‚ and the Inca within the Andes Mountains of South America‚ shaping their development․

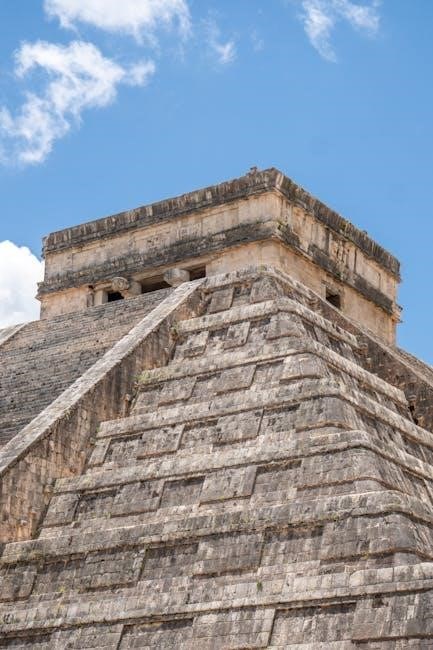
Maya Civilization: Central America

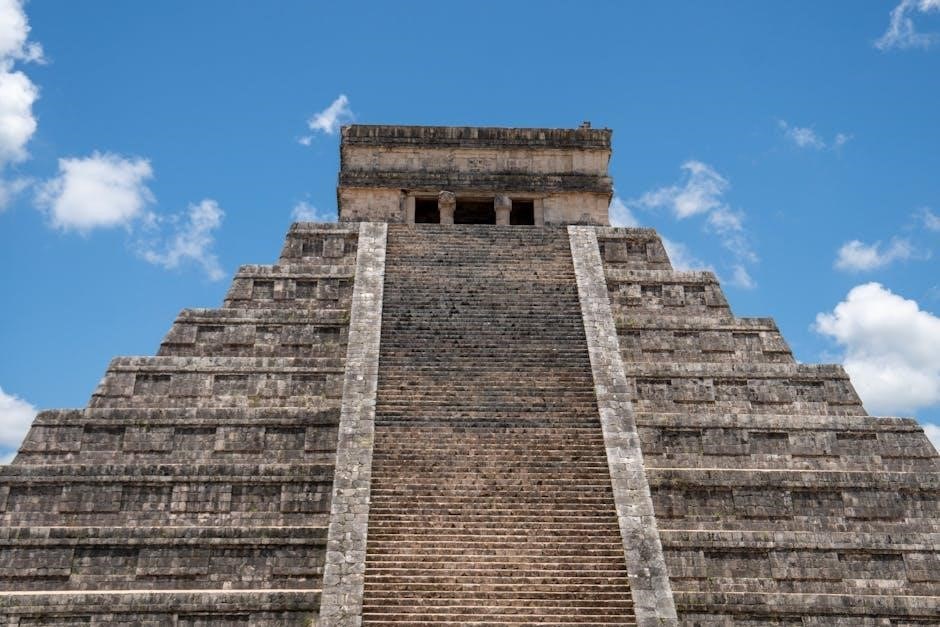
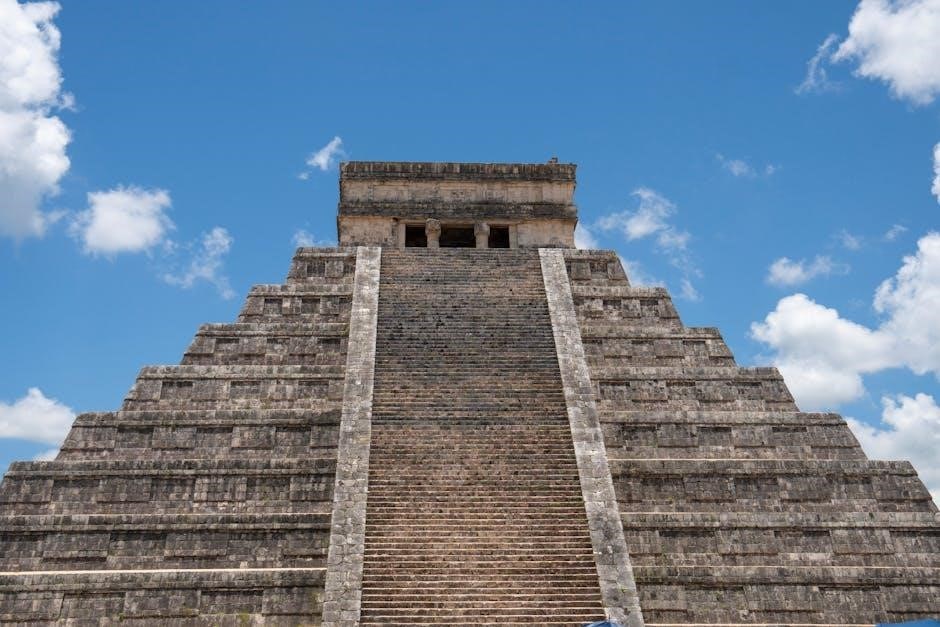
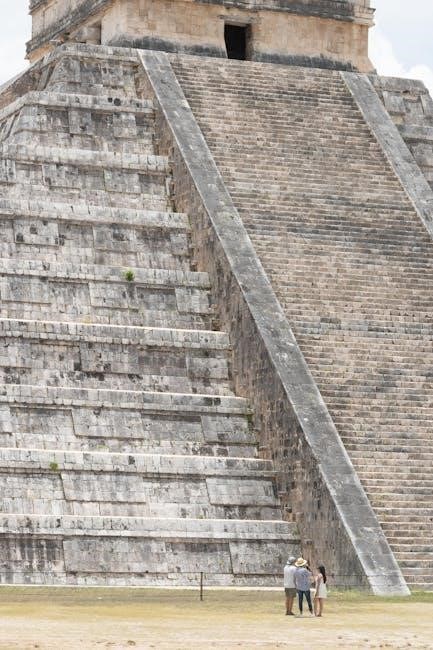
PDF documents detail the Maya flourishing in present-day Mexico‚ Guatemala‚ Belize‚ Honduras‚ and El Salvador․ Their civilization spanned diverse environments – rainforests to highlands․ Resources highlight advanced city planning‚ intricate hieroglyphic writing‚ and a sophisticated understanding of astronomy‚ all within this Central American locale․

Aztec Civilization: Central Mexico

PDF analyses reveal the Aztec empire centered in the Valley of Mexico‚ modern-day Mexico City․ They built Tenochtitlan‚ a magnificent island city․ Resources emphasize their complex social structure‚ tribute system‚ and impressive engineering feats‚ including causeways and aqueducts‚ all defining their Central Mexican dominance․

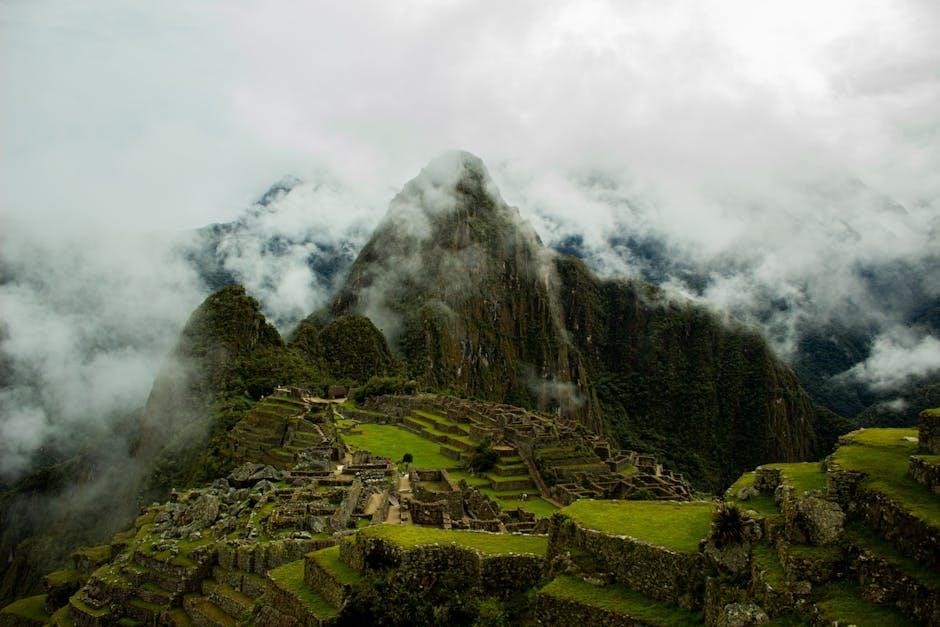
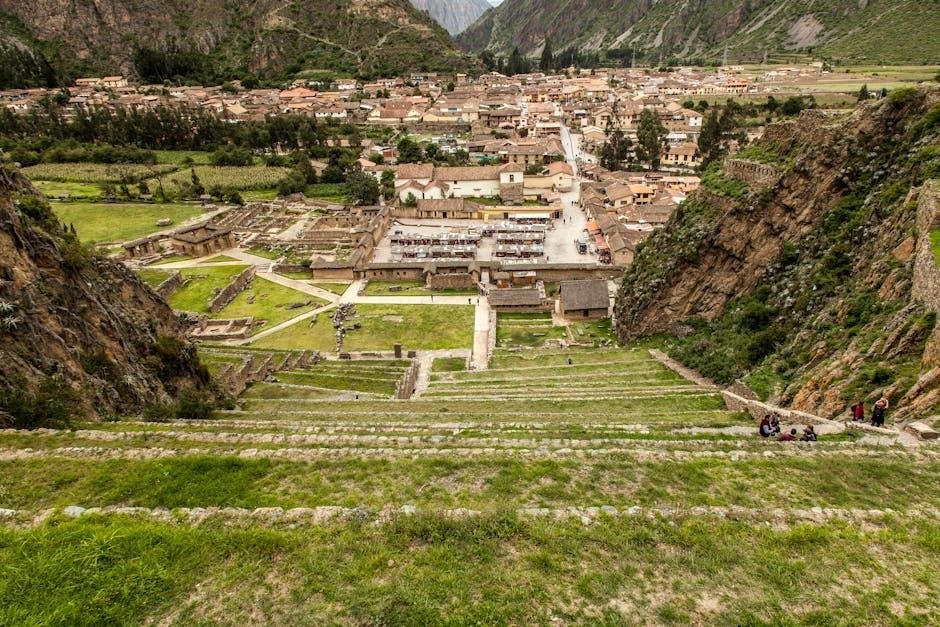
Inca Civilization: Andes Mountains‚ South America

PDF documents detail the Inca empire’s location spanning the Andes Mountains in South America․ They established a vast network of roads and bridges‚ showcasing advanced engineering․ Resources highlight their centralized bureaucracy‚ agricultural innovations like terrace farming‚ and sophisticated administrative systems within this challenging terrain․

Timeline and Historical Periods

PDF resources outline distinct periods for each civilization: Maya (Preclassic‚ Classic‚ Postclassic)‚ Aztec (1345-1521 CE)‚ and Inca (1438-1533 CE)‚ charting their development․

Maya Civilization: Preclassic‚ Classic‚ and Postclassic Periods

PDF documents detail the Maya timeline: Preclassic (2000 BCE – 250 CE) saw foundational development‚ the Classic (250 – 900 CE) marked peak cultural achievements‚ and the Postclassic (900 – 1697 CE) experienced shifts and eventual Spanish contact․ These periods‚ extensively studied‚ reveal a complex history;

Aztec Civilization: 1345 – 1521 CE

PDF resources illustrate the Aztec period‚ beginning in 1345 with Tenochtitlan’s founding‚ culminating in 1521 with the Spanish conquest․ This era witnessed rapid expansion‚ a tribute system‚ and complex religious practices‚ all thoroughly documented for historical analysis and understanding․

Inca Civilization: 1438 – 1533 CE

PDF analyses detail the Inca’s rise from 1438‚ establishing a vast empire through conquest and sophisticated administration‚ ending with Pizarro’s arrival in 1533․ Resources highlight their road systems‚ terrace farming‚ and unique societal structure‚ offering comprehensive historical insight․

Political Structures and Governance

PDF documents reveal diverse governance: Maya city-states‚ the centralized Aztec empire‚ and the Inca’s highly bureaucratic system‚ each uniquely structured for control․

Maya Political Organization: City-States

PDF analyses demonstrate the Maya lacked a unified empire‚ instead organizing into independent city-states․ Each city‚ like Tikal or Palenque‚ possessed its own ruler and government‚ often warring with neighbors․ These polities shared cultural traits but maintained political autonomy‚ creating a fragmented‚ yet vibrant‚ landscape․

Aztec Empire: Centralized Imperial Rule

PDF resources detail the Aztec’s highly centralized empire‚ originating in Tenochtitlan․ A single ruler‚ the Tlatoani‚ held supreme power‚ supported by a noble class and bureaucracy․ This structure enabled efficient tribute collection from conquered territories‚ fueling expansion and maintaining control‚ as documented in historical analyses․

Inca Empire: Highly Centralized Bureaucracy

PDF studies reveal the Inca Empire’s exceptionally organized bureaucracy‚ overseen by the Sapa Inca․ A complex network of officials managed resources‚ labor‚ and infrastructure across vast distances․ This centralized system‚ utilizing a decimal structure‚ ensured efficient administration and control‚ detailed in numerous academic sources․

Economic Systems

PDF analyses demonstrate diverse economic approaches: Maya trade & agriculture‚ Aztec tribute & markets‚ and Inca reciprocity & redistribution‚ shaping their societies․

Maya Economy: Agriculture and Trade

PDF resources detail the Maya economy’s foundation in intensive agriculture‚ utilizing techniques like slash-and-burn and raised fields․ Extensive trade networks connected city-states‚ exchanging goods like obsidian‚ jade‚ and textiles․ This complex system‚ lacking standardized currency‚ relied heavily on barter and specialized labor‚ fostering economic interdependence․

Aztec Economy: Tribute System and Markets

PDF analyses reveal the Aztec economy centered on a robust tribute system‚ demanding goods and labor from conquered territories․ Vibrant markets‚ like Tlatelolco‚ facilitated extensive trade with diverse products․ While lacking coinage‚ cacao beans served as a medium of exchange‚ supporting a complex commercial network․

Inca Economy: Reciprocity and Redistribution

PDF resources detail the Inca economy’s foundation on reciprocity and redistribution‚ managed by the state․ Labor obligations‚ rather than currency‚ fueled production․ Goods were collected and redistributed‚ ensuring resource access for all․ This system‚ alongside agricultural surplus‚ sustained a vast empire‚ documented in scholarly articles․

Agricultural Practices

PDF analyses reveal diverse farming techniques: Maya slash-and-burn‚ Aztec chinampas‚ and Inca terrace farming‚ all maximizing yields within their unique environments․

Maya Agriculture: Slash-and-Burn and Raised Fields

PDF resources detail Maya agricultural ingenuity‚ employing slash-and-burn methods to clear forests for planting‚ alongside sophisticated raised field systems․ These campos elevados‚ particularly in wetlands‚ enhanced drainage and fertility‚ boosting crop production․ This combination sustained a dense population‚ demonstrating advanced environmental adaptation and resource management․

Aztec Agriculture: Chinampas (Floating Gardens)

PDF analyses reveal the Aztecs’ innovative chinampas – “floating gardens” – in Lake Texcoco․ These artificial islands‚ created from mud and vegetation‚ provided fertile land for intensive agriculture․ This ingenious system dramatically increased food production‚ supporting the large Aztec population and complex urban centers‚ as documented in historical resources․

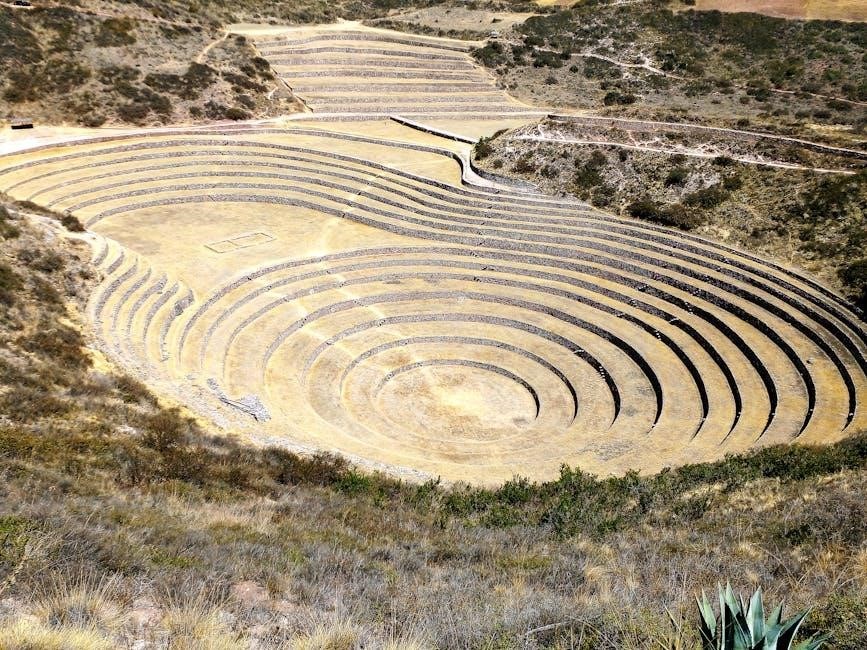
Inca Agriculture: Terrace Farming and Irrigation

PDF studies detail the Inca’s mastery of terrace farming along the steep Andean slopes․ Coupled with sophisticated irrigation systems‚ these terraces maximized arable land and prevented erosion․ This agricultural prowess‚ crucial for sustaining their empire‚ is extensively documented in academic resources and comparative civilization PDFs․

Religious Beliefs and Practices

PDF analyses reveal polytheistic systems; Maya cosmology‚ Aztec sun worship and human sacrifice‚ and Inca veneration of Inti‚ shaped their societies and are detailed within․

Maya Religion: Polytheistic with Complex Cosmology

PDF sources illustrate a highly intricate Maya belief system featuring a vast pantheon of gods and goddesses influencing all aspects of life․ Their cosmology included cyclical views of creation and destruction‚ detailed in the Popol Vuh․

Rituals‚ including offerings and ceremonies‚ aimed to maintain cosmic balance and appease deities‚ with priests playing a crucial role in interpreting the will of the gods․

Aztec Religion: Human Sacrifice and Sun Worship

PDF documents detail Aztec religion centered on maintaining the sun’s energy through frequent human sacrifice‚ believing it vital for cosmic continuation․ Huitzilopochtli‚ the sun and war god‚ received significant offerings․

Complex rituals and a priestly class governed religious practices‚ reflecting a worldview deeply intertwined with warfare‚ agriculture‚ and the cyclical nature of time․

Inca Religion: Inti (Sun God) and Ancestor Veneration

PDF resources illustrate Inca religion prominently featured Inti‚ the sun god‚ considered a divine ancestor․ Ancestor veneration was crucial‚ with mummified ancestors playing roles in daily life and rituals․

Priests conducted ceremonies to ensure agricultural fertility and maintain cosmic order‚ reflecting a polytheistic system deeply connected to nature and lineage․

Social Hierarchy and Class Structure

PDF analyses reveal distinct hierarchies: Maya (kings‚ nobles‚ commoners)‚ Aztec (emperors‚ warriors‚ slaves)‚ and Inca (Sapa Inca‚ nobles‚ commoners)․

Maya Social Structure: Kings‚ Nobles‚ Priests‚ and Commoners

PDF resources detail Maya society as a tiered structure‚ with k’uhul ajaw (divine kings) at the apex‚ followed by nobles and priests wielding significant power․ Below them were skilled artisans and merchants‚ supporting the elite‚ while the majority comprised commoners – farmers‚ laborers‚ and slaves – forming the base of this complex social pyramid․

Aztec Social Structure: Emperors‚ Nobles‚ Warriors‚ Merchants‚ and Slaves

PDF analyses reveal the Aztec social hierarchy‚ headed by the Tlatoani (emperor)․ Nobles (pipiltin) held administrative roles‚ while esteemed warriors (yāōtl) gained status through capture․ Merchants (pochteca) facilitated trade‚ and at the bottom‚ enslaved individuals – often war captives – comprised a significant portion of the population․

Inca Social Structure: Sapa Inca‚ Nobles‚ Commoners‚ and Yanaconas

PDF resources detail the Inca’s rigid social system‚ with the Sapa Inca – divine emperor – at its apex․ Nobles enjoyed privileges‚ while commoners (hatun runa) engaged in agriculture and labor․ Yanaconas‚ a class of servants‚ occupied the lowest stratum‚ performing various duties for the state․

Technological Advancements

PDF analyses reveal the Maya’s calendar and writing‚ Aztec engineering‚ and Inca innovations like roads and the quipu – a knotted-string recording device․

Maya Technology: Calendar System‚ Writing System

PDF resources detail the Maya’s sophisticated calendar systems‚ including the Long Count‚ and their hieroglyphic writing—one of the few fully developed writing systems of the pre-Columbian Americas․ These advancements enabled detailed astronomical observations and historical record-keeping‚ showcasing intellectual prowess․

Aztec Technology: Engineering‚ Architecture‚ and Weaponry

PDF documents illustrate Aztec engineering feats‚ like their capital Tenochtitlan‚ built on a lake‚ and impressive architecture․ Their weaponry‚ including the macuahuitl‚ a wooden club with obsidian blades‚ was formidable․ These technologies supported their empire and military dominance‚ as detailed in available resources․

Inca Technology: Road System‚ Suspension Bridges‚ and Quipu

PDF analyses reveal the Inca’s sophisticated road system‚ facilitating communication and control across their vast empire․ They expertly constructed suspension bridges from rope‚ overcoming challenging Andean terrain․ The quipu‚ a knotted-string device‚ served as a record-keeping system‚ detailed in scholarly PDFs․

Decline and Fall of Civilizations

PDF sources detail how environmental issues‚ warfare‚ and Spanish Conquest led to the decline of the Maya‚ Aztec‚ and Inca civilizations‚ altering their trajectories․

Maya Decline: Environmental Factors and Warfare

PDF analyses suggest the Maya civilization’s decline stemmed from prolonged drought‚ deforestation‚ and intensified warfare between competing city-states․ These ecological and political stresses‚ compounded over centuries‚ destabilized their complex societal structures․ Resource depletion and constant conflict ultimately contributed to societal fragmentation and abandonment of major centers․

Aztec Fall: Spanish Conquest by Hernán Cortés

PDF historical accounts detail the Aztec Empire’s downfall following Hernán Cortés’ arrival in 1519․ Utilizing superior weaponry‚ alliances with rival indigenous groups‚ and devastating diseases‚ Cortés conquered Tenochtitlan in 1521․ This marked the end of Aztec rule and the beginning of Spanish colonization‚ extensively documented in available resources․

Inca Fall: Spanish Conquest by Francisco Pizarro

PDF sources illustrate the Inca Empire’s collapse after Francisco Pizarro’s arrival in 1532․ Exploiting a civil war and utilizing advanced weaponry‚ Pizarro captured and executed the Sapa Inca‚ Atahualpa․ This led to the fall of Cusco in 1533‚ marking the end of Inca sovereignty and Spanish dominance‚ detailed in historical texts․

Cultural Contributions

PDF documents reveal lasting legacies: Maya mathematics and astronomy‚ Aztec architecture and poetry‚ and Inca engineering and administrative prowess profoundly shaped their worlds․

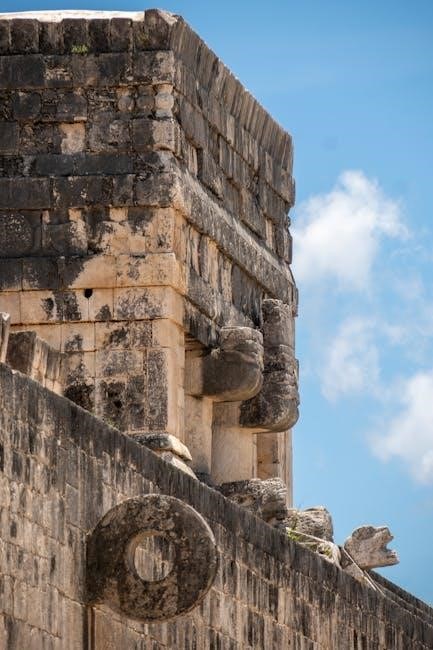
Maya Contributions: Mathematics‚ Astronomy‚ Art

PDF analyses demonstrate the Maya’s sophisticated base-20 numerical system‚ enabling complex calculations․ Their astronomical observations‚ meticulously recorded‚ predicted eclipses and charted celestial movements with remarkable accuracy․ Furthermore‚ Maya art—sculptures‚ murals‚ and pottery—reveals intricate narratives and a deep understanding of their cosmology‚ showcasing exceptional artistic skill․

Aztec Contributions: Architecture‚ Poetry‚ and Medicine

PDF resources highlight the Aztecs’ impressive architectural feats‚ notably Tenochtitlan’s grand temples and causeways․ Their rich oral tradition produced evocative poetry‚ often celebrating warfare and religious beliefs․ Aztec medicine utilized herbal remedies and surgical techniques‚ demonstrating advanced knowledge of anatomy and healing practices‚ as detailed in historical accounts․

Inca Contributions: Engineering‚ Textiles‚ and Administration

PDF documents showcase the Inca’s remarkable engineering skills‚ exemplified by their extensive road system and intricate stonework․ Highly skilled weavers produced vibrant textiles with symbolic meaning․ Their centralized administration‚ managing resources and labor efficiently‚ facilitated a vast empire‚ details readily available in scholarly PDFs․

Comparison Chart: Key Differences

PDF resources detail distinct differences in location‚ time periods‚ and capital cities among the Maya‚ Aztec‚ and Inca civilizations‚ highlighting unique societal developments․

Location‚ Time Period‚ and Capital Cities

PDF comparative charts reveal the Maya flourished in Central America (various city-states)‚ the Aztecs in central Mexico (Tenochtitlan)‚ and the Inca in the Andes Mountains of South America (Cusco)․ Their timelines also differed; Maya (250-900 CE)‚ Aztec (1345–1521 CE)‚ and Inca (1438–1533 CE)․

Similarities Between the Civilizations

PDF analyses demonstrate all three civilizations innovated in agricultural techniques and shared polytheistic religious practices‚ despite distinct cultural expressions and regional adaptations․

Agricultural Innovations and Religious Practices

PDF resources highlight shared agricultural ingenuity: the Maya with raised fields‚ Aztecs utilizing chinampas‚ and Incas mastering terrace farming—all maximizing yields․ Furthermore‚ all three practiced polytheism‚ featuring complex cosmologies‚ ritualistic ceremonies‚ and reverence for nature‚ though deities and specific practices differed significantly․

Legacy and Modern Relevance

PDF studies demonstrate enduring influence on contemporary cultures‚ visible in art‚ architecture‚ and agricultural techniques‚ preserving ancestral knowledge and inspiring modern innovation․

Influence on Contemporary Cultures

PDF resources highlight how Maya‚ Aztec‚ and Inca legacies permeate modern societies; their mathematical and astronomical advancements inspire scientific pursuits‚ while artistic motifs influence design․ Agricultural practices‚ like terrace farming‚ inform sustainable methods․ Furthermore‚ understanding their complex social structures provides insights into historical governance and cultural identity‚ fostering appreciation for indigenous heritage․

Resources for Further Study (PDFs and Online Materials)

Numerous PDF documents and online resources detail Maya‚ Aztec‚ and Inca civilizations‚ offering academic articles‚ educational websites‚ and comparative charts for in-depth exploration․

Links to Academic Articles and Educational Websites

Explore scholarly articles detailing Mesoamerican and Andean cultures via university databases․ Websites like those offering downloadable PDFs‚ such as week_3_resources‚ provide comparative analyses․ Quora discussions offer diverse perspectives‚ while resources focusing on Indigenous Peoples of the Americas present comprehensive overviews of these civilizations․

the essential oils handbook pdf free

Essential oil handbooks, often available as PDF downloads, offer comprehensive guides to these potent plant extracts. Discover a world of wellness knowledge today!

These resources detail production, uses, and safety, empowering users to harness nature’s fragrances for holistic well-being and aromatic enjoyment.

What is an Essential Oils Handbook?

Essential oil handbooks are detailed compendiums serving as invaluable resources for both beginners and experienced enthusiasts. They meticulously document the properties, extraction methods, and diverse applications of various essential oils.

These guides, frequently found in PDF format for easy access, delve into aromatherapy principles, safety guidelines, and potential benefits. A quality handbook, like Jennie Harding’s, highlights key information and fascinating facts, offering an authoritative yet accessible exploration of these complex fragrances.

They empower users to confidently integrate essential oils into their daily lives for enhanced well-being.

Why Download a Free PDF Version?

Downloading a free PDF version of an essential oils handbook offers unparalleled convenience and accessibility. It allows instant access to a wealth of information on PC, iPad, Android, iOS, tablets, and MAC devices – a new world at your fingertips!

PDFs eliminate the need for physical storage and enable easy searching and note-taking. This format is cost-effective, providing valuable knowledge without financial investment. Discover a comprehensive resource for enhancing well-being and exploring the captivating world of essential oils.

Jennie Harding’s Essential Oils Handbook

Jennie Harding’s handbook is an authoritative, accessible guide to essential oils, highlighting key information and fascinating facts for enhanced well-being.

Overview of the Book’s Content

Jennie Harding’s Essential Oils Handbook provides a detailed exploration of these natural compounds, covering their extraction, properties, and diverse applications. The book delves into individual oil profiles, offering insights into their unique characteristics and benefits.

Readers will discover how essential oils are utilized in aromatherapy, cosmetics, and household products. It also emphasizes safe usage, dilution guidelines, and potential precautions. This handbook serves as a valuable resource for both beginners and experienced enthusiasts seeking to deepen their understanding of these “fragrant gold” substances.

Key Features and Benefits

Jennie Harding’s handbook stands out with its authoritative yet accessible approach, making complex information easily digestible. Key points and fascinating facts are highlighted for quick reference, enhancing the learning experience.

The PDF format ensures convenient access across various devices – PCs, iPads, Androids, and more. This resource empowers readers to enhance well-being through essential oils, appreciating their alluring fragrances and therapeutic potential. It’s a delightful guide for anyone passionate about natural wellness.

Availability and Formats (PDF, EPUB, MOBI)

Jennie Harding’s Essential Oils Handbook is readily available as a digital download, offering convenience and portability. The book is offered in multiple formats to suit diverse reading preferences – PDF, EPUB, and MOBI.

These e-books are compatible with a wide range of devices, including PCs, iPads, Androids, iOS, tablets, and MACs. Discover a new world of knowledge at your fingertips through this accessible and versatile resource, now available online!

Essential Oil Production and Extraction

Essential oils are commonly extracted through distillation, a process detailed in handbooks. They fragrance products and are vital in aromatherapy practices.

Distillation Methods

Distillation, a cornerstone of essential oil production, involves separating oils from plant material using steam or water. Essential oil handbooks detail various techniques, including steam distillation – where steam passes through the plant matter – and water distillation, utilizing boiling water.

These methods rely on the principle that oils vaporize at lower temperatures than water. The resulting vapor is then cooled and condensed, yielding the pure essential oil. Handbooks often illustrate these processes, providing insights into optimizing yield and quality.

Other Extraction Techniques

Beyond distillation, essential oil handbooks explore alternative extraction methods. Solvent extraction, utilizing chemicals like hexane, yields absolutes – highly concentrated aromatic compounds. Expression, or cold pressing, is common for citrus oils, mechanically squeezing the oil from the rind;

CO2 extraction, a newer technique, employs carbon dioxide under pressure, offering a pure and environmentally friendly alternative. These methods, detailed in comprehensive guides, cater to different plant types and desired oil characteristics.

Common Essential Oils and Their Uses

Essential oil handbooks detail popular oils like lavender, tea tree, and peppermint, outlining their diverse properties and applications for wellness and aromatherapy.

Lavender Oil: Properties and Applications

Lavender oil, a cornerstone in aromatherapy, is celebrated for its calming and therapeutic properties. Essential oil handbooks highlight its versatility, detailing uses ranging from promoting relaxation and sleep to soothing skin irritations.

Its alluring fragrance makes it a popular ingredient in perfumes, cosmetics, and bath products. The handbooks often emphasize its antiseptic qualities and potential benefits for minor burns and insect bites, offering guidance on safe and effective application methods.

Tea Tree Oil: Benefits and Precautions

Tea Tree oil, renowned for its potent antiseptic and antimicrobial properties, is a staple in natural medicine. Essential oil handbooks detail its effectiveness against acne, fungal infections, and minor wounds, emphasizing its cleansing abilities.

However, these guides also stress crucial precautions; it’s toxic if ingested and can cause skin sensitivity. Proper dilution is paramount, and handbooks provide clear guidelines for safe topical application, ensuring responsible usage.

Peppermint Oil: Uses and Safety Guidelines

Peppermint oil, celebrated for its invigorating aroma, boasts diverse applications detailed in essential oil handbooks. It’s commonly used to alleviate headaches, soothe digestive issues, and boost energy levels, offering a natural remedy for various ailments.

However, safety is key. Handbooks caution against undiluted topical use, potential interactions with medications, and avoidance during pregnancy. Proper dilution and responsible application are vital for a positive experience.

Essential Oils in Aromatherapy

Aromatherapy utilizes essential oils for therapeutic benefits, detailed in handbooks. Explore inhalation and topical methods to enhance well-being and emotional balance naturally.

The Principles of Aromatherapy

Aromatherapy centers on the belief that essential oils, the “life force” of plants, impact physical and emotional health. These potent extracts interact with the body’s systems via inhalation and topical application.

Handbooks detail how specific oils correspond to various needs, promoting balance and well-being. Understanding these principles—the oil’s chemical components and their effects—is crucial for safe and effective use. The goal is holistic healing, addressing the whole person, not just symptoms.

Methods of Application (Inhalation, Topical)

Essential oils are versatile, applied through inhalation – diffusion, steam, or direct sniff – impacting the limbic system and emotions. Topical application, however, requires dilution with carrier oils to prevent skin sensitivity.

Handbooks emphasize proper dilution ratios and safe carrier oil choices. Massage blends, compresses, and bath additions are common topical methods. Always prioritize safety; never ingest oils without expert guidance. Understanding these application techniques unlocks aromatherapy’s full potential.

Storage, Labeling, and Transport of Essential Oils

Essential oil quality relies on proper dark glass storage, accurate labeling with date and contents, and safe transport to maintain potency and prevent degradation.

Proper Storage Techniques

Essential oils demand careful storage to preserve their therapeutic properties and prevent deterioration. Amber or dark blue glass bottles are crucial, shielding oils from harmful ultraviolet light.

Keep bottles tightly sealed in a cool, dark place, away from direct sunlight and heat sources. Avoid storing oils in plastic containers, as they can react with the oil’s chemical components.

Consistent temperature is key; fluctuations can degrade the oil. Proper storage extends shelf life and ensures maximum benefit from these precious botanical extracts.

Importance of Accurate Labeling

Accurate labeling is paramount when handling essential oils, ensuring safe and effective use. Each bottle should clearly display the oil’s botanical name, extraction method, and country of origin.

Include the date of distillation or purchase, as oils degrade over time. Note any carrier oils used for dilution, and clearly mark any potential allergens or sensitivities.

Precise labeling prevents confusion, minimizes risks, and allows for responsible aromatherapy practices, safeguarding both user well-being and the integrity of the oils.

Safe Transport Guidelines

Essential oils require careful transport to maintain their quality and prevent leakage. Securely seal bottles with tight-fitting caps and consider using tamper-evident packaging.

Protect glass bottles from breakage by cushioning them with bubble wrap or packing peanuts within a sturdy outer box.

Avoid exposing oils to extreme temperatures or direct sunlight during transit. Clearly label packages as containing “fragile” and “flammable” materials, adhering to relevant shipping regulations.

Essential Oils: Natural vs. Chemical Substances

Essential oils, though natural, possess complex chemical compositions. Understanding this classification is vital, especially considering regulatory frameworks like IN REACH for safe usage.

Understanding the Classification

Essential oils are fundamentally natural substances, derived directly from plants through processes like distillation. However, they aren’t simply ‘natural’ in a simplistic sense; they are complex mixtures of various chemical compounds.

These compounds – terpenes, esters, aldehydes, and more – are identifiable and measurable chemical entities. Therefore, classifying essential oils requires acknowledging their dual nature: originating from nature, yet possessing defined chemical structures. This understanding is crucial for safety assessments and regulatory compliance.

Accurate classification impacts how these oils are handled, marketed, and utilized within industries like aromatherapy and cosmetics.

Regulatory Considerations (IN REACH)

In Europe, the REACH (Registration, Evaluation, Authorisation and Restriction of Chemicals) regulation significantly impacts essential oil handling. REACH aims to ensure the safe use of chemicals, including those naturally derived.

Essential oil components must be registered if manufactured or imported in quantities exceeding one tonne per year. This involves submitting detailed information on their properties and safe usage.

Compliance with REACH is vital for businesses trading essential oils within the EU, ensuring product safety and legal market access.

Marketing and Sales of Essential Oils

Essential oils are often marketed as “fragrant gold,” capitalizing on their allure and therapeutic potential. Sales thrive through online platforms and wellness retailers.

The “Fragrant Gold of Nature”

Essential oils have earned the moniker “fragrant gold of nature” due to their concentrated value and captivating aromas. This evocative term highlights their historical significance and perceived worth, stemming from laborious extraction processes.

Marketing strategies frequently leverage this imagery, emphasizing the purity and potency of these botanical treasures. The appeal extends beyond aromatherapy, encompassing cosmetics, perfumery, and household products, driving consistent consumer demand. This branding positions essential oils as a luxurious and beneficial addition to daily life.

Current Market Trends

The essential oil market is experiencing robust growth, fueled by increasing consumer interest in natural health and wellness solutions. Demand for aromatherapy products and DIY beauty formulations is particularly strong, driving sales of individual oils and blends.

Sustainability and ethical sourcing are becoming key purchasing factors. Online retail dominates, offering convenience and a wide selection. Simultaneously, educational resources, like downloadable handbooks, empower informed consumer choices and boost market engagement.

Safety Considerations When Using Essential Oils

Essential oil use requires caution; potential risks and allergies exist. Proper dilution and informed application, detailed in handbooks, are crucial for safe enjoyment.

Potential Risks and Allergies

Essential oils, while natural, can present risks. Skin sensitivity and allergic reactions are possible, emphasizing the need for patch testing before widespread topical use.

Certain oils are phototoxic, increasing sun sensitivity. Internal use, without professional guidance, is generally discouraged.

Pregnant or breastfeeding individuals, and those with pre-existing medical conditions, should consult a healthcare professional before using essential oils. A comprehensive handbook, like a PDF guide, details these crucial safety considerations.

Dilution and Proper Usage

Essential oils are highly concentrated and require dilution with carrier oils – like jojoba or almond oil – for safe topical application. A PDF handbook will detail appropriate dilution ratios, typically 1-5% for adults.

Avoid undiluted application, which can cause skin irritation. Inhalation methods, such as diffusers, offer another safe usage option.

Always follow recommended guidelines and consult a qualified aromatherapist for personalized advice, ensuring responsible and effective use of these potent botanical extracts.

Resources for Further Learning

Essential oil knowledge expands with dedicated websites and publications. Explore PDF handbooks and online resources for deeper insights into aromatherapy and usage.

Continual learning enhances safe and effective application of these natural wonders.

Recommended Websites

Numerous online platforms provide valuable information regarding essential oils and downloadable handbooks. While specific sites weren’t directly mentioned, searching for “essential oils handbook PDF free” yields results from various botanical and aromatherapy resource hubs.

Look for reputable websites offering detailed guides on extraction, applications, and safety precautions. Be cautious of sources and prioritize those with expert backing. Exploring online forums and communities dedicated to aromatherapy can also provide practical insights and shared experiences, supplementing your PDF handbook knowledge.

Additional Books and Publications

Beyond readily available PDF handbooks, expanding your library with physical books deepens understanding. Jennie Harding’s Essential Oils Handbook, available in PDF, EPUB, and MOBI formats, is a highly recommended starting point.

Explore publications by H. Panda (ISBN 818662371X) for detailed insights into production and applications. Further research into aromatherapy texts and botanical guides will enrich your knowledge, complementing the information found in free downloadable resources.

pdf 7.3 powerstroke wiring diagram

Navigating the 7.3 Powerstroke’s electrical system requires a detailed pdf wiring diagram. Understanding its complexities is crucial for effective diagnostics and repairs, ensuring optimal engine performance.

Overview of the 7.3L Powerstroke Engine

The 7.3L Powerstroke diesel engine, produced from 1994 to 2003, is renowned for its durability and robust design. It’s a direct-injection engine utilizing a High-Pressure Oil Pump (HPOP) to deliver fuel to the injectors. A comprehensive pdf wiring diagram is essential due to the engine’s complex electronic controls, managing systems like fuel delivery, turbocharger operation, and glow plug activation.

Understanding the engine’s architecture—including the Engine Control Module (ECM) and various sensors—is vital. The 7.3L’s reliance on electronic signals for optimal function means accurate wiring diagrams are paramount for troubleshooting and repair, preventing costly misdiagnoses and ensuring reliable performance. Accessing a detailed pdf version simplifies this process.

Importance of a Wiring Diagram

A detailed pdf wiring diagram is indispensable when working with the 7.3L Powerstroke. It provides a visual roadmap of the entire electrical system, pinpointing wire locations, connector pinouts, and component interactions. Without it, diagnosing electrical faults becomes a frustrating and time-consuming process, potentially leading to incorrect repairs.

Accurate diagrams are crucial for identifying short circuits, open circuits, and faulty sensors. They enable technicians to trace wiring paths efficiently, verify voltage drops, and confirm proper grounding. A readily available pdf version allows for quick reference during repairs, minimizing downtime and ensuring a safe and effective restoration of the vehicle’s electrical functionality.

Essential Components and Systems

The 7.3 Powerstroke’s electrical system, detailed in a pdf diagram, integrates fuel, ICP sensors, HPOP, and turbocharger controls for optimal operation.

Fuel System Wiring

The 7.3 Powerstroke’s fuel system wiring, comprehensively illustrated in a pdf wiring diagram, is critical for delivering consistent fuel flow. This includes the fuel pump relay, fuel pump driver module, and the fuel injectors themselves. A detailed diagram reveals the power and ground connections for each component, alongside the data lines controlling injector pulse width.

Troubleshooting fuel delivery issues often begins with verifying power and ground at the fuel pump and injectors. The pdf diagram aids in tracing wiring paths, identifying potential shorts or opens. Understanding the wiring scheme allows for accurate diagnosis of problems like a failed fuel pump, clogged injectors, or a malfunctioning fuel pressure regulator, ultimately restoring optimal engine performance.

Injection Control Pressure (ICP) Sensor Wiring

A detailed pdf wiring diagram is essential for understanding the 7.3 Powerstroke’s ICP sensor circuit. This sensor provides crucial feedback to the ECM regarding oil pressure within the high-pressure oil system, directly impacting injection timing and fuel delivery. The diagram illustrates the ICP sensor’s power supply, signal wire, and ground connection, vital for accurate readings.

Diagnosing ICP sensor issues requires tracing the wiring harness using the pdf diagram. Common problems include corroded connectors, damaged wiring, or a faulty sensor. Proper diagnosis involves verifying voltage and signal integrity, ensuring the ECM receives accurate data for optimal engine operation and preventing performance issues like hard starting or lack of power.

High-Pressure Oil Pump (HPOP) Wiring

The 7.3 Powerstroke’s HPOP relies on a specific wiring configuration, best understood through a comprehensive pdf wiring diagram. This diagram details the solenoid valve controlling oil flow to the injectors, and its connection to the ECM. Accurate HPOP operation is critical for achieving sufficient injection pressure, directly impacting engine power and efficiency.

Troubleshooting HPOP wiring issues, using the pdf diagram, involves checking the solenoid’s power and ground, as well as the control signal from the ECM. Common failures include corroded connections, broken wires, or a faulty solenoid. Verifying proper voltage and resistance is key to diagnosing and resolving HPOP-related performance problems.

Turbocharger Control Wiring

A detailed pdf wiring diagram is essential for understanding the 7.3 Powerstroke’s turbocharger control system. This system utilizes a variable geometry turbo (VGT) controlled by an electronic actuator. The diagram illustrates the wiring connecting the turbo solenoid, the ECM, and various sensors providing feedback for optimal boost control.

Diagnosing turbocharger wiring faults, with the aid of the pdf, involves checking the solenoid’s power, ground, and control signal. Issues can stem from a faulty solenoid, damaged wiring, or ECM malfunctions. Proper boost control is vital for engine performance and fuel efficiency, making accurate wiring diagnosis crucial.

Key Wiring Harnesses

The pdf 7.3 Powerstroke wiring diagram highlights three main harnesses: engine, under-hood, and cab. Each is critical for system functionality and diagnosis.

Engine Control Module (ECM) Wiring Harness

The pdf 7.3 Powerstroke wiring diagram details the ECM harness as the central nervous system. It connects all engine sensors and actuators to the ECM, facilitating crucial data exchange. Key connections include the fuel injectors, ICP sensor, HPOP control, and turbocharger controls. Pinout diagrams within the pdf are essential for identifying each wire’s function.

Common issues involve corroded connectors, damaged wiring from engine heat, and broken pins. A digital multimeter, as shown in the pdf’s troubleshooting section, is vital for testing continuity and voltage. Proper diagnosis relies on accurately interpreting the pdf’s color codes and connector layouts, ensuring correct repairs and preventing further complications.

Under-Hood Wiring Harness

The pdf 7.3 Powerstroke wiring diagram illustrates the under-hood harness as a complex network distributing power and signals. It connects the ECM to vital components like the fuel pump, starter, alternator, and various sensors. Detailed diagrams within the pdf showcase wire routing and connector locations, crucial for tracing circuits.

Damage often occurs from heat, vibration, and exposure to fluids. The pdf highlights common failure points, such as chafed wires near the exhaust and corroded connections. Using a multimeter, as guided by the pdf, helps pinpoint shorts, opens, and voltage drops. Accurate interpretation of the pdf’s color codes is essential for effective repair and restoration of functionality.

Cab Wiring Harness

The pdf 7.3 Powerstroke wiring diagram details the cab harness, connecting interior components to the engine and chassis. This includes wiring for the instrument cluster, gauges, climate controls, and the transmission selector; The pdf’s schematics are vital for diagnosing issues like faulty sensors or intermittent electrical problems within the cab.

Often, issues arise from modifications like aftermarket stereo installations or lighting additions. The pdf helps identify factory wiring and avoid conflicts. Connector pinouts within the pdf are essential for troubleshooting. Careful examination of the pdf reveals potential grounding issues and wire routing concerns, aiding in efficient repair and restoration of cab electrical systems.

Decoding the Wiring Diagram

A pdf 7.3 Powerstroke diagram requires understanding color codes, connector pinouts, and symbols. Utilizing a multimeter, as shown in the pdf, verifies circuit integrity.

Understanding Wire Colors and Markings

The 7.3 Powerstroke wiring diagram, often found as a pdf, relies heavily on standardized wire colors to identify circuits. Red typically signifies power wires, while black denotes ground. Other colors, like orange, blue, and yellow, represent various sensor signals, control circuits, and data lines.

Markings on the wires themselves, often heat-shrink tubing with numbers or letters, provide crucial information about the wire’s function and its connection point within the harness. These markings correspond directly to the notations within the pdf wiring diagram. Deciphering these codes is essential for tracing circuits and pinpointing faults. Always refer to the pdf diagram for accurate color and marking interpretations, as variations can occur.

Pinout Diagrams for Connectors

A comprehensive 7.3 Powerstroke wiring diagram pdf includes detailed pinout diagrams for every connector. These diagrams illustrate the function of each pin within the connector – power, ground, signal, or data. Pin numbers are typically labeled, allowing technicians to accurately identify each wire’s purpose.

Understanding these pinouts is vital when testing circuits or replacing connectors. The pdf will often show the connector’s face view, clearly indicating pin locations. Incorrectly identifying a pin can lead to misdiagnosis and potential damage to the engine’s electrical system. Always cross-reference the pdf pinout with the physical connector before making any connections.

Using a Digital Multimeter for Testing

A digital multimeter (DMM) is indispensable when utilizing a 7.3 Powerstroke wiring diagram pdf for troubleshooting. The pdf guides you to specific wires and connectors for testing continuity, voltage, and resistance. Begin by verifying power and ground at the ECM and relevant sensors.

Continuity testing, guided by the pdf, confirms unbroken wire paths. Voltage checks, referenced to the diagram, ensure proper power delivery. Resistance measurements help identify faulty sensors or wiring. Always disconnect power before probing circuits. Referencing the pdf’s wire colors and pinouts ensures accurate testing and prevents accidental shorts or damage.

Common Wiring Issues and Troubleshooting

Utilizing a 7.3 Powerstroke wiring diagram pdf, common issues include corroded connectors, broken wires, and short circuits; systematic testing is key.

Injector Circuit Problems

Diagnosing injector circuit faults with a 7.3 Powerstroke wiring diagram pdf often begins by verifying power and ground at each injector. A lack of voltage or a poor ground indicates a wiring issue, potentially a broken wire or corroded connector.

Utilize a multimeter to check resistance across the injector coil; an open or shorted coil necessitates injector replacement. Inspect the Injector Driver Module (IDM) wiring for damage, as this module controls injector firing.

Common problems include chafed wires near the valve covers and corrosion within the IDM connector. Carefully examine the wiring harness for any signs of physical damage. A faulty IDM can also cause widespread injector issues, requiring further testing and potential replacement. Always refer to the diagram for correct pin locations.

Sensor Failure Diagnosis

Employing a 7.3 Powerstroke wiring diagram pdf is vital when diagnosing sensor failures. Begin by verifying the sensor’s power and ground connections using a multimeter; missing voltage or ground points to wiring faults.

Next, check the sensor’s signal wire for proper voltage or resistance, comparing readings to the specifications outlined in the diagram. Common culprits include the ICP, IPR, and coolant temperature sensors.

Inspect wiring harnesses for chafing, corrosion, and loose connections, particularly near exhaust components. A faulty sensor can trigger diagnostic trouble codes (DTCs), aiding pinpointing the issue. Remember to clear codes after repair and retest the system for proper operation, referencing the diagram throughout.

Harness Damage and Repair

Utilizing a 7.3 Powerstroke wiring diagram pdf is essential when addressing harness damage. Locate the damaged section, carefully inspecting for cracked insulation, corroded terminals, or broken wires. Common areas include those near the engine’s heat and moving parts.

Repair involves splicing in new wire sections, ensuring proper connections and insulation. Heat-shrink tubing provides excellent protection against moisture and corrosion. For extensive damage, consider replacing the entire harness section.

Always refer to the wiring diagram to maintain correct wire colors and pin assignments. Thoroughly test repaired circuits with a multimeter to confirm continuity and proper voltage. Secure the harness to prevent future damage, and document all repairs for future reference.

Specific Wiring Diagrams

Detailed pdf diagrams pinpoint glow plug, starter, and transmission control circuits within the 7.3 Powerstroke. These schematics are vital for targeted troubleshooting and repair.

Glow Plug System Wiring Diagram

The 7.3 Powerstroke’s glow plug system, crucial for cold-start performance, features a dedicated wiring circuit detailed in pdf diagrams. These schematics illustrate the glow plug relay, its control from the Engine Control Module (ECM), and the wiring harness connecting to each glow plug. Understanding this system requires tracing power flow from the battery, through the relay, and ultimately to the glow plugs themselves.

A typical diagram will showcase wire colors, connector pinouts, and ground locations. Troubleshooting often involves verifying voltage at the glow plugs during activation, checking relay functionality, and inspecting wiring for corrosion or breaks. Pdf versions often include component locations for easier identification, aiding in efficient diagnosis and repair of cold-weather starting issues.

Starter and Alternator Wiring Diagram

The 7.3 Powerstroke’s starting and charging systems are fundamental, and their wiring is comprehensively documented in pdf wiring diagrams. These diagrams detail the starter solenoid circuit, including the ignition switch connection, starter relay, and the heavy-gauge cables to the starter motor itself. Similarly, the alternator wiring shows the connections for voltage regulation, battery charging, and warning lights.

Pdf schematics illustrate the wiring path from the alternator to the battery, through the voltage regulator, and to the electrical load. Troubleshooting involves verifying voltage drops, checking relay operation, and inspecting wiring for corrosion. Accurate diagrams are essential for diagnosing no-start conditions or charging system failures.

Transmission Control Wiring Diagram

A detailed pdf wiring diagram is vital for understanding the 7.3 Powerstroke’s transmission control system. These diagrams showcase the connections between the Transmission Control Module (TCM), the engine control module (ECM), and various sensors like the transmission input speed sensor and output speed sensor. They also illustrate wiring for the torque converter clutch solenoid and shift solenoids.

Pdf schematics reveal the data communication pathways, typically utilizing the Controller Area Network (CAN) bus. Troubleshooting transmission issues requires verifying sensor signals, solenoid operation, and CAN bus communication. Accurate diagrams aid in diagnosing shifting problems, error codes, and potential wiring faults within the transmission control system.

Tools and Resources

Essential tools include a multimeter, scan tool, and access to a pdf wiring diagram database. Ford service manuals provide detailed schematics for accurate diagnostics.

Necessary Tools for Wiring Repair

Successfully tackling 7.3 Powerstroke wiring demands specific tools. A digital multimeter is paramount for voltage, continuity, and resistance testing, vital when referencing a pdf wiring diagram. Invest in a quality scan tool to retrieve diagnostic trouble codes (DTCs), pinpointing circuit issues. Wire strippers, crimpers, and a soldering iron are essential for repairs.

Don’t overlook the need for a wiring diagram itself – a detailed pdf version is invaluable. Test lights aid in quick circuit checks. Protective gear, like gloves and safety glasses, are crucial. Having a connector kit with various terminals simplifies replacements. Finally, a good set of pliers and screwdrivers completes the toolkit, ensuring efficient and safe repairs guided by the diagram.

Online Wiring Diagram Databases

Accessing a pdf 7.3 Powerstroke wiring diagram is easier than ever thanks to online databases. Several websites offer schematics, some free, others subscription-based. AllDataDIY and Identifix provide comprehensive diagrams and repair information, though they require payment. Ford’s official website may offer limited diagrams for registered owners.

Beware of unreliable sources; verify diagram accuracy. Forums dedicated to 7.3 Powerstroke engines often have user-uploaded diagrams, but cross-reference them. A searchable pdf version is ideal. Consider purchasing a digital subscription for consistent access to updated and verified wiring information, streamlining your diagnostic process.

Ford Service Manuals and Publications

Genuine Ford service manuals are the gold standard for 7.3 Powerstroke pdf wiring diagrams. These publications, available in print or digital format, offer detailed schematics directly from the manufacturer. They provide accurate and comprehensive wiring information, crucial for complex repairs.

However, these manuals can be expensive. Ford dealerships may offer access to their service information system, but typically charge a fee. Look for older, used manuals online or through automotive parts retailers. Ensure the manual specifically covers the 7.3L engine and includes electrical diagrams for your model year, guaranteeing compatibility and accuracy.

Advanced Troubleshooting Techniques

Utilizing a pdf wiring diagram alongside scan tools reveals diagnostic codes, pinpointing power distribution issues, and detecting short or open circuits efficiently.

Using Scan Tools for Diagnostic Codes

Employing a scan tool alongside a pdf 7.3 Powerstroke wiring diagram is paramount for accurate diagnostics. These tools retrieve Diagnostic Trouble Codes (DTCs) that illuminate specific system failures. The wiring diagram then becomes essential for tracing the circuits associated with those codes.

Interpreting DTCs requires understanding their meaning and correlating them with the wiring diagram’s component locations. For instance, a code related to the ICP sensor can be quickly located on the diagram, allowing you to check wiring continuity, voltage, and ground connections. Advanced scan tools offer live data streaming, enabling real-time monitoring of sensor values while referencing the diagram for expected ranges. This combination drastically reduces troubleshooting time and ensures precise repairs, avoiding unnecessary component replacements.

Power Distribution and Grounding Issues

A pdf 7.3 Powerstroke wiring diagram is invaluable when diagnosing power distribution and grounding faults. These issues often manifest as intermittent problems or complete system failures. The diagram reveals the power sources, fuses, relays, and ground locations for each circuit.

Poor grounding is a common culprit, causing voltage drops and erratic behavior. The diagram helps identify all ground points, allowing for inspection of connections and ensuring adequate conductivity. Similarly, tracing power distribution paths reveals potential points of failure, such as corroded terminals or blown fuses. Utilizing a multimeter alongside the diagram confirms voltage presence and continuity, pinpointing the source of power-related problems efficiently and accurately.

Short-to-Ground and Open Circuit Detection

Employing a pdf 7.3 Powerstroke wiring diagram is essential for locating short-to-ground and open circuit faults. A short to ground causes excessive current draw, often blowing fuses, while an open circuit interrupts the flow of electricity. The diagram provides a roadmap for tracing each wire’s path.

Using a multimeter in continuity mode, verify connections between components as shown on the diagram. A short to ground is identified by continuity between a wire and the chassis. An open circuit lacks continuity where it should exist. Careful diagram interpretation, combined with methodical testing, isolates the faulty wire or component, enabling targeted repairs and restoring proper system function.

Preventative Maintenance for Wiring

Regular inspection, guided by a pdf 7.3 Powerstroke wiring diagram, prevents issues. Cleaning connectors and protecting wires extends their lifespan and reliability.

Inspecting Wiring for Wear and Tear

Utilizing a detailed pdf 7.3 Powerstroke wiring diagram is the first step in proactive maintenance. Visually examine all wiring harnesses for cracks, fraying, or melted insulation. Pay close attention to areas near exhaust manifolds, moving parts, and sharp edges where abrasion is common.

Check connectors for corrosion, loose pins, and damage to the locking mechanisms. Gently tug on wires to assess their integrity; any that pull free easily indicate a connection problem. Look for signs of rodent damage, as they often chew through wiring insulation. A systematic approach, following the diagram, ensures no wire is overlooked, preventing future electrical failures and costly repairs.

Protecting Wiring from Environmental Damage

Referring to a pdf 7.3 Powerstroke wiring diagram aids in identifying vulnerable wiring routes. Shield exposed wiring with protective conduit or loom tubing, especially in areas prone to water, salt, or road debris. Regularly inspect and clean wiring harnesses to remove accumulated dirt and grime, which can accelerate corrosion.

Apply dielectric grease to connectors to prevent corrosion and ensure reliable connections. Consider using heat-shrink tubing to seal exposed wire splices and connections. Proper routing and securing of wiring harnesses minimize chafing and vibration damage. Consistent preventative measures, guided by the wiring diagram, extend the lifespan of the electrical system.

Cleaning and Lubricating Connectors

Utilizing a pdf 7.3 Powerstroke wiring diagram, locate all electrical connectors within the engine bay and cab. Disconnect connectors and inspect for corrosion, dirt, or damage. Clean corroded terminals with electrical contact cleaner, using a small brush to remove debris.

After cleaning, apply a thin coat of dielectric grease to the terminals before reconnection; This prevents future corrosion and ensures a solid electrical connection. Avoid using petroleum-based lubricants, as they can degrade the plastic connectors. Regular cleaning and lubrication, guided by the diagram, maintain optimal electrical conductivity and system reliability.

convert pdf to word bluebeam

Bluebeam Revu streamlines document workflows, offering a direct PDF to DOCX export for easy editing and refinement, eliminating tedious workarounds and ensuring accuracy.

Converting PDFs to Word with Bluebeam Revu empowers users to manipulate data and enhance editing capabilities, directly from the File menu’s Export function.

What is Bluebeam Revu?

Bluebeam Revu is a comprehensive PDF solution designed for professionals across various industries, including architecture, engineering, and construction. It goes beyond simple viewing, offering robust tools for creating, editing, marking up, and collaborating on PDF documents.

Central to its functionality is the ability to seamlessly convert PDFs to Word (DOCX) and Excel formats. This isn’t merely a visual conversion; Bluebeam Revu strives to maintain document integrity, recognizing text and formatting for editable results. It allows users to refine documents without starting from scratch.

Furthermore, Revu functions as a virtual printer, enabling PDF creation directly from any application with printing capabilities. Its power lies in streamlining workflows, enhancing document control, and facilitating efficient collaboration, making it a vital tool for document-intensive professions.

Why Convert PDF to Word?

Converting PDFs to Word format unlocks significant editing capabilities often unavailable within the PDF itself. This is particularly crucial when needing to refine content, update information, or repurpose existing documents. Bluebeam Revu’s export feature eliminates the need for manual retyping or cumbersome workarounds, saving valuable time and minimizing errors.

Furthermore, Word documents are more easily integrated with other Microsoft Office applications, facilitating collaboration and data manipulation. Converting allows for enhanced editing and data extraction, especially when dealing with complex layouts or tables.

Ultimately, the ability to convert PDFs to Word empowers users to take control of their documents, making them fully editable and adaptable to evolving needs.

Methods for PDF to Word Conversion in Bluebeam Revu

Bluebeam Revu offers a straightforward Export feature for direct PDF to Word conversion, or utilizes a virtual printer option for flexible document handling.

Using the Export Feature: A Direct Approach

Bluebeam Revu’s export functionality provides a streamlined, direct method for converting PDF documents into editable Word files. This approach is ideal for users needing quick access to modify content without complex procedures.

To initiate the conversion, simply open the desired PDF within Bluebeam Revu. Navigate to the “File” menu, and from the dropdown options, select “Export.” This action opens a dedicated export dialog box, allowing you to specify your desired output format and settings.

The direct export method is particularly beneficial when preserving the original document’s layout and formatting is crucial, offering a balance between convenience and accuracy. It’s a core feature for efficient document management.

Step-by-Step Guide to Exporting to Word

Step 1: Open your PDF document in Bluebeam Revu. Step 2: Click “File” in the top menu, then select “Export.” Step 3: In the Export dialog box, choose “Word Document” as your desired format.

Step 4: Configure export settings (discussed later) to optimize conversion. Step 5: Select a destination folder and filename for the new Word file. Step 6: Click “OK” to begin the export process.

Bluebeam Revu will then convert the PDF to a DOCX file, preserving as much formatting as possible. Review the converted document for any necessary adjustments. This straightforward process ensures efficient document transformation.

Selecting Word Document as the Export Format

Choosing “Word Document” within Bluebeam Revu’s Export function initiates a conversion optimized for editing in Microsoft Word. This selection prioritizes text flow and editability, creating a DOCX file.

Unlike other options like Excel Workbook, selecting Word focuses on preserving the document’s original layout as closely as possible within a text-based format. This is ideal for documents containing substantial text and requiring modifications.

The resulting Word file allows for comprehensive editing, formatting adjustments, and content refinement, making it a powerful tool for document manipulation.

Understanding Export Options and Settings

Bluebeam Revu’s export settings offer control over OCR for scanned PDFs, image handling, and font management, impacting conversion accuracy and document fidelity.

Text Recognition (OCR) for Scanned PDFs

Optical Character Recognition (OCR) is crucial when converting scanned PDFs to Word using Bluebeam Revu. Scanned documents are essentially images, lacking selectable text.

Bluebeam’s OCR technology analyzes these images, identifying characters and converting them into editable text within the resulting Word document. Without OCR, the converted file would retain the scanned image of the text, preventing editing.

The accuracy of OCR depends on the scan quality; clearer scans yield better results. Bluebeam Revu allows users to adjust OCR settings, optimizing recognition for various document types and languages, ensuring a more accurate and usable Word conversion.

Image Handling During Conversion

Bluebeam Revu intelligently manages images during PDF to Word conversion, preserving visual fidelity while optimizing file size. Images embedded within the PDF are extracted and placed within the Word document, maintaining their original position and scale.

Users can control image resolution during export, balancing image quality with file size. Lowering resolution reduces file size but may compromise clarity. Revu also offers options for compressing images, further minimizing the Word document’s overall footprint.

Proper image handling ensures the converted document accurately reflects the original PDF’s visual layout, crucial for documents containing diagrams, photographs, or illustrations.

Font Embedding and Substitution

Bluebeam Revu addresses font challenges during PDF to Word conversion by attempting to embed or substitute fonts accurately. If the original fonts are embedded within the PDF, Revu strives to maintain them in the resulting Word document, preserving the intended visual appearance.

However, if fonts are unavailable, Revu intelligently substitutes them with similar fonts, minimizing formatting discrepancies. Users may notice slight variations if exact font matches aren’t found. Careful review post-conversion is recommended.

Maintaining font fidelity is vital for professional documents, ensuring consistent branding and readability. Revu’s font handling capabilities contribute to a polished final product.

Optimizing Conversion Accuracy

Bluebeam Revu achieves optimal results with clear, readable PDFs; complex layouts and tables require careful attention to ensure accurate PDF to Word conversion.

Ensuring Clear and Readable PDFs

Prior to conversion within Bluebeam Revu, verifying the quality of your PDF is paramount for optimal PDF to Word results. Scanned documents, or those created from images, benefit significantly from utilizing Bluebeam’s robust Text Recognition (OCR) capabilities.

A clean source PDF minimizes errors during the export process. Ensure images are of sufficient resolution and that text is clearly defined. Addressing any pre-existing issues, such as skewed pages or low contrast, will dramatically improve the accuracy and readability of the final Word document. This proactive approach saves valuable editing time later.

Addressing Complex Layouts

Bluebeam Revu’s PDF to Word conversion handles intricate document structures, but complex layouts may require post-conversion adjustments. Documents with multi-column text, elaborate tables, or unconventional formatting often don’t translate perfectly.

Carefully review the exported Word file, paying close attention to alignment, spacing, and table integrity. Be prepared to manually refine these elements to match the original PDF’s appearance. Utilizing Bluebeam’s export settings, and understanding potential limitations, will help manage expectations and streamline the editing process for these challenging documents.

Dealing with Tables and Columns

Bluebeam Revu strives to accurately convert tables and columns from PDF to Word, but complexities can arise. Tables may sometimes be recognized as text, losing their structured format. Columns might merge or misalign during the conversion process, requiring manual correction within Word.

To mitigate these issues, ensure the original PDF has clearly defined table structures. After exporting, meticulously review tables and columns, adjusting row and column widths, and re-applying table formatting as needed. Complex tables often necessitate significant post-conversion editing to restore their original appearance and functionality.

Troubleshooting Common Conversion Issues

Formatting discrepancies can occur post-conversion; resetting Bluebeam Revu to default settings often resolves export errors, allowing successful PDF to Word conversions.

Formatting Discrepancies After Conversion

Post-conversion formatting issues are common when transitioning from the fixed layout of a PDF to the fluid structure of a Word document. Bluebeam Revu strives for accuracy, but complex PDFs can present challenges. Expect potential shifts in text alignment, font styles, and spacing.

To mitigate these discrepancies, ensure your original PDF is clear and well-structured. If problems persist, manually adjust the formatting within Word. Consider simplifying the PDF’s layout before exporting. Resetting Bluebeam Revu to its default settings can also sometimes resolve unexpected behavior during the PDF to Word conversion process, offering a fresh start.

Handling Errors During Export

Export errors in Bluebeam Revu can occur due to various factors, including corrupted PDFs or insufficient system resources. If an error arises during PDF to Word conversion, first, ensure the PDF isn’t damaged. Try exporting a smaller section of the document to isolate the issue;

If errors persist, resetting Bluebeam Revu to its default settings is a crucial troubleshooting step. This clears any potentially conflicting configurations. Confirm your system meets the minimum requirements for running Revu. Contacting Bluebeam Technical Support provides access to specialized assistance for resolving complex export problems.

Resetting Bluebeam Revu to Default Settings

Resetting Bluebeam Revu to its default configuration can resolve persistent PDF to Word conversion issues stemming from conflicting settings. To initiate the reset, navigate to the application’s settings or preferences menu. Locate the option to restore default values – often labeled as “Reset to Defaults” or similar.

Select “OK” to confirm the reset and close Bluebeam Revu. Upon reopening, the application will revert to its original state, eliminating any customized preferences that might be hindering the export process. This ensures a clean environment for testing the Word conversion again.

Advanced Conversion Techniques

Bluebeam Revu allows converting specific page ranges or utilizing it as a virtual printer for PDF to Word conversion, offering flexible document handling.

Converting Specific Pages or Ranges

Bluebeam Revu provides granular control over PDF to Word conversions, allowing users to select and export only the necessary pages. This targeted approach is invaluable when dealing with lengthy documents where only specific sections require editing in Word format.

Instead of converting the entire PDF, users can define a custom page range within the export settings. This feature significantly reduces processing time and file size, streamlining the workflow. It’s particularly useful for extracting specific chapters, appendices, or sections for focused revisions. This precision ensures efficiency and avoids unnecessary data transfer.

By leveraging this capability, users can maintain document organization and focus their efforts on the critical content, ultimately enhancing productivity and accuracy during the conversion process.

Exporting to Older Word Formats

Bluebeam Revu offers compatibility beyond the latest Word versions, enabling export to older formats like .doc. This functionality is crucial for collaborating with individuals or organizations still utilizing legacy software. Maintaining compatibility ensures seamless document exchange and prevents formatting issues arising from version discrepancies.

While newer formats generally offer enhanced features, exporting to older versions can be essential for broader accessibility. Bluebeam acknowledges this need and provides options to select the desired Word format during the export process.

However, be aware that older formats may not fully support all features present in the original PDF, potentially leading to minor formatting adjustments.

Using Bluebeam Revu as a Virtual Printer

Bluebeam Revu functions as a virtual printer, offering an alternative method for “converting” documents to PDF, and indirectly aiding Word workflows. Instead of direct export, you can “print” from any application with printing capabilities, selecting Bluebeam PDF as the printer.

This approach is particularly useful when direct export options are limited or unavailable within the source application. By choosing Bluebeam, the document is effectively converted to PDF, which can then be opened and further manipulated within Revu.

Adjust printing parameters as needed before finalizing the “print” process, ensuring the desired output quality and settings.

Comparing Bluebeam Revu to Other PDF Converters

Bluebeam Revu distinguishes itself from Adobe Acrobat and online converters with robust editing tools and precise PDF to Word conversion capabilities, offering superior control.

Bluebeam Revu vs. Adobe Acrobat

Bluebeam Revu and Adobe Acrobat are both powerful PDF solutions, but differ in approach. Acrobat traditionally focuses on comprehensive PDF creation and editing, while Revu excels in collaboration and document management, particularly within AEC (Architecture, Engineering, and Construction) industries.

When converting PDF to Word, Revu often provides more accurate formatting retention, especially with complex layouts and technical drawings; Acrobat’s conversion can sometimes struggle with these elements, requiring more manual cleanup. Revu’s export options are streamlined for common editing tasks, while Acrobat offers a wider, potentially overwhelming, range of settings.

Furthermore, Revu’s licensing model is often considered more cost-effective for teams needing multiple licenses, making it a compelling alternative to Acrobat’s subscription-based pricing.

Bluebeam Revu vs. Online PDF Converters

Bluebeam Revu distinguishes itself from online PDF converters through enhanced security, accuracy, and control. While online tools offer convenience, they often raise privacy concerns regarding document uploads and data handling. Revu processes conversions locally, ensuring sensitive information remains secure.

Online converters frequently struggle with complex PDFs, resulting in significant formatting errors and data loss. Bluebeam’s robust engine maintains layout integrity, particularly crucial for technical documents. Revu also provides granular control over export options, including OCR and image handling, features often lacking in free online services.

Ultimately, Revu delivers professional-grade conversion quality and reliability, justifying its cost for users prioritizing accuracy and security.

Best Practices for PDF to Word Conversion

Review and edit the converted document carefully to ensure accuracy and maintain document integrity after using Bluebeam Revu’s export feature.

Reviewing and Editing the Converted Document

After utilizing Bluebeam Revu’s PDF to Word conversion, a thorough review is paramount. Formatting discrepancies are common, so meticulously check for inconsistencies in fonts, spacing, and layout. Pay close attention to tables and columns, as these often require manual adjustments.

Verify the accuracy of text, especially in scanned PDFs where Optical Character Recognition (OCR) might introduce errors. Correct any misinterpretations and ensure all content is present. Editing within Microsoft Word allows for precise control over the final document’s appearance and content, guaranteeing a polished and professional result. Don’t skip this crucial step!

Maintaining Document Integrity

Preserving the original document’s intent is crucial when converting PDFs to Word with Bluebeam Revu. While conversion offers editability, it’s vital to safeguard against unintended alterations. Carefully compare the converted Word document to the original PDF, focusing on critical elements like data, formatting, and overall structure.

Ensure that tables, images, and complex layouts remain intact and accurately represented. Regularly save the converted file to prevent data loss and maintain a backup. Prioritize accuracy during review and editing to uphold the document’s original integrity and professional presentation.

Saving the Converted File

After meticulously reviewing and editing the converted document in Microsoft Word, properly saving the file is paramount. Choose a descriptive filename that clearly indicates the document’s content and version. Select the appropriate Word document format (.docx) to ensure compatibility and preserve formatting.

Consider creating a backup copy of the converted file as a safeguard against potential data loss or corruption. Store the file in a secure and easily accessible location, adhering to your organization’s document management protocols. Regularly back up your files to prevent irreversible data loss.

Bluebeam Revu Updates and Future Enhancements

Recent improvements to the export feature enhance PDF to Word conversion accuracy and speed. Future updates may offer even more refined control and format options.

Recent Improvements to the Export Feature

Bluebeam Revu has consistently refined its PDF to Word conversion capabilities, focusing on enhanced accuracy and streamlined workflows. Recent updates prioritize maintaining original formatting, including complex layouts, tables, and columns, during the export process.

The developers have addressed common issues like font substitution and image handling, resulting in more faithful reproductions of the source document. Furthermore, improvements to the OCR (Optical Character Recognition) engine significantly boost the accuracy of converting scanned PDFs into editable Word files.

These enhancements minimize the need for extensive post-conversion editing, saving users valuable time and ensuring document integrity. The goal is to provide a seamless transition from PDF to a fully editable Word document.

Potential Future Features for PDF to Word Conversion

Bluebeam Revu’s development roadmap suggests exciting possibilities for its PDF to Word conversion feature. Anticipated enhancements include more granular control over export settings, allowing users to customize conversion parameters for specific document types or layouts.

Improved handling of complex graphical elements and vector images is also a priority. Future iterations may incorporate AI-powered formatting recognition, automatically adjusting Word styles to match the original PDF.

Integration with cloud storage services and collaborative editing platforms could further streamline workflows. Ultimately, the aim is to deliver a conversion process that is not only accurate but also intelligent and adaptable to diverse document needs.

Resources and Support

Bluebeam Revu offers extensive technical support, alongside readily available online tutorials and comprehensive documentation to assist with PDF to Word conversions.

Bluebeam Revu Technical Support

Bluebeam Revu’s technical support team provides comprehensive assistance for users encountering issues with PDF to Word conversions. Should you experience problems, resetting Revu to its default settings – via File, then selecting OK to close and reopen the application – can often resolve export errors.

Support resources are available to address formatting discrepancies or handling errors during the export process. They can guide you through troubleshooting steps, ensuring a smooth workflow. Remember, selecting Bluebeam PDF as your printer from any printable application allows saving directly as a PDF, a foundational step for conversion.

For personalized help, reach out to Bluebeam Revu Technical Support directly, leveraging their expertise to optimize your document conversion experience.

Online Tutorials and Documentation

Bluebeam Revu offers extensive online resources to guide users through PDF to Word conversion. These tutorials demonstrate the straightforward process of exporting PDFs to editable Word documents, enhancing document refinement and saving valuable time.

Documentation details the Export feature, accessible via the File menu, and explains selecting the appropriate format – Word Document or Excel Workbook – based on your needs. These resources cover optimizing conversion accuracy, addressing complex layouts, and troubleshooting common issues.

Accessing these materials empowers users to maximize Bluebeam Revu’s capabilities for seamless document manipulation and conversion.

when he was wicked pdf

When He Was Wicked PDF: A Comprehensive Overview (Updated 02/02/2026)

Today, February 2nd, 2026, readers seek the “When He Was Wicked” PDF, a beloved installment in Julia Quinn’s Bridgerton series, readily available through OverDrive and Amazon Kindle․

“When He Was Wicked”, the sixth book in Julia Quinn’s immensely popular Bridgerton series, delves into the captivating romance between Michael Stirling and Francesca Bridgerton․ Published in 2002, this novel quickly became a fan favorite, celebrated for its witty dialogue, emotional depth, and steamy encounters․ The story centers around Michael, now the Earl of Kilmartin, and Francesca, the shy and beautiful Bridgerton sister․

Readers are drawn to the complex dynamic between these two characters, initially bound by a close friendship forged during Michael’s years as a friend of the Bridgerton family․ The narrative unfolds as Michael grapples with long-held, unspoken feelings for Francesca, while she remains largely unaware of his affections, viewing him solely as a trusted confidant․ The plot thickens with societal expectations and internal conflicts, creating a compelling journey towards love and acceptance․

The digital age has made accessing this beloved story easier than ever, with numerous options for obtaining the “When He Was Wicked” PDF or eBook format, including platforms like OverDrive and Amazon Kindle, catering to a wide range of reading preferences․

About Julia Quinn and the Bridgerton Series

Julia Quinn, born Julie Pottinger, is a prolific American author renowned for her historical romance novels, most notably the Bridgerton series․ She has penned numerous New York Times bestsellers, captivating readers with her charming characters, engaging plots, and sparkling wit․ Quinn’s writing style is characterized by its humor, emotional honesty, and attention to detail, bringing the Regency era to life․

The Bridgerton series, comprising eight novels and several epilogues, follows the romantic lives and adventures of the eight Bridgerton siblings as they navigate London’s high society․ Each book focuses on a different sibling, offering a unique love story within the overarching family saga․ The series gained even wider recognition with the release of the popular Netflix adaptation, further fueling interest in Quinn’s work and the availability of her novels in various formats, including the sought-after “When He Was Wicked” PDF․

Readers can easily access Quinn’s books through platforms like OverDrive and Amazon Kindle, ensuring continued enjoyment of the Bridgerton world․

The Core Plot: Michael and Francesca’s Story

“When He Was Wicked” centers on the complex and emotionally charged relationship between Michael Stirling and Francesca Bridgerton․ Michael, now the Earl of Kilmartin, harbors a long-held, secret love for Francesca, but believes himself unworthy due to a past indiscretion․ Francesca, known for her quiet nature and reserved demeanor, initially views Michael only as a dear friend and confidant, unaware of the depth of his feelings․

The narrative unfolds as Francesca returns to London after a period of mourning, and Michael struggles to reconcile his desire with his perceived limitations․ A pivotal moment arrives during a dangerous night, where a seemingly innocent encounter ignites a passionate connection between them․ This event forces both characters to confront their hidden emotions and the “wicked” secrets that threaten to keep them apart․

The story explores themes of redemption, societal expectations, and the courage to pursue love despite past mistakes, making the “When He Was Wicked” PDF a compelling read for romance enthusiasts․

Character Analysis: Michael Stirling

Michael Stirling, the Earl of Kilmartin, is a compelling figure defined by internal conflict and a strong sense of honor․ He carries the weight of a past mistake, believing it renders him unworthy of Francesca Bridgerton’s affections․ This perceived flaw fuels his initial reluctance to openly pursue her, despite years of suppressed longing․

Michael is portrayed as a man of quiet intensity, possessing a reserved exterior that masks a passionate heart․ He’s fiercely protective of those he cares for and demonstrates unwavering loyalty․ His character arc in “When He Was Wicked” revolves around overcoming his self-doubt and learning to accept his own worthiness of love․

The “When He Was Wicked” PDF reveals Michael’s vulnerability and his willingness to confront his demons, making him a deeply sympathetic and relatable hero․ His journey towards self-acceptance is central to the novel’s emotional core․

Character Analysis: Francesca Bridgerton

Francesca Bridgerton, the sixth Bridgerton sibling, is often described as the quietest and most reserved of the family․ However, beneath her demure exterior lies a thoughtful and independent spirit․ She prioritizes duty and societal expectations, initially struggling to reconcile them with her growing feelings for Michael Stirling․

The “When He Was Wicked” PDF showcases Francesca’s internal struggle as she navigates her attraction to a man she believes is flawed․ She’s intelligent and perceptive, carefully observing Michael and questioning her own assumptions about him․ Her character development centers on learning to trust her instincts and embrace her desires․

Francesca’s reserved nature doesn’t equate to a lack of passion; rather, it highlights her cautious approach to love․ She requires genuine connection and emotional safety, making her eventual surrender to Michael all the more poignant․ Her journey is a testament to finding strength in vulnerability․

Key Themes Explored in the Novel

“When He Was Wicked,” readily available as a PDF ebook, delves into several compelling themes․ A central focus is the power of overcoming societal judgment and embracing unconventional love․ Michael Stirling’s past reputation clashes with Francesca Bridgerton’s societal standing, forcing them to confront prejudice and forge their own path․

The novel also explores the theme of self-discovery․ Both Michael and Francesca undergo significant personal growth, challenging their preconceived notions about themselves and each other․ Francesca learns to prioritize her own happiness, while Michael confronts his past mistakes and strives for redemption․

Furthermore, the story examines the complexities of trust and forgiveness․ Michael’s “wicked” past creates a barrier to trust, requiring both characters to demonstrate vulnerability and offer genuine forgiveness․ The PDF version allows readers to closely analyze these nuanced themes․

The Significance of the “Wicked” Element

The title, “When He Was Wicked,” and the associated reputation surrounding Michael Stirling are pivotal to the narrative, readily accessible when reading the PDF version of the novel․ This “wickedness” isn’t about inherent evil, but rather a carefully constructed image fueled by gossip and past actions․ It serves as a significant obstacle to Michael’s pursuit of Francesca Bridgerton, representing societal judgment and the challenges of overcoming preconceived notions․

The “wicked” label forces both characters to confront their own biases and expectations․ Francesca must decide if she can look beyond Michael’s reputation and see the man beneath, while Michael must grapple with the consequences of his past and prove his worthiness․

Ultimately, the novel subverts the traditional understanding of “wickedness,” demonstrating that appearances can be deceiving and that true character lies in one’s actions and capacity for change․ The PDF format allows for detailed examination of this thematic element․

Availability of the “When He Was Wicked” PDF

Finding a legitimate “When He Was Wicked” PDF requires careful navigation․ While direct, free PDF downloads are often associated with copyright concerns, several legal avenues exist for accessing the eBook․ OverDrive, a popular platform linked with public libraries, frequently offers Julia Quinn’s novels, including this title, in PDF and other eBook formats, accessible with a library card․

Amazon Kindle provides the book for purchase, allowing readers to download and read it on various devices․ Additionally, online bookstores may offer PDF versions for sale․ Websites like ReadAnyBook also list the title, though verifying the source’s legitimacy is crucial․

Readers should exercise caution when searching for free PDF downloads, prioritizing legal and reputable sources to support the author and avoid potential security risks․

Legal Considerations Regarding PDF Downloads

Downloading “When He Was Wicked” PDF files from unauthorized sources carries significant legal ramifications․ Copyright law protects Julia Quinn’s work, and distributing or obtaining copies without permission constitutes infringement․ Such actions can lead to legal penalties, including fines and potential lawsuits from the copyright holder․

Websites offering free PDF downloads often operate outside legal boundaries, potentially exposing users to malware and viruses alongside copyright violations․ Supporting authors by purchasing eBooks through legitimate channels – like Amazon Kindle or borrowing via OverDrive – ensures continued creative output․

The DMCA (Digital Millennium Copyright Act) addresses digital copyright issues, and unauthorized file sharing can trigger takedown notices and legal action․ Prioritizing legal access methods safeguards both the author’s rights and the user’s digital security․

Reliable Sources for Obtaining the eBook

For a secure and legal copy of “When He Was Wicked” as an eBook, several reputable platforms are available․ Amazon․com’s Kindle Store offers the book in Kindle format, allowing for immediate download and reading on various devices․ OverDrive, a service utilized by many public libraries, provides access to the eBook for free with a library card․

These platforms ensure a legitimate purchase or borrow, supporting Julia Quinn and respecting copyright laws․ Avoid websites offering “free” PDF downloads, as these often contain malware or violate copyright regulations․ Checking your local library’s website for OverDrive availability is a cost-effective option․

ReadAnyBook also lists the title, but verifying the source’s legitimacy is crucial before proceeding with any download․ Prioritize established retailers and library services for a safe and legal reading experience․

“When He Was Wicked”: The 2nd Epilogue

“When He Was Wicked: The 2nd Epilogue” offers a delightful continuation of Michael Stirling and Francesca Bridgerton’s story, providing readers with further insight into their married life and family․ This extended epilogue is highly sought after by fans, often searched for in PDF format to enjoy beyond the novel’s main conclusion․

The epilogue delves into the joys and challenges of parenthood, showcasing the couple’s evolving dynamic and deepening love․ It’s a heartwarming addition that solidifies their place as one of the most beloved pairings within the Bridgerton series․ Finding a legitimate source for this epilogue is key, as unofficial downloads may be unreliable․

ReadAnyBook lists the epilogue, and it can sometimes be found bundled with eBook editions․ Remember to prioritize legal and safe download options when seeking this extra chapter․

Content and Significance of the Epilogue

“When He Was Wicked: The 2nd Epilogue” significantly expands upon the happily-ever-after established in the novel, focusing on Michael Stirling and Francesca Bridgerton as they navigate the joys and complexities of parenthood․ The content centers around their growing family and the subtle shifts in their relationship as they embrace their roles as mother and father․

Its significance lies in providing a more complete picture of their long-term happiness, addressing the quiet moments and everyday challenges that follow a passionate romance․ Readers appreciate this glimpse into their domestic life, solidifying their connection to the characters․ The epilogue offers a satisfying resolution for those invested in their journey․

Often sought in PDF format for convenient access, the epilogue demonstrates Quinn’s skill in crafting enduring and relatable characters, even beyond the initial narrative arc․ It’s a testament to the enduring appeal of their love story․

Accessing the 2nd Epilogue in PDF Format

Finding the “When He Was Wicked: The 2nd Epilogue” in PDF format requires careful navigation․ While not always officially offered by publishers, several avenues exist․ Websites like ReadAnyBook sometimes host it, though users should exercise caution regarding site legitimacy and potential malware․

Searching online book communities and forums dedicated to Julia Quinn and the Bridgerton series can yield leads, as fans often share resources․ However, downloading from unofficial sources carries legal and security risks․ Always verify the file’s safety with antivirus software․

Checking OverDrive, your local library’s digital lending platform, is a safe and legal option, though availability varies․ Purchasing the complete Kindle edition often includes the epilogue, providing a secure and high-quality reading experience․ Be mindful of DMCA claims when searching․

File Formats: EPUB vs․ PDF

When considering “When He Was Wicked” formats, EPUB and PDF offer distinct reading experiences․ EPUB, with file sizes around 255KB to 821KB, is a reflowable format, adapting text to different screen sizes – ideal for e-readers and tablets․ It allows for adjustable font sizes and styles, enhancing readability․

Conversely, PDF maintains a fixed layout, preserving the book’s original formatting․ This is beneficial for visually rich content but can be less flexible on smaller screens, potentially requiring zooming and scrolling․ While PDF ensures a consistent appearance, EPUB prioritizes user customization․

Both formats are widely supported, but EPUB is generally preferred for novels due to its adaptability․ Platforms like OverDrive and Kindle (converting to their proprietary format) readily handle EPUB files, while PDF is often used for documents requiring precise formatting․

Comparing eBook Platforms: Kindle, OverDrive, and Others

For accessing “When He Was Wicked” digitally, several platforms compete for readers’ attention․ Amazon Kindle offers a vast library and seamless integration with Kindle devices, allowing direct purchase and reading․ It utilizes its proprietary format, often converting EPUB files․

OverDrive, a popular choice, partners with public libraries, providing free access to eBooks, including Julia Quinn’s novels, with a library card․ This platform supports EPUB and offers reading within its app or transferring to other devices․

Other options include Kobo, another dedicated e-reader platform, and various bookstore apps․ Each platform boasts unique features – from adjustable fonts and highlighting tools to cloud syncing and social reading capabilities․ The best choice depends on individual preferences, existing devices, and library access․

Troubleshooting PDF Download and Reading Issues

Encountering problems downloading or reading the “When He Was Wicked” PDF? Several solutions exist․ First, ensure your device has sufficient storage space․ Corrupted downloads can occur; try re-downloading the file from a reliable source like OverDrive or after repurchase․

If the PDF won’t open, verify you have a compatible PDF reader installed – Adobe Acrobat Reader is a common choice․ Update your reader to the latest version for optimal performance․ Compatibility issues can arise with older devices or operating systems․

For EPUB files converted to PDF, formatting errors may occur․ Consider reading the EPUB directly using an EPUB-compatible reader․ If a DMCA claim blocks access, confirm the source’s legitimacy․ Finally, check your internet connection during download․

Reviews and Critical Reception of the Novel

“When He Was Wicked”, the sixth installment of Julia Quinn’s Bridgerton series, generally receives positive reviews, lauded for its compelling characters and passionate romance․ Critics praise the development of both Michael Stirling and Francesca Bridgerton, noting their internal conflicts and the slow-burn nature of their connection․

Readers frequently highlight the emotional depth of the story, appreciating how Quinn explores themes of longing, duty, and overcoming past hurts․ The novel’s blend of witty dialogue and steamy scenes contributes to its popularity․ While some find the plot predictable, the engaging writing style and charming characters consistently earn favorable feedback․

The availability of the PDF version allows wider access, boosting readership and online discussions․ Many readers share their enjoyment through online book communities, solidifying the novel’s place as a fan favorite within the series․

Reader Reactions and Popularity

“When He Was Wicked” consistently ranks as a highly favored book among Bridgerton fans, with the PDF format contributing to its widespread accessibility and popularity․ Online book communities buzz with discussions about Michael and Francesca’s romance, often praising their chemistry and the emotional resonance of their story․

Readers express particular fondness for the novel’s exploration of vulnerability and the challenges of overcoming personal obstacles․ Many appreciate the second epilogue, seeking it out specifically in PDF form to revisit the characters’ happily-ever-after․ The book’s appeal extends beyond the initial release, experiencing continued readership through digital platforms like OverDrive and Amazon Kindle․

The novel’s enduring popularity is evident in its frequent appearances on “best of” lists and recommendations within the historical romance genre, solidifying its status as a beloved classic․

The Novel’s Place Within the Bridgerton Universe

“When He Was Wicked” occupies a significant position as the sixth installment in Julia Quinn’s celebrated Bridgerton series, offering a compelling narrative that expands upon the established world and characters․ While each book focuses on a different Bridgerton sibling, recurring figures and interconnected storylines create a rich tapestry throughout the series․

The PDF version allows readers to easily revisit this crucial piece of the Bridgerton saga, understanding how Michael Stirling’s introduction into the family dynamic impacts the overall narrative․ Francesca’s journey, detailed within the PDF, provides a nuanced exploration of love and societal expectations, themes prevalent throughout the series․

The novel bridges gaps between other books, offering glimpses into the lives of previously featured siblings and setting the stage for future romances․ Accessing the story via PDF enhances the immersive experience for dedicated fans․

Similar Works by Julia Quinn

Readers captivated by the passionate romance within the “When He Was Wicked” PDF will find similar enjoyment in Julia Quinn’s broader catalog․ Her Bridgerton series, available in EPUB and PDF formats, consistently delivers engaging characters and witty dialogue․ Titles like “The Duke and I” (Book 1) and “An Offer From a Gentleman” (Book 3) share the same historical setting and focus on the romantic entanglements of the Bridgerton family․

Beyond the Bridgerton universe, Quinn’s Bevelstoke series, including “Splendid,” offers comparable Regency-era romance with strong-willed heroines and charming heroes․ The availability of these novels as PDF downloads allows for convenient access and repeated readings․

Quinn’s consistent themes of societal expectations, personal growth, and the power of love resonate throughout her work, making her a favorite among historical romance enthusiasts seeking a delightful escape, easily found in eBook form․

Related Historical Romance Novels

For readers enjoying the allure of “When He Was Wicked” PDF and Julia Quinn’s style, a wealth of related historical romance novels awaits․ Authors like Lisa Kleypas, known for her Wallflowers and Hathaways series, offer similarly captivating Regency-era stories with complex characters and passionate relationships․ These are often available as eBooks, including PDF options․

Sarah MacLean’s Rules of Scoundrels series provides a slightly more daring and unconventional take on the genre, appealing to those who appreciate the “wicked” element present in Quinn’s work․ Eloisa James, with her Essex Sisters series, delivers charming and witty romances․

Exploring these authors expands the enjoyment beyond the Bridgerton world, offering a diverse range of historical settings and romantic tropes, all easily accessible in digital formats like EPUB and Kindle editions․

Future Adaptations and Media Coverage

Following the immense success of the Bridgerton series on Netflix, speculation regarding adaptations of subsequent novels, including those featuring the storyline explored in the “When He Was Wicked” PDF, is rampant․ While no official announcements have been made as of today, February 2nd, 2026, fan demand is high for Francesca Bridgerton and Michael Stirling’s story to be brought to the screen․

Media coverage consistently tracks updates regarding potential seasons and spin-offs, with numerous articles and online forums dedicated to predicting which books will be adapted next․ The availability of the eBook and PDF versions fuels continued interest and discussion amongst fans․

Any future adaptation would likely generate significant buzz, mirroring the popularity of the initial seasons and further solidifying the Bridgerton universe’s place in popular culture․ Keep an eye on official Netflix announcements and reputable entertainment news sources for updates․

chopin waltz in a minor pdf

Chopin’s haunting Waltz in A Minor, B.150, offers a glimpse into Romantic-era melancholy, readily available as a PDF for pianists of all levels.

Numerous online resources provide free sheet music downloads, facilitating access to this beloved composition for study and performance.

Its expressive qualities and technical demands continue to captivate audiences, making it a cornerstone of the piano repertoire.

Historical Context of the Waltz

The waltz, originating in 18th-century Austria and Southern Germany, rose to prominence during the early 19th century, becoming a defining dance of the Romantic era. Initially considered scandalous due to its close embrace, it quickly gained acceptance in ballrooms across Europe.

Chopin’s waltzes, composed primarily between 1830 and 1847, represent a sophisticated evolution of the genre. He moved beyond the purely social dance music, infusing his waltzes with poetic depth and individual expression.

Access to Chopin’s works, including the A Minor Waltz, has been greatly enhanced by the availability of PDF sheet music online. This allows modern musicians to study and perform these pieces, preserving a vital part of musical history. The ease of access through digital formats ensures the waltz’s continued relevance.

Chopin’s Contribution to the Waltz Genre

Frédéric Chopin fundamentally transformed the waltz, elevating it from a simple dance form to a vehicle for profound musical expression. He imbued his waltzes with a lyrical beauty, harmonic complexity, and nuanced emotional depth previously unheard of in the genre.

Unlike the grand, often bombastic waltzes of his contemporaries, Chopin’s waltzes possess an intimate, melancholic quality. The Waltz in A Minor exemplifies this, showcasing his masterful use of rubato and delicate ornamentation.

The widespread availability of PDF sheet music allows pianists to explore these subtleties firsthand. Accessing Chopin’s scores digitally democratizes music study, fostering a deeper appreciation for his innovative contributions to the waltz tradition and his lasting legacy.

Understanding the Sheet Music (PDF Format)

PDF versions of Chopin’s Waltz in A Minor offer convenient access to the score, enabling detailed study and practice for pianists globally.

Sources for Free PDF Sheet Music

Finding free, legal PDF sheet music for Chopin’s Waltz in A Minor requires careful navigation. Several websites offer downloads, but verifying copyright status is crucial.

IMSLP (International Music Score Library Project) is a prominent resource, providing public domain scores, including various editions of this waltz.

MuseScore also hosts user-submitted arrangements and transcriptions, often available as PDFs, though quality and accuracy can vary.

8notes.com provides a selection of classical sheet music, including Chopin’s works, in PDF format. Always check the terms of use before downloading and printing. Be cautious of sites offering seemingly free downloads that may infringe on copyright laws.

Navigating PDF Sheet Music – Key Symbols

Decoding Chopin’s Waltz in A Minor PDF requires understanding common musical symbols. The key signature of A minor features four sharps, influencing accidentals throughout the piece.

Dynamic markings – p (piano), mf (mezzo forte), f (forte) – dictate volume. Slurs indicate phrasing and legato articulation.

Pedal markings, often denoted by “ped.” or “*”, guide damper pedal usage for harmonic richness. Pay attention to crescendos and diminuendos for expressive shaping.

Fermatas extend notes, while staccato dots shorten them. Understanding these symbols unlocks Chopin’s intended nuances within the PDF score.

Print Quality and Legality of PDF Sources

Downloading Chopin’s Waltz in A Minor PDF necessitates caution regarding source legitimacy. Free PDFs vary significantly in print quality; some may appear blurry or contain errors. Prioritize sources offering high-resolution scans for clear notation.

Copyright considerations are crucial. Public domain scores are legal to download and print, but copyrighted editions require purchase or subscription. Websites offering unauthorized PDFs infringe copyright laws.

Reputable sources, like the IMSLP (International Music Score Library Project), provide legally accessible, high-quality scores. Always verify the source’s credibility before downloading to ensure both legality and readability.

Musical Analysis of the Waltz in A Minor

Chopin’s A Minor Waltz showcases a poignant melody, rich harmonies, and a distinctive rhythmic flow, often studied using readily available PDF scores.

Its structure reveals Chopin’s masterful command of form and emotional expression.

Key Signature and Tonality

Chopin’s Waltz in A Minor is firmly rooted in the key of A minor, indicated by the key signature of no sharps and no flats. However, the tonality is far from simple, exhibiting frequent and dramatic shifts.

The piece explores closely related keys, notably C major (the relative major) and E minor, creating harmonic tension and release. These modulations, easily followed when studying a PDF score, contribute significantly to the waltz’s emotional depth.

Chopin frequently employs chromaticism, adding color and complexity to the harmonic landscape. The use of diminished chords and altered harmonies further intensifies the expressive character of the waltz, making it a compelling study for pianists and music theorists alike.

Analyzing the PDF reveals these tonal nuances.

Tempo and Time Signature

The Waltz in A Minor is notated in 3/4 time, the standard time signature for waltzes, providing its characteristic lilting rhythm. However, determining a precise tempo is nuanced, often described as Moderato, though interpretations vary.

Many performers favor a tempo around 66-76 beats per minute, allowing for expressive phrasing and clarity of articulation. Examining a PDF score reveals Chopin’s subtle tempo markings and dynamic indications, crucial for informed interpretation.

Rubato, a flexible approach to tempo, is essential to capturing the waltz’s emotional essence. This involves subtly speeding up and slowing down, creating a sense of freedom and spontaneity. A clear PDF facilitates studying these rhythmic subtleties.

Mastering the tempo is key to a successful performance.

Melodic Structure and Themes

The Waltz in A Minor features a distinctly melancholic and lyrical melody, characterized by descending phrases and expressive ornamentation. Analyzing a PDF score reveals a ternary (ABA) structure, with a contrasting middle section offering a brief respite from the prevailing sadness;

The primary theme, presented initially, is hauntingly beautiful, built upon stepwise motion and delicate chromaticism. Recurring melodic fragments create a sense of unity throughout the piece. A detailed PDF allows close examination of these thematic connections.

Chopin masterfully employs ornamentation – grace notes, trills, and mordents – to enhance the melody’s expressive power. These embellishments, clearly visible in a quality PDF, demand careful attention to detail.

The melodic contour evokes a sense of longing and introspection.

Harmonic Progression and Chord Voicings

The harmonic language of Chopin’s Waltz in A Minor is richly chromatic and emotionally evocative, readily apparent when studying a PDF of the score. The progression frequently utilizes diminished chords and unexpected modulations, contributing to the waltz’s overall sense of yearning.

Chopin’s characteristic use of seventh chords and inversions adds depth and color to the harmonic texture. A clear PDF reveals his sophisticated voice leading, creating smooth transitions between chords.

The piece centers around A minor, but explores related keys, enhancing the emotional impact. Examining a PDF allows pianists to trace these harmonic shifts and understand their expressive function.

Chord voicings are carefully crafted to maximize resonance and create a lush, romantic sound.

Technical Aspects for Pianists

Chopin’s Waltz in A Minor demands refined technique; a clear PDF score aids mastering its delicate fingerings, nuanced pedaling, and expressive dynamics.

Precise rhythmic control is crucial for interpreting this piece effectively.

Fingerings and Hand Positions

Chopin’s Waltz in A Minor presents unique fingering challenges, best addressed with a carefully studied PDF score. Achieving fluidity requires prioritizing comfortable hand positions and efficient finger substitutions.

The opening arpeggios benefit from a relaxed wrist and a focus on evenness between notes. Consider utilizing fingerings that minimize tension and allow for seamless transitions.

Pay close attention to passages requiring large stretches; strategic finger choices can prevent strain and maintain clarity. A well-annotated PDF can offer suggested fingerings from experienced performers.

Maintaining a curved finger shape and a flexible thumb are essential for navigating the waltz’s melodic lines and harmonic textures. Consistent practice with mindful technique will unlock the piece’s expressive potential.

Pedaling Techniques

Effective pedaling is crucial for realizing the nuanced beauty of Chopin’s Waltz in A Minor, and a detailed PDF score can illuminate suggested pedal markings. Avoid excessive pedaling, which can muddy the harmonic clarity.

Instead, employ subtle half-pedaling and quick changes to create a shimmering effect without sacrificing definition. The waltz’s melancholic character benefits from a delicate touch with the sustain pedal.

Observe the phrasing and use the pedal to enhance the emotional arc of each musical line. Syncopated rhythms require precise pedal coordination to maintain rhythmic integrity.

Studying recordings of renowned pianists alongside the PDF can provide valuable insights into their pedaling choices and interpretive approaches. Experiment to discover what best serves the music.

Dynamics and Articulation

Chopin’s Waltz in A Minor demands a sensitive approach to dynamics and articulation, readily apparent when studying a detailed PDF score. The piece fluctuates between delicate pianissimo passages and more assertive forte sections.

Pay close attention to the composer’s markings – crescendos, diminuendos, and accents – to shape the musical phrases effectively. Articulation should be varied, employing legato for lyrical melodies and staccato for rhythmic emphasis.

Subtle nuances in touch and phrasing are essential for conveying the waltz’s inherent emotional depth. A well-annotated PDF will highlight these expressive details.

Balance the left-hand accompaniment with the right-hand melody, ensuring neither overpowers the other. Careful attention to dynamics and articulation brings this waltz to life.

Rhythmic Accuracy and Interpretation

Maintaining rhythmic precision is crucial when performing Chopin’s Waltz in A Minor, especially when referencing a PDF score for detailed analysis. The waltz’s characteristic 3/4 time signature requires a steady pulse and graceful flow.

However, avoid rigidity; Chopin often employs subtle rubato – a flexible tempo – to enhance expressiveness. Studying a quality PDF reveals these nuanced rhythmic indications.

Interpretation involves balancing adherence to the written rhythm with artistic freedom. Understand the harmonic structure to inform phrasing and dynamic shaping.

A clear understanding of the waltz’s rhythmic foundation, combined with sensitive interpretation, unlocks its emotional power and beauty.

Learning Resources and Tutorials

PDF sheet music unlocks learning; online video tutorials demonstrate technique, while interactive platforms offer guided practice of Chopin’s Waltz.

Dedicated websites provide Chopin-specific insights, aiding interpretation and performance.

Online Video Tutorials

YouTube hosts a wealth of tutorials dissecting Chopin’s Waltz in A Minor, often utilizing the readily available PDF sheet music as a visual aid. These videos cater to diverse skill levels, from beginner walkthroughs focusing on basic hand positions and fingerings to advanced masterclasses exploring nuanced interpretations.

Many instructors offer slow-motion demonstrations, highlighting challenging passages and providing detailed explanations of phrasing and dynamics. Some tutorials even incorporate on-screen annotations directly onto the PDF score, clarifying complex rhythms or harmonic progressions.

Platforms like Flowkey and Skoove offer interactive learning experiences, syncing the PDF sheet music with real-time feedback as you play, helping to refine timing and accuracy. Searching for “Chopin Waltz A Minor tutorial” yields numerous options, allowing learners to find an instructor whose style resonates with their learning preferences.

Interactive Sheet Music Platforms

Several platforms enhance the learning experience beyond static PDF sheet music. Musicnotes.com and Sheet Music Plus offer interactive versions of Chopin’s Waltz in A Minor, allowing tempo adjustment and looping of difficult sections. These platforms often include playback features, enabling students to hear professional recordings alongside the score.

Newzik and ForScore are popular apps for iPad and iPhone, transforming the PDF into a dynamic, annotatable score. Users can mark fingerings, dynamics, and phrasing directly onto the music, creating a personalized learning tool.

These platforms frequently integrate with MIDI keyboards, providing real-time feedback on accuracy and rhythm. The ability to transpose the PDF to different keys can also be beneficial for learners, facilitating practice and comprehension.

Chopin-Specific Learning Websites

Dedicated websites offer focused resources for studying Chopin, complementing PDF sheet music of the Waltz in A Minor. Chopinmusic.net provides biographical information, historical context, and detailed analyses of his works, enriching understanding. International Chopin Piano Competition’s website archives performances and masterclasses, offering invaluable insights.

The Fryderyk Chopin Institute offers scholarly articles, PDF scores (some free, others for purchase), and a vast digital library. These resources delve into Chopin’s compositional techniques and stylistic nuances.

Many piano teachers maintain blogs and websites with specific lessons and interpretations of Chopin’s pieces, often referencing readily available PDF versions. Exploring these curated resources can significantly enhance learning.

Performance Considerations

Chopin’s Waltz in A Minor, often accessed via PDF, demands nuanced interpretation; prioritize emotional expression and phrasing for a captivating performance.

Authentic style requires careful attention to dynamics and rubato, bringing the piece’s inherent drama to life.

Interpreting Chopin’s Style

Chopin’s unique style, beautifully showcased in the Waltz in A Minor – frequently studied from a PDF score – transcends mere technical proficiency. It necessitates a deep understanding of bel canto, the Italian operatic style, influencing his melodic lines and phrasing.

Rubato, a flexible tempo, is crucial; it’s not about speeding up or slowing down randomly, but rather a subtle “robbing” of time from one beat to lend expression to another.

Pay attention to the ornamentation – grace notes and trills – they aren’t simply decorative, but integral to the melodic character.

Furthermore, Chopin’s harmonies are often unexpected, creating a sense of longing and melancholy. A successful interpretation requires conveying this emotional depth, moving beyond a technically accurate reading to truly embody the composer’s intent.

Emotional Expression and Phrasing

The Waltz in A Minor, often accessed via PDF sheet music, demands nuanced emotional expression. Chopin’s music isn’t simply about notes; it’s about conveying a profound sense of longing and melancholy.

Phrasing should be shaped like a vocal line, with careful attention to dynamics and subtle tempo variations. Avoid a mechanical approach; instead, allow the music to breathe.

Consider the harmonic shifts – they often create moments of tension and release. Emphasize these changes to highlight the emotional narrative.

Ultimately, successful performance relies on connecting with the music’s inherent sadness and vulnerability, communicating this depth to the audience through sensitive phrasing and expressive playing.

Stage Presence and Performance Practice

Performing Chopin’s Waltz in A Minor, often studied from a PDF score, requires a delicate balance between technical precision and artistic interpretation. Stage presence should reflect the music’s introspective nature – avoid excessive gestures or theatrics.

Maintain a focused and composed demeanor, allowing the music to speak for itself. Historically informed performance practice suggests a degree of rubato, but avoid exaggeration.

Connect with the emotional core of the piece, conveying its inherent sadness and vulnerability.

Remember that Chopin’s music was intended for intimate settings; strive to create a similar atmosphere, even in larger venues, fostering a connection with the audience.

The Waltz in A Minor in Popular Culture

Chopin’s Waltz in A Minor, easily accessed as a PDF, frequently appears in film and television, enhancing dramatic scenes with its poignant melody.

Numerous arrangements exist, showcasing its adaptability, while modern recordings continue to introduce it to new listeners.

Use in Film and Television

Chopin’s Waltz in A Minor, often found as a readily available PDF, has experienced notable inclusion in various cinematic and television productions. Its melancholic and romantic character lends itself beautifully to scenes requiring emotional depth and dramatic tension.

The waltz frequently underscores moments of introspection, loss, or burgeoning romance, enhancing the narrative impact. While specific instances are often subtle, the piece’s recognizable melody contributes to the overall atmosphere.

The accessibility of the PDF format has likely facilitated its use by independent filmmakers and student projects, further expanding its presence in visual media. Its timeless quality ensures continued relevance for future productions seeking a touch of classical elegance.

Arrangements and Adaptations

Chopin’s Waltz in A Minor, easily accessible as a PDF, has inspired a wealth of arrangements and adaptations across diverse musical genres. Beyond the original piano solo version, orchestral arrangements exist, expanding the harmonic palette and dynamic range.

Numerous transcriptions cater to different instrumentations, including cello, guitar, and even wind ensembles, demonstrating the waltz’s melodic versatility. Contemporary artists have incorporated elements of the piece into electronic music and pop songs, bridging classical and modern sounds.

The widespread availability of the PDF sheet music encourages amateur musicians to create their own interpretations, fostering creativity and a deeper engagement with Chopin’s masterpiece.

Modern Interpretations and Recordings

The accessibility of the Waltz in A Minor PDF has fueled countless modern interpretations and recordings. Renowned pianists continue to offer fresh perspectives on Chopin’s work, balancing fidelity to the score with individual artistry.

Recordings range from historically informed performances striving for authenticity to more romanticized readings emphasizing emotional expression. Digital platforms host a vast collection of these interpretations, allowing listeners to explore diverse approaches.

Furthermore, amateur pianists sharing their performances online contribute to a vibrant community surrounding the waltz, showcasing the enduring appeal of this iconic piece, readily available through PDF sheet music.

Related Chopin Waltzes

Chopin’s waltzes, including the famous “Minute Waltz” and Op. 18 “Grande valse brillante”, share stylistic traits with the A Minor Waltz PDF.

Exploring these pieces provides a broader understanding of Chopin’s waltz compositions and his innovative approach to the genre.

Waltz in D-flat Major, Op. 64, No. 1 (“Minute Waltz”)

Chopin’s “Minute Waltz,” despite its nickname, rarely takes a full minute to perform, though brisk tempos are common. Like the A Minor Waltz, readily available as a PDF, it showcases Chopin’s lyrical genius and technical brilliance.

This waltz, Op. 64 No. 1, is characterized by its sparkling melody and delicate ornamentation, demanding precise fingerwork and a light touch from the pianist. Its popularity stems from its accessibility and immediate appeal, making it a favorite among both performers and audiences.

While structurally simpler than some of Chopin’s other waltzes, the “Minute Waltz” requires nuanced interpretation to convey its charm and elegance. Numerous PDF versions exist online, offering varying levels of editing and accuracy.

Waltz in E-flat Major, Op. 18 (“Grande valse brillante”)

Chopin’s “Grande valse brillante,” Op. 18, stands in contrast to the intimacy of the A Minor Waltz, offering a display of virtuosic brilliance. Like its counterpart, finding a PDF version is relatively easy, though quality varies significantly.

This waltz demands considerable technical prowess, featuring rapid passages, sweeping arpeggios, and intricate ornamentation. It’s a showcase piece, intended to impress with its grandeur and dazzling effect. The piece’s length and complexity require stamina and a refined sense of musicality.

Despite its showy character, the “Grande valse brillante” retains Chopin’s characteristic melodic sensitivity, making it more than just a technical exercise. Many free PDF scores are available online for study.

Waltz in C-sharp Minor, Op. 64, No. 2

Chopin’s Waltz in C-sharp Minor, Op. 64, No. 2, shares a similar introspective quality with the A Minor Waltz, though possessing a distinct character. Accessing a PDF of this piece is common, with numerous websites offering free downloads of the sheet music.

This waltz is noted for its melancholic beauty and expressive harmonies, creating a poignant and emotionally resonant experience. It’s a more restrained work than the “Grande Valse Brillante,” focusing on nuance and delicate phrasing;

While technically demanding, the emphasis lies on conveying the waltz’s underlying emotional depth. Finding a legally sourced, high-quality PDF is crucial for accurate interpretation and practice.

free 12×24 shed plans pdf

Planning a spacious storage solution? Explore readily available free 12×24 shed plans PDF options online, offering detailed guides for DIY enthusiasts seeking a large, functional structure.

Why Choose a 12×24 Shed?

A 12×24 shed offers substantial space – ideal for workshops, garden tool storage, or even small vehicle housing. Utilizing free 12×24 shed plans PDF allows you to construct this sizable structure without significant upfront costs for design.

These plans cater to diverse needs, from basic storage to more complex projects. The generous dimensions accommodate larger equipment, furniture, or seasonal items. Many downloadable plans feature gable roofs and include details for doors and windows, enhancing functionality and aesthetics.

Choosing this size provides ample room for organization, while the availability of free PDF plans makes it an accessible project for DIYers of varying skill levels. It’s a cost-effective way to add valuable space to your property.

Benefits of Using PDF Plans

Free 12×24 shed plans in PDF format offer numerous advantages for builders. They are easily downloadable and printable, providing a readily accessible reference throughout the construction process. PDF plans ensure consistent formatting, eliminating discrepancies often found with online guides.

These plans typically include detailed diagrams, cut lists, and material lists, streamlining the building process and minimizing waste. The digital format allows for easy zooming and annotation, facilitating a clearer understanding of complex details.

Furthermore, PDF plans are compatible with various devices, enabling access on-site. Many plans are designed to be print-friendly, optimizing paper usage. Utilizing these resources empowers DIYers to confidently tackle a 12×24 shed project.

Essential Tools and Materials

Building from free 12×24 shed plans PDF requires standard tools – saws, drills, levels – and materials like lumber, concrete, fasteners, roofing, and siding.

Lumber Selection for Shed Construction

Choosing the right lumber is crucial when utilizing free 12×24 shed plans PDF. Typically, 2×6 lumber is recommended for wall framing, providing sufficient strength for a shed of this size. However, some builders, as noted in online discussions, opt for 2x4s for cost savings, potentially requiring closer stud spacing.

For rafters, 2x10s are frequently suggested, offering the necessary support for the roof structure. Pressure-treated lumber is essential for any wood in direct contact with the ground, preventing rot and extending the shed’s lifespan. Consider the grade of lumber; higher grades minimize knots and imperfections, leading to a more structurally sound build.

Carefully review your chosen free plans PDF for specific lumber requirements and adjust based on local building codes and desired durability.

Foundation Materials: Concrete, Gravel, or Wood

Selecting a foundation is key when implementing free 12×24 shed plans PDF. Concrete foundations offer the most durable and level base, but require more labor and expense. Gravel pads are a cost-effective alternative, providing good drainage, though they may settle over time. Wooden foundations, using pressure-treated skids, are simpler to install but are less permanent and may be unsuitable for certain soil conditions.

Many free shed plans don’t specify a foundation, leaving the choice to the builder. Consider your local climate, soil type, and intended use when deciding. Proper site preparation is vital regardless of the material chosen, ensuring a stable and long-lasting structure.

Always check local building codes regarding foundation requirements before starting construction.

Fasteners, Roofing, and Siding Options

Utilizing free 12×24 shed plans PDF requires careful material selection. For fasteners, galvanized screws and nails resist rust, crucial for outdoor structures. Roofing options range from asphalt shingles – affordable and common – to metal roofing for durability and longevity. Consider the aesthetic and budget when choosing.

Siding choices include wood, vinyl, and metal. Wood offers a classic look but needs regular maintenance. Vinyl is low-maintenance but less durable. Metal siding is robust but can be more expensive.

Free plans often list material quantities, but verifying these against your specific design and local building codes is essential for a successful build.

Understanding the 12×24 Shed Plans

Free 12×24 shed plans PDF require careful review of blueprints, component lists, and cut lists to ensure a smooth and accurate construction process.

Reading and Interpreting Shed Blueprints

Decoding free 12×24 shed plans PDF blueprints is crucial for success. These plans typically utilize standard architectural symbols representing walls, doors, windows, and roofing elements. Pay close attention to dimensions, ensuring accurate measurements for lumber and materials.

Understanding views – top, front, side, and sections – provides a comprehensive understanding of the shed’s structure. Look for details regarding framing, foundation specifics (concrete, gravel, or wood), and roofing pitch.

Familiarize yourself with the legend or key, which explains the symbols used. Note fastener types and spacing, as well as any specific construction techniques illustrated. Carefully examine the bill of materials, cross-referencing it with the drawings to verify quantities and sizes.

Don’t hesitate to consult online resources or seek guidance if any aspect of the blueprint remains unclear before commencing construction.

Key Components of the Plan: Walls, Roof, Floor

Free 12×24 shed plans PDF detail three core components: walls, roof, and floor. Wall plans specify framing layouts – typically 2×6 or 2×4 studs – with details on stud spacing, header sizes for openings, and sheathing requirements. Roof plans illustrate rafter or truss designs, pitch angles, and overhang dimensions, crucial for weather protection.

Floor plans outline foundation types (concrete slab, gravel base, or wooden skid foundation) and framing details, including joist size and spacing. Pay attention to the plans’ depiction of siding and roofing materials, ensuring compatibility with the structural design.

Understand how these components interconnect. Wall framing ties into the floor platform, while the roof structure rests upon the walls. Accurate interpretation of these relationships is vital for a structurally sound shed.

Bill of Materials and Cut Lists

Free 12×24 shed plans PDF invariably include a Bill of Materials (BOM), a comprehensive list of all required materials – lumber, fasteners, roofing, siding, doors, and windows. Carefully review the BOM to estimate project costs and ensure you procure everything needed before starting construction.

Alongside the BOM, you’ll find a Cut List. This details the precise dimensions and quantities of each lumber piece required. Utilizing a cut list minimizes waste, saves time, and improves accuracy. Double-check measurements and quantities before cutting any lumber.

Some plans categorize materials by component (walls, roof, floor), simplifying organization. Always verify the BOM and cut list against the plans to avoid discrepancies and ensure a smooth build.

Step-by-Step Construction Guide

Free 12×24 shed plans PDF provide sequential instructions, starting with the foundation and progressing through framing, roofing, and finishing – a clear path to completion!

Building the Foundation

Utilizing free 12×24 shed plans PDF, the foundation is paramount for a durable structure. Plans typically detail options like concrete slabs, gravel bases, or wooden skids. Concrete provides a robust, level surface, requiring formwork and pouring, while gravel offers excellent drainage and is more affordable.

Wooden skids are suitable for smaller sheds and allow for relocation. Regardless of the chosen method, ensure proper leveling and compaction. The plans will specify dimensions and material quantities. Accurate foundation construction, following the PDF’s guidance, prevents future structural issues and ensures a square, stable shed. Thorough preparation is key to a successful build!

Framing the Walls

Free 12×24 shed plans PDF will illustrate wall framing using 2×6 lumber, commonly spaced 16 or 24 inches on center. Begin by constructing wall sections flat on the floor, ensuring squareness with accurate measurements. Include top and bottom plates, and stud cuts detailed in the PDF.

Pay close attention to window and door openings, adding headers for support. Once sections are assembled, raise and brace them, connecting them securely at the corners. Proper bracing is crucial for stability during construction. The plans will guide you on sheathing application, adding rigidity and weather protection. Accurate framing, guided by the PDF, is vital for a structurally sound shed.

Constructing the Roof

Free 12×24 shed plans PDF typically detail a gable roof, utilizing 2×10 rafters for strength. Begin by cutting rafters to the specified angle, referencing the PDF’s diagrams for precise measurements. Assemble roof trusses or rafters individually, ensuring consistent spacing.

Install a ridge board to support the rafters, creating the roof’s peak. Sheathe the roof with plywood or OSB, following the PDF’s instructions for proper fastening. Consider overhangs for weather protection. The plans will guide you through installing roofing felt and your chosen roofing material. Accurate cuts and secure fastening, as shown in the PDF, are essential for a weatherproof roof.

Adding Finishing Touches

Free 12×24 shed plans PDF guide siding, roofing, and door/window installation. Interior finishing and organization enhance functionality, completing your spacious shed build.

Installing Siding and Roofing

Utilizing your free 12×24 shed plans PDF, carefully install siding to protect the structure from the elements. Options range from wood, vinyl, or metal, each offering unique aesthetics and durability.

Ensure proper overlap and secure fastening, following the plan’s specifications. Roofing installation is equally crucial; consider asphalt shingles, metal roofing, or other suitable materials.

Pay close attention to underlayment application for waterproofing. The free plans PDF will detail rafter spacing and roofing material quantities. Proper installation prevents leaks and extends the shed’s lifespan. Accurate cuts and secure attachment are vital for a weather-resistant finish, completing a robust exterior shell.

Door and Window Installation

Referring to your free 12×24 shed plans PDF, precisely frame the openings for doors and windows. Ensure squareness and proper dimensions before installing the frames. Select doors and windows appropriate for shed use – consider durability and weather resistance.

The free plans typically indicate window sizes and placement for optimal light and ventilation. Securely fasten the frames, ensuring a tight seal to prevent drafts and water intrusion.

Install doors with robust hinges and a reliable locking mechanism. Proper alignment is crucial for smooth operation. Following the PDF’s guidance, complete this stage for a functional and secure shed, enhancing both accessibility and usability.

Interior Finishing and Organization

Utilizing your free 12×24 shed plans PDF as a guide, consider interior finishing options to maximize usability. While not always essential, adding plywood or OSB to the walls and ceiling creates a cleaner, more finished space. This also provides a surface for mounting shelving and organization systems.

The free plans won’t detail specific organization, so plan shelving, workbenches, or pegboards based on your needs. Prioritize vertical storage to utilize the shed’s height effectively.

Think about electrical needs if you plan to use power tools. Refer to the PDF for structural considerations when adding weight. A well-organized interior transforms your shed into a functional workshop or storage haven;

Customization Options

Free 12×24 shed plans PDF offer a base; personalize with shelving, workbenches, or electrical wiring to create a tailored, functional space for your needs.

Adding Shelving and Workbenches

Maximizing space within your 12×24 shed, built from free 12×24 shed plans PDF, is crucial. Incorporating shelving and workbenches transforms it from simple storage to a functional workshop.

Consider building sturdy shelving units along the walls, utilizing the shed’s height for vertical storage. Plan for adjustable shelves to accommodate items of varying sizes. A dedicated workbench provides a solid surface for projects, and can be customized with drawers and vises.

When designing these additions, factor in the shed’s door placement and workflow. Ensure ample space for movement and access to tools and materials. Utilizing scrap lumber from the shed construction can reduce costs and promote sustainability. Remember to securely anchor shelving and workbenches to the shed’s framing for stability and safety.

Electrical Wiring Considerations

Enhancing your 12×24 shed, constructed using free 12×24 shed plans PDF, with electrical wiring expands its usability, but requires careful planning and adherence to safety codes.

Before starting, check local regulations regarding shed electrical installations – permits may be necessary. Use underground-rated wiring for exterior runs, protecting it within conduit. A dedicated circuit breaker in your main panel is essential, sized appropriately for the shed’s anticipated load.

Ground Fault Circuit Interrupter (GFCI) outlets are crucial for safety, especially in damp environments. Plan outlet placement strategically for tools, lighting, and potential future needs. If you’re unfamiliar with electrical work, always consult a qualified electrician to ensure a safe and code-compliant installation.

Paint and Exterior Protection

Protecting your shed, built from free 12×24 shed plans PDF, from the elements is vital for longevity. Begin with a quality exterior primer, ensuring good adhesion to the siding material. Choose paints specifically formulated for outdoor use, offering UV resistance and weather protection.

Acrylic latex paints are popular choices, providing durability and ease of application. Consider a satin or semi-gloss finish for better washability. Before painting, thoroughly clean the siding, removing any dirt, mildew, or loose paint.

For added protection, explore wood preservatives or stains, especially if using natural wood siding. Regularly inspect the exterior for damage and repaint as needed to maintain a weatherproof barrier.

Resources for Free 12×24 Shed Plans PDF

Numerous websites offer free 12×24 shed plans PDF downloads, providing diverse designs and instructions for building a robust and spacious outdoor structure.

Popular Websites Offering Free Plans

Finding reliable free 12×24 shed plans PDF requires exploring several online resources. Many websites specialize in DIY projects and offer downloadable plans as a service to builders. These platforms frequently feature a range of shed designs, including the popular 12×24 size, catering to various storage and workshop needs.

Some sites provide plans directly, while others link to external resources or require registration. It’s crucial to verify the source’s credibility before downloading any plans. Look for websites with positive user reviews and clear, detailed instructions. Remember to carefully review licensing and usage rights before commencing construction, ensuring compliance with any terms and conditions associated with the free plans.

Exploring these resources can significantly reduce project costs and provide a solid foundation for a successful shed-building endeavor.

Checking Plan Validity and Completeness

Before starting your 12×24 shed project with a free PDF plan, thorough verification is essential. Ensure the plans include a comprehensive bill of materials, detailed cut lists, and clear, step-by-step instructions. Missing components can lead to costly delays and structural issues.

Scrutinize the blueprints for accuracy and logical flow. Check for proper dimensions, foundation specifications, and framing details. A complete plan should cover all construction phases, from foundation building to roofing and finishing. Look for 3D diagrams or sketches to aid visualization.

If anything seems unclear or inconsistent, seek clarification or consider alternative plans. A valid, complete plan is the cornerstone of a safe and successful build.

Understanding Licensing and Usage Rights

When utilizing free 12×24 shed plans PDF, carefully review the licensing and usage rights. Many “free” plans aren’t entirely unrestricted. Some websites may retain copyright, limiting commercial use or modifications. Others might require attribution or prohibit redistribution.

Pay close attention to the terms of service or accompanying documentation. Understand if you’re permitted to alter the plans, build for resale, or share them with others. Ignoring these terms could lead to legal issues.

Look for plans with a clear Creative Commons license or explicit permission for broad usage. Prioritize plans that grant you the freedom to adapt and build without restrictions, ensuring a hassle-free project.

ductwork installation guide pdf

Ductwork Installation Guide: A Comprehensive Plan

This comprehensive guide details ductwork installation, referencing SMACNA manuals and BSRIA guides for optimal HVAC system performance. UL 181 standards and CLIMAVER installation are covered.

Understanding Ductwork Systems

Ductwork systems are the circulatory network of any HVAC (Heating, Ventilation, and Air Conditioning) system, responsible for distributing conditioned air throughout a building. A properly designed and installed duct system ensures efficient heating and cooling, contributing significantly to indoor comfort and energy savings.

These systems typically consist of a network of interconnected ducts, originating from the central HVAC unit. Main trunk lines carry large volumes of air, branching into smaller ducts that deliver airflow to individual rooms or zones. Understanding the principles of static regain, as outlined in SMACNA’s HVAC Systems—Duct Design manual, is crucial for maintaining consistent airflow and minimizing energy loss.

Effective ductwork isn’t simply about pipes; it’s about airflow dynamics. Air diffusion supply duct systems offer alternatives to traditional methods, improving performance. Proper installation, adhering to standards like UL 181, is paramount. Resources like BSRIA guides help clarify complexities, particularly with flexible ductwork, ensuring optimal building performance and avoiding common pitfalls during installation.

Types of Ductwork Materials

Several materials are commonly used in ductwork installation, each with distinct advantages and disadvantages. Sheet metal, traditionally galvanized steel or aluminum, offers durability and rigidity, making it suitable for main trunk lines. However, it requires skilled fabrication and can be prone to noise transmission.

Flexible ductwork, often constructed from a wire helix encased in a plastic film, provides ease of installation, particularly in tight spaces. BSRIA guides address concerns surrounding flexible ductwork, emphasizing proper support and minimizing bends to maintain airflow efficiency. While convenient, it generally has a shorter lifespan and higher air leakage potential than rigid systems.

Other options include fiberglass duct board, offering good thermal and acoustic properties, and plastic ducts, often used for specific applications. UL 181 listed ducts and connectors, with plain ends, ensure compliance with safety standards. The choice of material depends on factors like budget, accessibility, HVAC system requirements, and the specific installation environment, as detailed in comprehensive installation instructions.

Sheet Metal Ductwork: Pros and Cons

Sheet metal ductwork, typically galvanized steel or aluminum, remains a popular choice for HVAC systems due to its inherent strengths. A significant pro is its durability; properly installed sheet metal systems can last for decades, resisting damage and maintaining structural integrity. It also offers excellent airtightness when correctly sealed, minimizing energy loss and maximizing system efficiency, as outlined in SMACNA duct design manuals.

However, sheet metal also presents challenges. Installation requires skilled labor for accurate fabrication and assembly, increasing labor costs. The rigidity of the material can make navigating complex building layouts difficult, potentially necessitating more fittings and increasing resistance to airflow. Noise transmission is another concern; without adequate insulation, sheet metal can amplify system sounds.

Furthermore, corrosion can be an issue, particularly in humid environments, although galvanized coatings offer some protection. Careful consideration of these pros and cons is crucial when determining if sheet metal is the appropriate material for a specific ductwork installation project.

Flexible Ductwork: Applications and Limitations

Flexible ductwork, often constructed with a wire helix and an inner liner, provides versatility in HVAC system installation, particularly in retrofits or buildings with complex geometries. Its primary advantage lies in its ease of routing around obstacles, reducing the need for numerous elbows and fittings. This simplifies installation and can lower material costs. The ADCAS recommends the new BSRIA guide to clarify confusion surrounding flexible ductwork.

However, flexible duct also has significant limitations. It inherently offers higher airflow resistance compared to smooth metal ducts due to its corrugated interior. This increased resistance can reduce system efficiency and increase energy consumption. Furthermore, flexible duct is more prone to leaks and damage if not properly supported and protected.

Its use should be limited to short runs and connecting rigid ductwork to registers. Overreliance on flexible duct can compromise overall system performance and longevity, emphasizing the importance of adhering to best practices and industry standards.

Duct Sizing and Static Regain

Proper duct sizing is crucial for an efficient HVAC system, ensuring adequate airflow to each room while minimizing energy waste. Incorrectly sized ducts can lead to noisy operation, uneven temperatures, and increased utility bills. The SMACNA HVAC Systems—Duct Design manual provides detailed methodologies for calculating appropriate duct dimensions.

The concept of static regain is central to effective duct design. Static regain refers to the recovery of static pressure as airflow velocity decreases in the ductwork. A well-designed system aims to balance velocity and static pressure, minimizing friction losses and maximizing airflow delivery.

Calculating duct sizes involves considering factors like airflow rate (CFM), duct length, and desired velocity. Methods include equal friction, static regain, and velocity reduction. Utilizing software or consulting with a qualified HVAC professional is recommended for complex systems to ensure optimal performance and adherence to industry standards.

HVAC System Compatibility

Ensuring compatibility between the new ductwork and the existing HVAC system is paramount for optimal performance and efficiency. Factors like the system’s BTU capacity, airflow requirements, and static pressure capabilities must be carefully considered during the installation process.

An undersized duct system can restrict airflow, causing the HVAC unit to work harder, potentially leading to premature failure and increased energy consumption. Conversely, an oversized system can result in short-cycling, reducing dehumidification and comfort levels.

When upgrading or replacing ductwork, it’s crucial to verify that the new system aligns with the HVAC unit’s specifications. Consulting the HVAC manufacturer’s installation manual and seeking guidance from a qualified installer are essential steps. Properly matched systems deliver consistent comfort, reduced energy costs, and extended equipment lifespan.

Essential Tools for Ductwork Installation

Successful ductwork installation requires a range of specialized tools to ensure precise cuts, secure connections, and proper sealing. Essential tools include sheet metal snips for cutting duct material, a seam sealer for airtight joints, and a foil tape dispenser for efficient application.

A duct cutter, whether manual or powered, is vital for creating clean, accurate cuts in round or rectangular ducts. A crimping tool is necessary for forming and shaping sheet metal, while a rivet gun secures duct sections together. Measuring tools like tape measures and levels are crucial for accurate layout and alignment.

Safety gear, including gloves, safety glasses, and a dust mask, is non-negotiable. Additionally, a vacuum with a HEPA filter helps maintain a clean work environment. Referencing a detailed installation guide and understanding each tool’s proper use is key to a professional and safe installation.

Safety Precautions During Installation

Prioritizing safety during ductwork installation is paramount. Always wear appropriate personal protective equipment (PPE), including safety glasses to shield against debris, gloves to protect hands from sharp edges, and a dust mask to prevent inhalation of particles. Working at heights necessitates fall protection, such as harnesses and secure scaffolding.

Be mindful of electrical hazards; always de-energize circuits before working near wiring. Sharp sheet metal edges pose laceration risks, demanding careful handling and the use of protective gear. Proper ventilation is crucial when using sealants or adhesives, following manufacturer’s instructions diligently.

When utilizing power tools, adhere to all safety guidelines and ensure proper grounding. A comprehensive installation guide should emphasize these precautions. Remember, if you lack confidence in performing a task safely, consult a qualified HVAC installer. Prioritize well-being throughout the entire process.

Planning the Ductwork Layout

Effective ductwork layout planning is crucial for optimal HVAC system performance. Begin by analyzing the building’s floor plan, identifying areas requiring heating and cooling. Consider the location of the HVAC unit and plan the main trunk lines for efficient airflow distribution. Minimize duct length and bends to reduce static pressure loss, referencing SMACNA duct design manuals for guidance.

Strategic placement of supply registers and return grilles ensures balanced air distribution throughout the space. Account for obstructions like walls, ceilings, and existing structures. A well-planned layout minimizes noise and maximizes comfort. Utilize a ductwork installation guide to visualize the system and identify potential challenges.

Prioritize accessibility for future maintenance and cleaning. Proper planning, informed by resources like BSRIA guides, is fundamental to a successful and efficient installation.

Calculating Ductwork Dimensions

Accurate ductwork dimensioning is vital for maintaining proper airflow and system efficiency. Calculations begin with determining the required airflow (CFM – cubic feet per minute) for each room, based on its size and heat load. Utilize the static regain method, as outlined in SMACNA HVAC Systems – Duct Design manuals, to size duct runs effectively.

Consider duct velocity – typically between 700-900 feet per minute for main runs and 500-700 feet per minute for branch ducts. Friction rate, influenced by duct material and length, must also be factored in. Employ duct sizing charts or software to translate airflow requirements into appropriate duct diameters or rectangular dimensions.

A ductwork installation guide should provide detailed instructions and formulas. Proper sizing prevents excessive noise, energy waste, and system imbalances. Referencing BSRIA guides can clarify complex calculations and ensure compliance with industry standards.

Installing Main Trunk Lines

The installation of main trunk lines forms the backbone of your HVAC system. Begin by securely supporting the ductwork with appropriate hangers and bracing, adhering to local building codes. Ensure proper alignment and slope for condensate drainage, especially in horizontal runs.

When using sheet metal ductwork, carefully join sections using approved methods like duct tape, mastic sealant, or mechanical fasteners, ensuring airtight seals. For flexible duct, avoid sharp bends and kinks, maintaining a smooth, gradual curvature. A ductwork installation guide emphasizes the importance of minimizing restrictions to airflow.

Regularly check for levelness and stability as you progress. Refer to the CLIMAVER Installation Manual for specific guidance on their systems. Remember, a solid foundation with well-installed trunk lines is crucial for optimal system performance and longevity. Prioritize safety and follow all manufacturer’s instructions.

Connecting Branch Ducts

Connecting branch ducts to the main trunk lines requires precision to maintain airflow balance and efficiency. Utilize properly sized take-offs and dampers to regulate airflow to individual rooms or zones. Securely fasten branch ducts using screws, rivets, or approved duct tape, ensuring airtight connections.

When transitioning between different ductwork materials – for example, from metal trunk lines to flexible branches – employ appropriate transition fittings. Avoid abrupt changes in duct diameter, as these can create turbulence and reduce system performance. A ductwork installation guide stresses the importance of smooth transitions.

Carefully seal all joints and seams with mastic sealant or foil tape to prevent air leakage. Refer to SMACNA standards for best practices in duct sealing. Remember, even small leaks can significantly impact HVAC system efficiency. Prioritize airtight connections for optimal comfort and energy savings.

Sealing Ductwork for Optimal Efficiency

Effective duct sealing is paramount for maximizing HVAC system efficiency and indoor air quality. Air leaks within the ductwork can lead to significant energy loss, increased utility bills, and uneven temperature distribution throughout the building. A comprehensive ductwork installation guide emphasizes meticulous sealing practices.

Utilize mastic sealant, specifically designed for ductwork, along all joints, seams, and connections. Foil tape can be used for reinforcing, but should not be the primary sealant. Avoid using duct tape, as its adhesive degrades over time. SMACNA standards provide detailed guidance on approved sealing methods.

Inspect all connections thoroughly, paying close attention to areas where ducts intersect or transition. Pressure testing the duct system after sealing can identify any remaining leaks. Addressing these leaks ensures optimal airflow and minimizes energy waste. Remember, a well-sealed duct system contributes to a more comfortable and cost-effective home.

Insulating Ductwork to Prevent Heat Loss

Proper ductwork insulation is crucial for maintaining consistent temperatures and reducing energy consumption. Insulating ducts minimizes heat loss in winter and heat gain in summer, improving HVAC system efficiency. A detailed ductwork installation guide stresses the importance of selecting the appropriate insulation material and applying it correctly.

Consider the climate and location of the ductwork when choosing insulation. Options include fiberglass, duct wrap, and spray foam. Ensure the insulation’s R-value meets local building codes and energy efficiency standards. Seal all seams and joints in the insulation with foil tape to prevent air infiltration.

Pay particular attention to insulating ducts located in unconditioned spaces, such as attics, crawl spaces, and garages. Properly insulated ducts contribute to a more comfortable indoor environment and lower utility bills. Refer to SMACNA guidelines for specific insulation recommendations and best practices.

Air Diffusion Supply Duct Systems

Air diffusion supply duct systems represent a modern alternative to traditional HVAC setups utilizing conventional vents, registers, and diffusers. These systems are designed for enhanced air distribution and improved building performance, as highlighted in various ductwork installation guides. They offer a streamlined approach to delivering conditioned air throughout a space.

Compared to traditional methods, air diffusion systems often feature fabric-based ducts or specialized linear diffusers. These components promote a more even airflow, reducing hot and cold spots. This technology can lead to increased comfort and energy savings. Proper installation, following manufacturer’s instructions and industry standards, is paramount for optimal functionality.

When considering an air diffusion system, consult with a qualified HVAC installer to assess its suitability for your specific building and climate. Understanding the system’s design principles and installation requirements, as outlined in relevant guides, ensures a successful and efficient outcome.

UL 181 Listed Ductwork: Standards and Compliance

Ensuring ductwork meets industry standards is crucial for safety and performance. UL 181 listing signifies that nonmetallic air ducts and connectors have undergone rigorous testing by Underwriters Laboratories (UL). This certification, under file numbers like MH9596 and 9844, confirms the materials meet specific requirements for fire resistance and structural integrity.

Compliance with UL 181 is often a requirement for building codes and insurance regulations. Utilizing listed ductwork provides peace of mind, knowing the system has been evaluated for potential hazards. Installation instructions for UL 181 listed products must be strictly followed to maintain the listing’s validity.

A comprehensive ductwork installation guide should always emphasize the importance of verifying UL listing before selecting materials. Proper installation, coupled with compliant materials, contributes to a safe and efficient HVAC system. Referencing the UL directory and manufacturer’s specifications is essential for adherence to standards.

CLIMAVER Installation Manual Overview

The CLIMAVER Installation Manual provides detailed guidance for working with their specific ductwork systems. It emphasizes mastering construction techniques through understanding the phases of manual fabrication. This handbook is designed to streamline the installation process, offering a practical approach to achieving optimal results.

A key component of the manual focuses on calculating the square meterage of CLIMAVER ductwork needed for a project, ensuring accurate material ordering and minimizing waste. The manual highlights the ease and speed of installation, positioning CLIMAVER as a user-friendly solution for HVAC professionals.

A thorough ductwork installation guide should reference resources like the CLIMAVER manual for system-specific details. Understanding the manufacturer’s recommendations is vital for maintaining warranty coverage and ensuring long-term system reliability. Proper adherence to the manual’s instructions contributes to a high-quality, efficient installation.

Finding a Qualified HVAC Installer

Successfully navigating ductwork installation often requires the expertise of a qualified HVAC installer. If you lack confidence in performing the work yourself, or encounter complex issues, professional assistance is crucial. A skilled installer ensures adherence to local codes, proper system sizing, and optimal performance.

When selecting an installer, verify their licensing and insurance. Seek recommendations from trusted sources and check online reviews. A reputable contractor will provide detailed quotes, explain the installation process clearly, and address any concerns you may have. They should also be familiar with relevant ductwork installation guides and industry standards like those from SMACNA.

Remember, a poorly installed HVAC system can lead to energy inefficiency, reduced comfort, and costly repairs. Investing in a qualified installer is a long-term investment in your home’s comfort and efficiency. Don’t hesitate to ask about their experience with CLIMAVER systems or UL 181 compliance.

Resources and Further Reading (SMACNA, BSRIA Guides)

For in-depth knowledge and best practices in ductwork installation, several resources are invaluable. The Sheet Metal and Air Conditioning Contractors’ National Association (SMACNA) provides comprehensive HVAC Systems—Duct Design manuals, detailing design, fabrication, and installation procedures. These are considered industry benchmarks.

The Building Services Research and Information Association (BSRIA) offers guides, including recent publications clarifying flexible ductwork applications and improving building performance. These resources address common misconceptions and promote efficient system design. Accessing these guides can significantly enhance understanding.

Furthermore, manufacturers like CLIMAVER provide detailed installation manuals specific to their products, ensuring proper implementation and adherence to safety standards. UL 181 listing information, available online, confirms ductwork meets stringent safety and performance requirements. Utilizing these resources ensures a compliant and effective installation.

cpo test questions and answers pdf

CPO Test Questions and Answers PDF: A Comprehensive Overview

Finding reliable CPO (/Cost Per Order) test resources in PDF format is crucial for professionals. These materials cover diverse aspects, from data center technology to e-commerce metrics, aiding certification preparation.

What is CPO? Defining the Terminology

CPO, an acronym, carries distinct meanings depending on the context. Within the rapidly evolving technology sector, particularly concerning data centers and high-performance computing, CPO stands for Co-Packaged Optics. This refers to the innovative integration of optical engines and electronic chips into a single socketed slot, forming a co-packaged assembly. This contrasts with NPO (Near Package Optics), where components are separately assembled on a PCB.

However, in the realm of e-commerce and online marketing, CPO signifies Cost Per Order – a vital metric for evaluating campaign efficiency. It represents the total expenses incurred to fulfill a single order. Understanding this dual definition is paramount. Furthermore, within business hierarchies, CPO can denote a Chief Portfolio Officer, responsible for strategic asset management. The context dictates the correct interpretation. Recent developments highlight CPO’s potential to significantly reduce energy consumption in AI applications, making it a key technology for future data infrastructure.

CPO in Data Centers: The Core Concept

Co-Packaged Optics (CPO) represents a paradigm shift in data center networking architecture. Traditionally, optical transceivers were separate components. CPO integrates the optical engine directly alongside the switch chip within the same package. This proximity drastically reduces the distance signals travel, minimizing power consumption and latency – critical factors for high-speed data transmission.

The increasing demands of AI and high-performance computing necessitate significantly higher network speeds, exceeding the capabilities of current interconnects. CPO is positioned as a key enabler, potentially lowering the power consumption of existing pluggable optical modules by as much as 50%. This technology addresses the challenge of efficiently handling data rates ten times higher than present standards.

Currently in its early stages of development, CPO is gaining traction, with companies like Ruijie Networks actively involved in its advancement. It’s considered the ultimate form, with NPO serving as a transitional phase, offering greater openness and easier implementation.

CPO vs. NPO: Understanding the Differences

Both Co-Packaged Optics (CPO) and Near-Package Optics (NPO) aim to improve data transmission efficiency, but they differ in their integration approach. NPO places the optical engine and switch chip on the same Printed Circuit Board (PCB), maintaining separation between the components. CPO, conversely, achieves a tighter integration by co-packaging the optical engine and switch chip within a single socketed slot.

CPO is considered the more advanced, ultimate form of this technology, offering superior performance characteristics. NPO serves as a stepping stone, being easier to implement and providing greater flexibility in design. The Optical Interconnect Network (OIF) forum is driving the development of both technologies.

Essentially, CPO represents a more complete integration, while NPO offers a more modular approach. The choice between the two depends on specific performance requirements, cost considerations, and the desired level of design flexibility. Both are crucial for meeting the escalating bandwidth demands of modern data centers.

CPO Technology: How it Works

Co-Packaged Optics (CPO) fundamentally alters data transmission by integrating optical engines directly alongside electronic chips – specifically, within the same socketed slot. This close proximity drastically reduces the distance data needs to travel, minimizing power consumption and latency. Traditionally, signals travel across PCBs, incurring significant energy loss and delays.

CPO achieves this by essentially ‘packaging’ the optics and electronics together, creating a more efficient and streamlined data pathway. This co-packaging allows for higher bandwidth and improved signal integrity. The technology is particularly relevant given the exponential increase in AI-driven computing demands, which require network speeds exceeding current capabilities by a factor of ten.

By reducing power consumption by as much as 50% compared to conventional methods, CPO addresses a critical challenge in high-speed, high-density interconnect scenarios. It represents a significant advancement in optical interconnect technology, paving the way for more powerful and energy-efficient computing systems.

Benefits of CPO Technology

CPO technology delivers substantial advantages, primarily centered around enhanced performance and reduced operational costs. The most significant benefit is a dramatic reduction in power consumption – potentially up to 50% lower than traditional architectures. This directly translates to lower energy bills and a smaller carbon footprint for data centers.

Furthermore, CPO facilitates significantly higher data transmission speeds, crucial for supporting the demands of artificial intelligence and high-performance computing. By minimizing signal travel distance, latency is also reduced, leading to faster processing times and improved application responsiveness.

The compact nature of co-packaged optics allows for increased port density, enabling more connections within the same physical space. This is particularly valuable in space-constrained data center environments. While still in its early stages of development, CPO promises to be a key enabler of efficient, high-performance computing solutions, driving innovation across various industries.

CPO and Energy Efficiency: Reducing Costs

A core driver behind CPO (Co-Packaged Optics) adoption is its potential for significant energy savings. Traditional data center networking relies on discrete optical modules and electrical interconnects, consuming substantial power. CPO integrates the optics directly with the switch chip, drastically shortening signal paths and minimizing energy loss.

Reports indicate CPO can reduce power consumption by as much as 50% compared to existing pluggable optics. This reduction stems from lower signal transmission losses and the elimination of power-hungry electrical-to-optical conversions. Lower energy usage directly translates into reduced operational expenditures (OPEX) for data center operators.

Beyond direct energy cost savings, CPO’s efficiency also lowers cooling requirements, further decreasing OPEX. As AI workloads and data rates continue to escalate, the energy efficiency gains offered by CPO become increasingly critical for sustainable and cost-effective data center operations. This makes CPO a vital technology for future infrastructure.

CPO Market Trends and Future Predictions

The CPO (Co-Packaged Optics) market is poised for substantial growth, driven by the insatiable demand for bandwidth in AI and high-performance computing applications. Currently in its early stages, the market is expected to accelerate as key players finalize designs and production ramps up.

Industry forecasts, like those from LightCounting, suggest AI will necessitate network speeds ten times greater than present capabilities. CPO is uniquely positioned to meet this demand, becoming a primary solution for efficient high-compute scenarios. Initial deployments are focused on hyperscale data centers, with broader adoption anticipated in the coming years.

Several Chinese companies, including Ruijie Networks, are actively developing CPO technologies. Leading manufacturers like Zhongji Xuchuang are diversifying their product portfolios to include CPO solutions. Future trends point towards increased integration and standardization within the CPO ecosystem, fostering wider market acceptance and innovation.

Key Players in the CPO Sector: Top Companies

Several companies are leading the charge in the burgeoning CPO (Co-Packaged Optics) sector, driving innovation and shaping the future of data center interconnects. Zhongji Xuchuang (300308.SZ) stands out as a key player, focusing on the R&D, production, and sales of high-speed optical transceivers, and actively diversifying its CPO product matrix.

Ruijie Networks is another significant domestic force, pioneering CPO development under the guidance of the OIF (Optical Interconnect Network Forum). While a comprehensive list of “top ten” companies is emerging, these firms represent the forefront of technological advancement.

Beyond these, major players in the broader optical communications industry are heavily investing in CPO research and development. These investments signal a strong belief in CPO’s potential to address the escalating bandwidth demands of AI and high-performance computing. The competitive landscape is rapidly evolving, with new entrants and partnerships continually emerging.

CPO Applications: Beyond Data Centers

While initially focused on revolutionizing data center networks, the applications of CPO (Co-Packaged Optics) are expanding beyond traditional boundaries. The core benefit – increased data transmission speed and reduced energy consumption – makes CPO attractive for a wider range of high-performance computing environments.

Specifically, CPO is poised to play a critical role in supporting the demands of Artificial Intelligence (AI). As AI models grow in complexity, the need for faster and more efficient data transfer becomes paramount. CPO addresses this need by significantly increasing network rates, potentially exceeding current capabilities by a factor of ten.

Furthermore, applications requiring substantial bandwidth and low latency, such as high-frequency trading and scientific simulations, could benefit from CPO technology. The ability to reduce power consumption by up to 50% also makes CPO a compelling solution for environmentally conscious deployments. The future holds potential for CPO in edge computing and telecommunications infrastructure.

CPO and AI: The Connection to High-Performance Computing

The synergy between CPO (Co-Packaged Optics) and Artificial Intelligence (AI) is becoming increasingly significant, particularly within the realm of high-performance computing. AI’s escalating demands for data transfer rates are driving the need for innovative interconnect solutions, and CPO emerges as a frontrunner.

Current network infrastructure struggles to keep pace with the bandwidth requirements of modern AI workloads. LightCounting predicts AI demands are already ten times greater than existing network capacities. CPO directly addresses this bottleneck by dramatically increasing data transmission speeds while simultaneously reducing power consumption – a critical factor for large-scale AI deployments;

The efficient energy profile of CPO is vital, as AI computations are inherently power-intensive. By lowering power demands, CPO enables denser server configurations and reduces overall operational costs. Furthermore, CPO’s ability to facilitate faster data movement directly translates to quicker AI model training and inference times, accelerating innovation and deployment.

CPO Challenges: Current Limitations and Obstacles

Despite its promising potential, CPO (Co-Packaged Optics) technology faces several hurdles hindering widespread adoption. Currently, CPO development remains in its early stages, with market demand still emerging but projected to grow significantly. This nascent stage presents challenges in standardization and supply chain maturity.

One key obstacle is the complexity of integrating optical and electrical components within a single package. Achieving optimal thermal management is crucial, as heat dissipation can significantly impact performance and reliability. Manufacturing processes also require refinement to ensure consistent quality and yield.

Furthermore, the transition from existing NPO (Near-Package Optics) solutions presents a challenge. While NPO offers a more immediate and open approach, CPO represents the ultimate goal. Establishing a robust ecosystem and fostering collaboration between chip manufacturers and optical engine suppliers are essential for overcoming these limitations and unlocking CPO’s full potential.

Cost Per Order (CPO) in E-commerce: A Different Meaning

Outside of data center technology, CPO signifies “Cost Per Order” within the realm of e-commerce and online marketing. This metric is a vital indicator of campaign efficiency, reflecting the total costs incurred to fulfill a single order. Understanding CPO is crucial for businesses aiming to optimize their marketing spend and improve profitability.

Calculating CPO involves summing all associated expenses – advertising costs, processing fees, shipping, and fulfillment – then dividing by the total number of orders generated. A lower CPO generally indicates a more efficient and profitable campaign. Businesses leverage CPO to assess the return on investment (ROI) of various marketing channels;

Analyzing CPO trends helps identify areas for improvement, such as negotiating better shipping rates or optimizing ad targeting. It’s a key performance indicator (KPI) used to refine marketing strategies and ensure sustainable growth. Effectively managing CPO is paramount for success in the competitive e-commerce landscape.

CPO in Business: Other Executive Roles (CEO, CFO, COO, CGO)

While CPO often refers to Chief Product Officer or Cost Per Order, understanding its context alongside other C-suite roles is vital. The CEO (Chief Executive Officer) leads overall strategy and represents shareholder interests. The CFO (Chief Financial Officer) manages financial health and reporting, a crucial function for assessing CPO-related investments.

The COO (Chief Operating Officer) oversees daily operations, impacting order fulfillment costs – directly influencing CPO in e-commerce. A CGO (Chief Growth Officer) focuses on driving revenue, often analyzing CPO to optimize marketing spend. These roles are interconnected; a successful CPO (Product) needs alignment with these leaders.

Effective collaboration between these executives ensures strategic alignment and efficient resource allocation. Understanding each role’s responsibilities provides a holistic view of business operations. A well-defined organizational structure, with clear roles and responsibilities, is essential for maximizing profitability and achieving sustainable growth, especially when considering metrics like CPO.

Finding CPO Test Questions and Answers PDF Resources

Locating comprehensive CPO (both Chief Product Officer and Cost Per Order) test preparation materials in PDF format requires a strategic approach. Online platforms specializing in professional certifications often offer practice exams and study guides. Vendor-specific resources, particularly for data center technologies like co-packaged optics, are invaluable.

Industry forums and communities dedicated to networking and e-commerce frequently share links to relevant PDFs. However, verifying the source’s credibility is paramount to ensure accuracy and relevance. Searching academic databases and professional organizations’ websites can also yield useful study materials.

Beware of outdated or inaccurate information; the CPO landscape evolves rapidly. Prioritize resources published recently, reflecting current industry standards and best practices. Combining multiple sources provides a well-rounded understanding and increases your chances of success on any CPO-related assessment.

Preparing for CPO-Related Certifications and Exams

Effective preparation for CPO-related certifications demands a multifaceted strategy. Begin by thoroughly reviewing the exam objectives and identifying knowledge gaps. Utilize practice exams – often available in PDF format – to simulate the testing environment and assess your understanding.

Focus on core concepts like co-packaged optics (CPO) technology, its advantages in data centers, and distinctions from NPO solutions. For e-commerce focused CPO exams, master the calculation and interpretation of Cost Per Order metrics. Supplement study materials with industry reports and whitepapers to stay current with market trends.

Consider joining study groups or online forums to collaborate with peers and share insights. Dedicate sufficient time to practice problem-solving and analytical skills. Remember to prioritize understanding the why behind the concepts, not just memorizing facts. A structured approach and consistent effort are key to achieving certification success.

old gm engine codes list pdf

Understanding old GM engine codes is essential for identifying engine specifications, ensuring proper maintenance, and sourcing accurate parts. These codes, often found on engine blocks or cylinder heads, provide critical information about displacement, horsepower, and production details. Resources like the “Lime Book” and online databases offer comprehensive guides for decoding, making it easier to verify engine authenticity and performance capabilities. This section introduces the importance of these codes and their role in preserving classic GM vehicles.

1.1 Importance of Engine Codes for Identification and Maintenance

Engine codes are vital for accurately identifying engine specifications, ensuring proper maintenance, and facilitating repairs. They provide detailed information about displacement, horsepower, and production details, which is crucial for sourcing the correct parts and verifying authenticity. For classic vehicles, these codes help enthusiasts restore engines to their original condition. Additionally, understanding engine codes enables better troubleshooting and performance upgrades, making them indispensable for both mechanics and restorers. This information is often compiled in resources like the old GM engine codes list PDF, which serves as a comprehensive guide for enthusiasts and professionals alike.

1.2 Brief History of GM Engine Codes

GM engine codes originated in the 1950s as a system to identify engine specifications. Initially simple, these codes evolved to include detailed information about displacement, horsepower, and production details. By the 1960s and 1970s, codes became more complex, reflecting the diversity of GM’s engine lineup. The “Lime Book” emerged as a definitive guide for Chevrolet V8 codes, while resources like the old GM engine codes list PDF compiled historical data for enthusiasts. This system remained crucial through the 1980s, eventually transitioning to VIN decoding for modern vehicles.

1.3 Purpose of the Article

This article aims to provide a detailed guide to understanding and decoding old GM engine codes, particularly focusing on the old GM engine codes list PDF; It serves as a resource for enthusiasts, restorers, and technicians to accurately identify engines, verify authenticity, and source correct parts. By exploring the history, format, and decoding methods of these codes, the article helps users troubleshoot, maintain, and enhance their classic GM vehicles. It also highlights the importance of resources like PDF guides and online databases for effective engine code identification and application.

Locating Engine Codes on Old GM Engines

Engine codes on old GM engines are typically found on the passenger side below the cylinder heads or on the engine block. They are often stamped in a specific format, such as alphanumeric sequences, and may include casting numbers or suffix codes. These codes are crucial for identifying the engine’s specifications and origin, ensuring accurate parts sourcing and maintenance.

2.1 Where to Find Engine Codes

Engine codes on old GM engines are typically found on the passenger side, below the cylinder heads or on the engine block. They may also appear on a flat surface near the cylinder heads or on the front of the block. Codes are usually stamped and can be small, so they might be easy to miss. Cleaning the area may help visibility. Referencing a resource like the “Lime Book” or a PDF guide can aid in decoding these codes accurately.

2.2 Understanding the Format of Engine Codes

Old GM engine codes are typically alphanumeric and vary in length, often ranging from 1 to . These codes are usually located at the end of the engine’s assembly date stamp. For example, a code like “TLS” indicates a 400ci engine with specific horsepower and transmission configurations. The format includes details about engine size, horsepower rating, and transmission type. Resources like the “Lime Book” provide detailed decoding guides, helping enthusiasts and technicians interpret these codes accurately for maintenance, restoration, or performance upgrades.

Types of Old GM Engine Codes

Old GM engine codes include casting numbers, suffix codes, and VIN decoding. Casting numbers identify the engine block’s manufacturing details, while suffix codes reveal specifications like displacement and horsepower. VIN decoding ties the engine to the vehicle’s history, aiding in authenticating originality and ensuring compatibility for restorations or upgrades.

3.1 Casting Numbers

Casting numbers are critical for identifying GM engines, providing details about the block’s origin and specifications. Typically found on the engine block, these numbers indicate the manufacturing plant, production date, and engine type. For example, a casting number like “3951509” corresponds to a 400ci engine from 1970-1971. These numbers are essential for enthusiasts and restorers to verify engine authenticity and ensure compatibility with original components. By cross-referencing casting numbers with PDF guides or online databases, one can accurately determine the engine’s history and capabilities.

3.2 Suffix Codes

Suffix codes are alphanumeric identifiers used by GM to specify engine details. Typically located at the end of the assembly date code, these 1- reveal critical information such as engine displacement, horsepower, and transmission type. For example, “CMD” denotes a 350ci engine with 170hp and a 4-barrel carburetor. Chevrolet used suffix codes from 1955 through 1969, making them invaluable for identifying classic engines. Resources like the Lime Book and PDF guides provide comprehensive lists for accurate decoding, ensuring enthusiasts can verify engine authenticity and performance capabilities.

3.3 VIN Decoding

VIN decoding is a crucial process for identifying engine specifications in GM vehicles. The Vehicle Identification Number contains , with specific positions revealing details like engine type, model year, and assembly plant. For example, the fourth character indicates engine code, while the tenth reflects the model year. While VINs are essential for vehicle identification, they don’t fully replace engine codes for detailed specifications. Combining VIN decoding with engine code lists from PDF guides ensures accurate identification and verification of classic GM engines, aiding in restoration and maintenance efforts.

Decoding Old GM Engine Codes

Decoding old GM engine codes involves understanding their structure and referencing reliable resources like the “Lime Book” or online databases. Common mistakes include misreading characters or confusing suffix codes with casting numbers. Accurate decoding ensures proper engine identification, parts sourcing, and performance tuning, making it essential for restorers and enthusiasts. Always cross-reference codes with trusted guides to avoid errors and verify authenticity.

4.1 Breaking Down the Code Structure

Old GM engine codes are typically alphanumeric, combining letters and numbers to provide specific details. The code structure often starts with a prefix indicating the manufacturing plant, followed by numbers representing the engine size, horsepower, and production year. For example, codes like F0622TLS or C7F485632 contain information about the engine’s displacement, carburetion type, and application. The suffix code further specifies the engine’s intended use, such as CTX for a 400ci engine. Understanding this structure helps in accurately identifying and verifying the engine’s original specifications and applications.

4.2 Suffix Code Examples and Their Meanings

Old GM engine suffix codes, such as TLS or CTX, provide detailed information about the engine’s specifications. For instance, TLS indicates a 400ci engine with 175 horsepower, equipped with a 4-barrel carburetor and paired with a TH350 transmission. Similarly, CTX denotes a 400ci engine with 170 horsepower, designed for truck applications. These suffix codes are crucial for identifying the engine’s original configuration, ensuring accurate parts sourcing, and verifying authenticity for restorations or upgrades. Decoding these codes helps enthusiasts and technicians understand the engine’s intended use and performance capabilities.

4.3 Common Mistakes in Decoding

Common mistakes in decoding old GM engine codes include misinterpreting suffix codes as casting numbers and not cross-referencing with VINs. Many confuse the engine’s production year with its installation year, leading to incorrect assumptions. Additionally, overlooking the engine’s application (e.g., truck vs. car) can result in mismatched parts. Incorrectly deciphering the code format, such as mixing up letters and numbers, is another frequent error. Always verify codes against multiple sources, like the “Lime Book” or online databases, to ensure accuracy and avoid costly mistakes during restoration or maintenance.

Resources for Old GM Engine Codes

Key resources include PDF guides, online databases, and forums. The “Lime Book” is a definitive source for Chevy V8 codes, aiding in decoding, parts sourcing, and troubleshooting.

5.1 PDF Guides and Manuals

PDF guides and manuals are invaluable resources for decoding old GM engine codes. The “Lime Book” is a renowned reference for Chevrolet V8 engines, providing detailed code lists and specifications. Websites like Mortec.com offer comprehensive PDF documents listing engine codes, including formats like CExxxx for warranty replacement engines. These guides help enthusiasts and technicians identify engine displacement, horsepower, and production years. They also aid in troubleshooting and sourcing authentic parts, ensuring accuracy and compatibility for restorations and performance upgrades. Downloading these resources is a must for anyone working with classic GM engines.

5.2 Online Databases and Forums

Online databases and forums are essential for decoding old GM engine codes. Websites like Mortec.com and forums such as El Camino Central provide detailed code lists and decoding tools; These platforms offer comprehensive information on engine displacement, horsepower, and production years. Enthusiasts and technicians can access forums to share knowledge and experiences, aiding in accurate identification and troubleshooting. Online resources also include discussions on rare codes and less-documented engines, making them invaluable for restoring and maintaining classic GM vehicles with precision and authenticity.

5.3 Specialized Publications

Specialized publications, such as the renowned “Lime Book,” are indispensable for decoding old GM engine codes. These books provide detailed code lists, casting numbers, and production specifics, making them a must-have for enthusiasts and technicians. They often include historical context, part numbers, and application details, ensuring accurate identification and authentication. For example, the “Lime Book” focuses on Chevrolet V8 engines, offering a comprehensive guide to suffix codes and their corresponding specifications. Such publications are vital for restoring classic vehicles and verifying originality for collectors and restorers.

Chevrolet V8 Engine Codes

Chevrolet V8 engine codes are highly sought after due to their popularity and long production run. Suffix codes reveal key details about horsepower, year, and application, making the “Lime Book” an essential resource for enthusiasts and restorers.

6.1 Popularity and Longevity of Chevy V8 Engines

Chevrolet V8 engines have remained iconic due to their durability, versatility, and performance. Their long production run and widespread use in various GM models have made them a favorite among enthusiasts. The availability of detailed resources, such as the “Lime Book,” has further cemented their popularity. These engines are prized for their horsepower range, from mild to wild, and their adaptability across generations of vehicles. Their enduring appeal lies in their balance of power, reliability, and the vast aftermarket support that ensures they remain relevant for both restorations and modern builds.

6.2 Specific Codes for Different Years and Models

Chevrolet V8 engines feature unique suffix codes that vary by year and model, providing detailed information about horsepower, displacement, and applications. For instance, the code “CMD” corresponds to a 1978 Malibu with a 350ci engine and 170hp, while “CDJ” identifies a 454ci big-block from 1992. These codes help enthusiasts and technicians match engines to their intended vehicles, ensuring authenticity and proper performance. Resources like the “Lime Book” and online databases offer extensive lists of these codes, making it easier to decode and verify engine specifications for restoration or maintenance projects.

6.3 The “Lime Book” as a Definitive Source

The “Lime Book” is a revered resource for Chevrolet engine enthusiasts, offering detailed suffix codes and specifications for Chevy V8 engines. It provides year-specific information, including horsepower ratings, carburetion types, and transmission pairings. For example, the code “CMD” is listed for a 1978 Malibu with a 350ci engine and 170hp. This guide is indispensable for verifying engine authenticity, especially for classic models like the 1972 El Camino SS. Its comprehensive data ensures accurate identification and restoration, making it a must-have for collectors and restorers.

The old GM engine codes list PDF provides a comprehensive guide to identifying engine specifications, including casting numbers, suffix codes, and VIN decoding. It covers various engine types, such as the CExxxx format, which denotes warranty replacement engines. This resource is invaluable for classic vehicle enthusiasts, offering detailed information to ensure accurate identification and restoration of GM engines.

7.1 Comprehensive Lists of Engine Codes

The old GM engine codes list PDF offers extensive catalogs of engine codes, covering various models and years. It includes detailed information on casting numbers, suffix codes, and VIN decoding, essential for identifying engine specifications. The PDF guide lists codes for different engine types, such as the CExxxx format, which indicates warranty replacement engines. This resource is particularly useful for classic vehicle enthusiasts, providing a clear reference for accurate engine identification and restoration. It ensures that users can easily match codes to specific engine models and verify originality for restorations or upgrades.

7.2 How to Use the PDF Guide Effectively

To maximize the value of the old GM engine codes list PDF, start by downloading the guide and familiarizing yourself with its structure. The PDF is organized by engine types and years, making it easy to locate specific codes. Use the index or search function to quickly find relevant sections. Cross-reference engine codes with VIN decoding and casting numbers for accurate identification. Pay attention to notes on warranty replacement engines and production years. This guide is indispensable for restorers, enthusiasts, and technicians aiming to verify engine authenticity and specifications efficiently.

7.3 Examples of Codes and Their Applications

The old GM engine codes list PDF provides detailed examples, such as the TLS code, which identifies a 400ci 175hp 4bbl truck motor from 1975-1979. Another example is the CMD code, linked to a 350ci engine in a 1978 Malibu. These codes help enthusiasts and technicians identify engine specifications, verify authenticity, and order correct parts. For instance, the CDJ code refers to a 454ci engine, though specific applications may vary. Such examples demonstrate how these codes are essential for accurate engine identification and restoration projects, ensuring compatibility and performance alignment with original specifications.

GM OBD1 Diagnostic Trouble Codes

GM OBD1 codes help diagnose issues like sensor malfunctions, transmission problems, and ignition faults. Codes such as P0030 (heater circuit issues) and P0107 (MAP sensor low voltage) guide technicians in troubleshooting and repairs, ensuring accurate diagnostics for vintage GM vehicles.

8.1 Overview of OBD1 Codes

GM OBD1 codes are diagnostic tools for identifying issues in older vehicles. These codes cover a wide range of problems, including sensor malfunctions, transmission issues, and ignition system faults. Codes like P0030 (heater circuit issues) and P0107 (MAP sensor low voltage) provide specific fault locations. Technicians use these codes to pinpoint problems, ensuring accurate repairs. OBD1 codes are essential for maintaining and troubleshooting vintage GM vehicles, offering a clear guide for resolving mechanical and electrical issues efficiently.

8.2 Common Codes and Their Meanings

Common OBD1 codes for GM vehicles include P0030 and P0036, which indicate oxygen sensor heater circuit issues. P0107 and P0108 relate to low or high voltage in the manifold absolute pressure sensor. P0112 and P0113 refer to low or high voltage in the intake air temperature sensor, while P0117 points to low voltage in the engine coolant temperature sensor. These codes help technicians identify specific faults, such as sensor malfunctions or wiring problems, enabling precise repairs and maintaining vehicle performance.

8.3 Troubleshooting Using OBD1 Codes

Troubleshooting with OBD1 codes involves identifying specific issues by referencing the code list in the old GM engine codes list PDF. For example, codes like P0030 or P0036 indicate oxygen sensor heater circuit problems, while P0107 or P0108 point to manifold absolute pressure sensor voltage issues. By cross-referencing these codes, technicians can diagnose faults such as faulty sensors, wiring issues, or system malfunctions. This guide helps pinpoint the root cause, enabling targeted repairs and ensuring the engine operates efficiently. Regular use of these codes can prevent minor issues from becoming major problems.

Engine Code Identification for Classic Vehicles

Identifying engine codes for classic vehicles ensures authenticity and proper maintenance. Codes like F0622TLS or C7F485632 reveal engine specs, aiding restorations and upgrades. The old GM engine codes list PDF and resources like the “Lime Book” provide essential decoding tools for enthusiasts.

9.1 Matching Codes to Specific Engine Models

Matching engine codes to specific models ensures accuracy in identification and restoration. For example, the code F0622TLS corresponds to a 400ci engine, while C7F485632 indicates a 400ci block from 1974-1980. The old GM engine codes list PDF and resources like the “Lime Book” provide detailed cross-references, helping enthusiasts verify engine authenticity. By aligning codes with production years and specifications, restorers can ensure originality and performance, making these resources indispensable for classic GM vehicle enthusiasts and technicians alike.

9.2 Verifying Originality for Restorations

Verifying engine originality is crucial for accurate restorations. By cross-referencing codes like F0622TLS or C7F485632 with the old GM engine codes list PDF, restorers can confirm if the engine matches the vehicle’s specifications. This process ensures authenticity, especially for classic models. The “Lime Book” and other resources provide detailed code breakdowns, helping identify displacement, horsepower, and production years. This step is vital for maintaining a vehicle’s historical integrity and value, particularly when dealing with modified or swapped engines.

9.3 Upgrading and Performance Enhancements

Decoding old GM engine codes is vital for upgrading and performance enhancements, allowing enthusiasts to identify compatible parts and optimize their builds. For instance, a 400ci block with a TLS suffix code can be ideal for a performance build due to its higher nickel content. Resources like the “Lime Book” and PDF guides provide detailed code breakdowns, helping enthusiasts select the right components for upgrades. Matching intake manifolds, camshafts, and carburetors to the engine’s specifications ensures maximum performance and reliability, making the decoding process indispensable for successful modifications.

Case Studies and Examples

Real-world examples, like decoding a TLS suffix code for a 400ci engine or identifying a CMD code for a 1978 Malibu, demonstrate how engine codes aid in restorations and upgrades, ensuring authenticity and performance.

10.1 Decoding a 400ci Engine Code

Decoding a 400ci engine code involves analyzing the suffix code and casting numbers. For example, the code TLS indicates a 400ci engine with 175hp and a 4-barrel carburetor, commonly used in trucks from 1975 to 1979. The casting number 3951509 confirms it as a 400ci block from 1974 to 1980. This information helps enthusiasts verify authenticity and specs for restorations or upgrades.

Such decoding ensures accurate parts sourcing and performance tuning, preserving the engine’s original integrity and value.

10.2 Identifying a 350 Small Block Engine

Identifying a 350 Small Block Engine involves decoding its suffix code and casting number. For instance, the code CKK denotes a 350ci engine with 175hp and a 4-barrel carburetor, typically used in 1972 models like the Chevelle or Nova. The casting number MF28800 indicates a later production block, often found in crate engines. These codes, located on the right cylinder head, help enthusiasts verify authenticity and specs for restorations or upgrades.

Such identification ensures accurate parts sourcing and performance tuning, maintaining the engine’s original integrity and value for classic GM vehicles.

10.3 Troubleshooting with Real-World Scenarios

A common scenario involves decoding engine stamps like F0622TLS or C7F485632 to identify specs. For example, F0622TLS indicates a 400ci engine from 1975-1979, while C7F485632 points to a 350 small block. By cross-referencing these codes with resources like the “Lime Book” or online databases, enthusiasts can troubleshoot issues, verify authenticity, and ensure proper upgrades. Such real-world applications highlight the practical value of engine codes in maintaining and enhancing classic GM vehicles.

Old GM engine codes are vital for accurate identification, maintenance, and upgrades. Resources like PDF guides and forums provide essential tools for enthusiasts to decode and verify engines effectively.

11.1 Summary of Key Points

Old GM engine codes are crucial for identifying specifications, ensuring proper maintenance, and sourcing parts. Resources like PDF guides and forums provide detailed lists and decoding tools. The “Lime Book” is a definitive source for Chevy V8 codes, while online databases offer comprehensive lists. Common codes like the 350 small block and 400ci engines are well-documented, aiding enthusiasts in verifying authenticity and performance. Decoding challenges, especially for post-1991 engines, highlight the importance of reliable resources for accurate identification and troubleshooting.

11.2 Final Thoughts on the Importance of Engine Codes

Old GM engine codes are indispensable for enthusiasts and technicians, providing vital information for identification, maintenance, and upgrades. They reveal engine specifications, production details, and compatibility, ensuring accurate parts sourcing and troubleshooting. Resources like the “Lime Book” and PDF guides are invaluable for decoding, especially for popular engines like the 350 small block and 400ci. While challenges remain, particularly for post-1991 engines, the wealth of available data underscores the enduring importance of these codes in preserving and enhancing classic GM vehicles.

1 2 3 11