ductwork installation guide pdf

Ductwork Installation Guide: A Comprehensive Plan

This comprehensive guide details ductwork installation, referencing SMACNA manuals and BSRIA guides for optimal HVAC system performance. UL 181 standards and CLIMAVER installation are covered.

Understanding Ductwork Systems

Ductwork systems are the circulatory network of any HVAC (Heating, Ventilation, and Air Conditioning) system, responsible for distributing conditioned air throughout a building. A properly designed and installed duct system ensures efficient heating and cooling, contributing significantly to indoor comfort and energy savings.

These systems typically consist of a network of interconnected ducts, originating from the central HVAC unit. Main trunk lines carry large volumes of air, branching into smaller ducts that deliver airflow to individual rooms or zones. Understanding the principles of static regain, as outlined in SMACNA’s HVAC Systems—Duct Design manual, is crucial for maintaining consistent airflow and minimizing energy loss.

Effective ductwork isn’t simply about pipes; it’s about airflow dynamics. Air diffusion supply duct systems offer alternatives to traditional methods, improving performance. Proper installation, adhering to standards like UL 181, is paramount. Resources like BSRIA guides help clarify complexities, particularly with flexible ductwork, ensuring optimal building performance and avoiding common pitfalls during installation.

Types of Ductwork Materials

Several materials are commonly used in ductwork installation, each with distinct advantages and disadvantages. Sheet metal, traditionally galvanized steel or aluminum, offers durability and rigidity, making it suitable for main trunk lines. However, it requires skilled fabrication and can be prone to noise transmission.

Flexible ductwork, often constructed from a wire helix encased in a plastic film, provides ease of installation, particularly in tight spaces. BSRIA guides address concerns surrounding flexible ductwork, emphasizing proper support and minimizing bends to maintain airflow efficiency. While convenient, it generally has a shorter lifespan and higher air leakage potential than rigid systems.

Other options include fiberglass duct board, offering good thermal and acoustic properties, and plastic ducts, often used for specific applications. UL 181 listed ducts and connectors, with plain ends, ensure compliance with safety standards. The choice of material depends on factors like budget, accessibility, HVAC system requirements, and the specific installation environment, as detailed in comprehensive installation instructions.

Sheet Metal Ductwork: Pros and Cons

Sheet metal ductwork, typically galvanized steel or aluminum, remains a popular choice for HVAC systems due to its inherent strengths. A significant pro is its durability; properly installed sheet metal systems can last for decades, resisting damage and maintaining structural integrity. It also offers excellent airtightness when correctly sealed, minimizing energy loss and maximizing system efficiency, as outlined in SMACNA duct design manuals.

However, sheet metal also presents challenges. Installation requires skilled labor for accurate fabrication and assembly, increasing labor costs. The rigidity of the material can make navigating complex building layouts difficult, potentially necessitating more fittings and increasing resistance to airflow. Noise transmission is another concern; without adequate insulation, sheet metal can amplify system sounds.

Furthermore, corrosion can be an issue, particularly in humid environments, although galvanized coatings offer some protection. Careful consideration of these pros and cons is crucial when determining if sheet metal is the appropriate material for a specific ductwork installation project.

Flexible Ductwork: Applications and Limitations

Flexible ductwork, often constructed with a wire helix and an inner liner, provides versatility in HVAC system installation, particularly in retrofits or buildings with complex geometries. Its primary advantage lies in its ease of routing around obstacles, reducing the need for numerous elbows and fittings. This simplifies installation and can lower material costs. The ADCAS recommends the new BSRIA guide to clarify confusion surrounding flexible ductwork.

However, flexible duct also has significant limitations. It inherently offers higher airflow resistance compared to smooth metal ducts due to its corrugated interior. This increased resistance can reduce system efficiency and increase energy consumption. Furthermore, flexible duct is more prone to leaks and damage if not properly supported and protected.

Its use should be limited to short runs and connecting rigid ductwork to registers. Overreliance on flexible duct can compromise overall system performance and longevity, emphasizing the importance of adhering to best practices and industry standards.

Duct Sizing and Static Regain

Proper duct sizing is crucial for an efficient HVAC system, ensuring adequate airflow to each room while minimizing energy waste. Incorrectly sized ducts can lead to noisy operation, uneven temperatures, and increased utility bills. The SMACNA HVAC Systems—Duct Design manual provides detailed methodologies for calculating appropriate duct dimensions.

The concept of static regain is central to effective duct design. Static regain refers to the recovery of static pressure as airflow velocity decreases in the ductwork. A well-designed system aims to balance velocity and static pressure, minimizing friction losses and maximizing airflow delivery.

Calculating duct sizes involves considering factors like airflow rate (CFM), duct length, and desired velocity. Methods include equal friction, static regain, and velocity reduction. Utilizing software or consulting with a qualified HVAC professional is recommended for complex systems to ensure optimal performance and adherence to industry standards.

HVAC System Compatibility

Ensuring compatibility between the new ductwork and the existing HVAC system is paramount for optimal performance and efficiency. Factors like the system’s BTU capacity, airflow requirements, and static pressure capabilities must be carefully considered during the installation process.

An undersized duct system can restrict airflow, causing the HVAC unit to work harder, potentially leading to premature failure and increased energy consumption. Conversely, an oversized system can result in short-cycling, reducing dehumidification and comfort levels.

When upgrading or replacing ductwork, it’s crucial to verify that the new system aligns with the HVAC unit’s specifications. Consulting the HVAC manufacturer’s installation manual and seeking guidance from a qualified installer are essential steps. Properly matched systems deliver consistent comfort, reduced energy costs, and extended equipment lifespan.

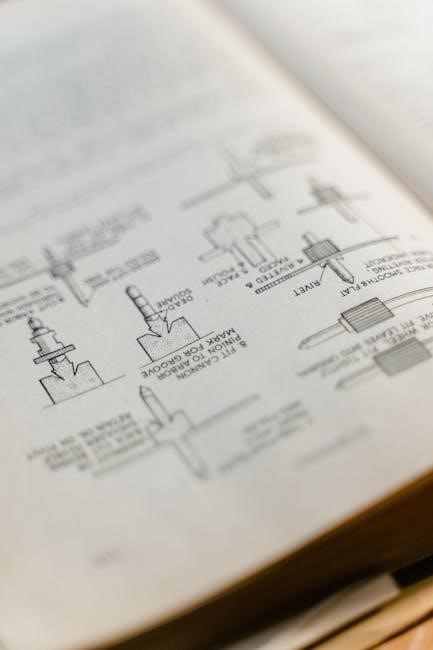
Essential Tools for Ductwork Installation

Successful ductwork installation requires a range of specialized tools to ensure precise cuts, secure connections, and proper sealing. Essential tools include sheet metal snips for cutting duct material, a seam sealer for airtight joints, and a foil tape dispenser for efficient application.

A duct cutter, whether manual or powered, is vital for creating clean, accurate cuts in round or rectangular ducts. A crimping tool is necessary for forming and shaping sheet metal, while a rivet gun secures duct sections together. Measuring tools like tape measures and levels are crucial for accurate layout and alignment.

Safety gear, including gloves, safety glasses, and a dust mask, is non-negotiable. Additionally, a vacuum with a HEPA filter helps maintain a clean work environment. Referencing a detailed installation guide and understanding each tool’s proper use is key to a professional and safe installation.

Safety Precautions During Installation

Prioritizing safety during ductwork installation is paramount. Always wear appropriate personal protective equipment (PPE), including safety glasses to shield against debris, gloves to protect hands from sharp edges, and a dust mask to prevent inhalation of particles. Working at heights necessitates fall protection, such as harnesses and secure scaffolding.

Be mindful of electrical hazards; always de-energize circuits before working near wiring. Sharp sheet metal edges pose laceration risks, demanding careful handling and the use of protective gear. Proper ventilation is crucial when using sealants or adhesives, following manufacturer’s instructions diligently.

When utilizing power tools, adhere to all safety guidelines and ensure proper grounding. A comprehensive installation guide should emphasize these precautions. Remember, if you lack confidence in performing a task safely, consult a qualified HVAC installer. Prioritize well-being throughout the entire process.

Planning the Ductwork Layout

Effective ductwork layout planning is crucial for optimal HVAC system performance. Begin by analyzing the building’s floor plan, identifying areas requiring heating and cooling. Consider the location of the HVAC unit and plan the main trunk lines for efficient airflow distribution. Minimize duct length and bends to reduce static pressure loss, referencing SMACNA duct design manuals for guidance.

Strategic placement of supply registers and return grilles ensures balanced air distribution throughout the space. Account for obstructions like walls, ceilings, and existing structures. A well-planned layout minimizes noise and maximizes comfort. Utilize a ductwork installation guide to visualize the system and identify potential challenges.

Prioritize accessibility for future maintenance and cleaning. Proper planning, informed by resources like BSRIA guides, is fundamental to a successful and efficient installation.

Calculating Ductwork Dimensions

Accurate ductwork dimensioning is vital for maintaining proper airflow and system efficiency. Calculations begin with determining the required airflow (CFM – cubic feet per minute) for each room, based on its size and heat load. Utilize the static regain method, as outlined in SMACNA HVAC Systems – Duct Design manuals, to size duct runs effectively.

Consider duct velocity – typically between 700-900 feet per minute for main runs and 500-700 feet per minute for branch ducts. Friction rate, influenced by duct material and length, must also be factored in. Employ duct sizing charts or software to translate airflow requirements into appropriate duct diameters or rectangular dimensions.

A ductwork installation guide should provide detailed instructions and formulas. Proper sizing prevents excessive noise, energy waste, and system imbalances. Referencing BSRIA guides can clarify complex calculations and ensure compliance with industry standards.

Installing Main Trunk Lines

The installation of main trunk lines forms the backbone of your HVAC system. Begin by securely supporting the ductwork with appropriate hangers and bracing, adhering to local building codes. Ensure proper alignment and slope for condensate drainage, especially in horizontal runs.

When using sheet metal ductwork, carefully join sections using approved methods like duct tape, mastic sealant, or mechanical fasteners, ensuring airtight seals. For flexible duct, avoid sharp bends and kinks, maintaining a smooth, gradual curvature. A ductwork installation guide emphasizes the importance of minimizing restrictions to airflow.

Regularly check for levelness and stability as you progress. Refer to the CLIMAVER Installation Manual for specific guidance on their systems. Remember, a solid foundation with well-installed trunk lines is crucial for optimal system performance and longevity. Prioritize safety and follow all manufacturer’s instructions.

Connecting Branch Ducts

Connecting branch ducts to the main trunk lines requires precision to maintain airflow balance and efficiency. Utilize properly sized take-offs and dampers to regulate airflow to individual rooms or zones. Securely fasten branch ducts using screws, rivets, or approved duct tape, ensuring airtight connections.

When transitioning between different ductwork materials – for example, from metal trunk lines to flexible branches – employ appropriate transition fittings. Avoid abrupt changes in duct diameter, as these can create turbulence and reduce system performance. A ductwork installation guide stresses the importance of smooth transitions.

Carefully seal all joints and seams with mastic sealant or foil tape to prevent air leakage. Refer to SMACNA standards for best practices in duct sealing. Remember, even small leaks can significantly impact HVAC system efficiency. Prioritize airtight connections for optimal comfort and energy savings.

Sealing Ductwork for Optimal Efficiency

Effective duct sealing is paramount for maximizing HVAC system efficiency and indoor air quality. Air leaks within the ductwork can lead to significant energy loss, increased utility bills, and uneven temperature distribution throughout the building. A comprehensive ductwork installation guide emphasizes meticulous sealing practices.

Utilize mastic sealant, specifically designed for ductwork, along all joints, seams, and connections. Foil tape can be used for reinforcing, but should not be the primary sealant. Avoid using duct tape, as its adhesive degrades over time. SMACNA standards provide detailed guidance on approved sealing methods.

Inspect all connections thoroughly, paying close attention to areas where ducts intersect or transition. Pressure testing the duct system after sealing can identify any remaining leaks. Addressing these leaks ensures optimal airflow and minimizes energy waste. Remember, a well-sealed duct system contributes to a more comfortable and cost-effective home.

Insulating Ductwork to Prevent Heat Loss

Proper ductwork insulation is crucial for maintaining consistent temperatures and reducing energy consumption. Insulating ducts minimizes heat loss in winter and heat gain in summer, improving HVAC system efficiency. A detailed ductwork installation guide stresses the importance of selecting the appropriate insulation material and applying it correctly.

Consider the climate and location of the ductwork when choosing insulation. Options include fiberglass, duct wrap, and spray foam. Ensure the insulation’s R-value meets local building codes and energy efficiency standards. Seal all seams and joints in the insulation with foil tape to prevent air infiltration.

Pay particular attention to insulating ducts located in unconditioned spaces, such as attics, crawl spaces, and garages. Properly insulated ducts contribute to a more comfortable indoor environment and lower utility bills. Refer to SMACNA guidelines for specific insulation recommendations and best practices.

Air Diffusion Supply Duct Systems

Air diffusion supply duct systems represent a modern alternative to traditional HVAC setups utilizing conventional vents, registers, and diffusers. These systems are designed for enhanced air distribution and improved building performance, as highlighted in various ductwork installation guides. They offer a streamlined approach to delivering conditioned air throughout a space.

Compared to traditional methods, air diffusion systems often feature fabric-based ducts or specialized linear diffusers. These components promote a more even airflow, reducing hot and cold spots. This technology can lead to increased comfort and energy savings. Proper installation, following manufacturer’s instructions and industry standards, is paramount for optimal functionality.

When considering an air diffusion system, consult with a qualified HVAC installer to assess its suitability for your specific building and climate. Understanding the system’s design principles and installation requirements, as outlined in relevant guides, ensures a successful and efficient outcome.

UL 181 Listed Ductwork: Standards and Compliance

Ensuring ductwork meets industry standards is crucial for safety and performance. UL 181 listing signifies that nonmetallic air ducts and connectors have undergone rigorous testing by Underwriters Laboratories (UL). This certification, under file numbers like MH9596 and 9844, confirms the materials meet specific requirements for fire resistance and structural integrity.

Compliance with UL 181 is often a requirement for building codes and insurance regulations. Utilizing listed ductwork provides peace of mind, knowing the system has been evaluated for potential hazards. Installation instructions for UL 181 listed products must be strictly followed to maintain the listing’s validity.

A comprehensive ductwork installation guide should always emphasize the importance of verifying UL listing before selecting materials. Proper installation, coupled with compliant materials, contributes to a safe and efficient HVAC system. Referencing the UL directory and manufacturer’s specifications is essential for adherence to standards.

CLIMAVER Installation Manual Overview

The CLIMAVER Installation Manual provides detailed guidance for working with their specific ductwork systems. It emphasizes mastering construction techniques through understanding the phases of manual fabrication. This handbook is designed to streamline the installation process, offering a practical approach to achieving optimal results.

A key component of the manual focuses on calculating the square meterage of CLIMAVER ductwork needed for a project, ensuring accurate material ordering and minimizing waste. The manual highlights the ease and speed of installation, positioning CLIMAVER as a user-friendly solution for HVAC professionals.

A thorough ductwork installation guide should reference resources like the CLIMAVER manual for system-specific details. Understanding the manufacturer’s recommendations is vital for maintaining warranty coverage and ensuring long-term system reliability. Proper adherence to the manual’s instructions contributes to a high-quality, efficient installation.

Finding a Qualified HVAC Installer

Successfully navigating ductwork installation often requires the expertise of a qualified HVAC installer. If you lack confidence in performing the work yourself, or encounter complex issues, professional assistance is crucial. A skilled installer ensures adherence to local codes, proper system sizing, and optimal performance.

When selecting an installer, verify their licensing and insurance. Seek recommendations from trusted sources and check online reviews. A reputable contractor will provide detailed quotes, explain the installation process clearly, and address any concerns you may have. They should also be familiar with relevant ductwork installation guides and industry standards like those from SMACNA.

Remember, a poorly installed HVAC system can lead to energy inefficiency, reduced comfort, and costly repairs. Investing in a qualified installer is a long-term investment in your home’s comfort and efficiency. Don’t hesitate to ask about their experience with CLIMAVER systems or UL 181 compliance.

Resources and Further Reading (SMACNA, BSRIA Guides)

For in-depth knowledge and best practices in ductwork installation, several resources are invaluable. The Sheet Metal and Air Conditioning Contractors’ National Association (SMACNA) provides comprehensive HVAC Systems—Duct Design manuals, detailing design, fabrication, and installation procedures. These are considered industry benchmarks.

The Building Services Research and Information Association (BSRIA) offers guides, including recent publications clarifying flexible ductwork applications and improving building performance. These resources address common misconceptions and promote efficient system design. Accessing these guides can significantly enhance understanding.

Furthermore, manufacturers like CLIMAVER provide detailed installation manuals specific to their products, ensuring proper implementation and adherence to safety standards. UL 181 listing information, available online, confirms ductwork meets stringent safety and performance requirements. Utilizing these resources ensures a compliant and effective installation.

cpo test questions and answers pdf

CPO Test Questions and Answers PDF: A Comprehensive Overview

Finding reliable CPO (/Cost Per Order) test resources in PDF format is crucial for professionals. These materials cover diverse aspects, from data center technology to e-commerce metrics, aiding certification preparation.

What is CPO? Defining the Terminology

CPO, an acronym, carries distinct meanings depending on the context. Within the rapidly evolving technology sector, particularly concerning data centers and high-performance computing, CPO stands for Co-Packaged Optics. This refers to the innovative integration of optical engines and electronic chips into a single socketed slot, forming a co-packaged assembly. This contrasts with NPO (Near Package Optics), where components are separately assembled on a PCB.

However, in the realm of e-commerce and online marketing, CPO signifies Cost Per Order – a vital metric for evaluating campaign efficiency. It represents the total expenses incurred to fulfill a single order. Understanding this dual definition is paramount. Furthermore, within business hierarchies, CPO can denote a Chief Portfolio Officer, responsible for strategic asset management. The context dictates the correct interpretation. Recent developments highlight CPO’s potential to significantly reduce energy consumption in AI applications, making it a key technology for future data infrastructure.

CPO in Data Centers: The Core Concept

Co-Packaged Optics (CPO) represents a paradigm shift in data center networking architecture. Traditionally, optical transceivers were separate components. CPO integrates the optical engine directly alongside the switch chip within the same package. This proximity drastically reduces the distance signals travel, minimizing power consumption and latency – critical factors for high-speed data transmission.

The increasing demands of AI and high-performance computing necessitate significantly higher network speeds, exceeding the capabilities of current interconnects. CPO is positioned as a key enabler, potentially lowering the power consumption of existing pluggable optical modules by as much as 50%. This technology addresses the challenge of efficiently handling data rates ten times higher than present standards.

Currently in its early stages of development, CPO is gaining traction, with companies like Ruijie Networks actively involved in its advancement. It’s considered the ultimate form, with NPO serving as a transitional phase, offering greater openness and easier implementation.

CPO vs. NPO: Understanding the Differences

Both Co-Packaged Optics (CPO) and Near-Package Optics (NPO) aim to improve data transmission efficiency, but they differ in their integration approach. NPO places the optical engine and switch chip on the same Printed Circuit Board (PCB), maintaining separation between the components. CPO, conversely, achieves a tighter integration by co-packaging the optical engine and switch chip within a single socketed slot.

CPO is considered the more advanced, ultimate form of this technology, offering superior performance characteristics. NPO serves as a stepping stone, being easier to implement and providing greater flexibility in design. The Optical Interconnect Network (OIF) forum is driving the development of both technologies.

Essentially, CPO represents a more complete integration, while NPO offers a more modular approach. The choice between the two depends on specific performance requirements, cost considerations, and the desired level of design flexibility. Both are crucial for meeting the escalating bandwidth demands of modern data centers.

CPO Technology: How it Works

Co-Packaged Optics (CPO) fundamentally alters data transmission by integrating optical engines directly alongside electronic chips – specifically, within the same socketed slot. This close proximity drastically reduces the distance data needs to travel, minimizing power consumption and latency. Traditionally, signals travel across PCBs, incurring significant energy loss and delays.

CPO achieves this by essentially ‘packaging’ the optics and electronics together, creating a more efficient and streamlined data pathway. This co-packaging allows for higher bandwidth and improved signal integrity. The technology is particularly relevant given the exponential increase in AI-driven computing demands, which require network speeds exceeding current capabilities by a factor of ten.

By reducing power consumption by as much as 50% compared to conventional methods, CPO addresses a critical challenge in high-speed, high-density interconnect scenarios. It represents a significant advancement in optical interconnect technology, paving the way for more powerful and energy-efficient computing systems.

Benefits of CPO Technology

CPO technology delivers substantial advantages, primarily centered around enhanced performance and reduced operational costs. The most significant benefit is a dramatic reduction in power consumption – potentially up to 50% lower than traditional architectures. This directly translates to lower energy bills and a smaller carbon footprint for data centers.

Furthermore, CPO facilitates significantly higher data transmission speeds, crucial for supporting the demands of artificial intelligence and high-performance computing. By minimizing signal travel distance, latency is also reduced, leading to faster processing times and improved application responsiveness.

The compact nature of co-packaged optics allows for increased port density, enabling more connections within the same physical space. This is particularly valuable in space-constrained data center environments. While still in its early stages of development, CPO promises to be a key enabler of efficient, high-performance computing solutions, driving innovation across various industries.

CPO and Energy Efficiency: Reducing Costs

A core driver behind CPO (Co-Packaged Optics) adoption is its potential for significant energy savings. Traditional data center networking relies on discrete optical modules and electrical interconnects, consuming substantial power. CPO integrates the optics directly with the switch chip, drastically shortening signal paths and minimizing energy loss.

Reports indicate CPO can reduce power consumption by as much as 50% compared to existing pluggable optics. This reduction stems from lower signal transmission losses and the elimination of power-hungry electrical-to-optical conversions. Lower energy usage directly translates into reduced operational expenditures (OPEX) for data center operators.

Beyond direct energy cost savings, CPO’s efficiency also lowers cooling requirements, further decreasing OPEX. As AI workloads and data rates continue to escalate, the energy efficiency gains offered by CPO become increasingly critical for sustainable and cost-effective data center operations. This makes CPO a vital technology for future infrastructure.

CPO Market Trends and Future Predictions

The CPO (Co-Packaged Optics) market is poised for substantial growth, driven by the insatiable demand for bandwidth in AI and high-performance computing applications. Currently in its early stages, the market is expected to accelerate as key players finalize designs and production ramps up.

Industry forecasts, like those from LightCounting, suggest AI will necessitate network speeds ten times greater than present capabilities. CPO is uniquely positioned to meet this demand, becoming a primary solution for efficient high-compute scenarios. Initial deployments are focused on hyperscale data centers, with broader adoption anticipated in the coming years.

Several Chinese companies, including Ruijie Networks, are actively developing CPO technologies. Leading manufacturers like Zhongji Xuchuang are diversifying their product portfolios to include CPO solutions. Future trends point towards increased integration and standardization within the CPO ecosystem, fostering wider market acceptance and innovation.

Key Players in the CPO Sector: Top Companies

Several companies are leading the charge in the burgeoning CPO (Co-Packaged Optics) sector, driving innovation and shaping the future of data center interconnects. Zhongji Xuchuang (300308.SZ) stands out as a key player, focusing on the R&D, production, and sales of high-speed optical transceivers, and actively diversifying its CPO product matrix.

Ruijie Networks is another significant domestic force, pioneering CPO development under the guidance of the OIF (Optical Interconnect Network Forum). While a comprehensive list of “top ten” companies is emerging, these firms represent the forefront of technological advancement.

Beyond these, major players in the broader optical communications industry are heavily investing in CPO research and development. These investments signal a strong belief in CPO’s potential to address the escalating bandwidth demands of AI and high-performance computing. The competitive landscape is rapidly evolving, with new entrants and partnerships continually emerging.

CPO Applications: Beyond Data Centers

While initially focused on revolutionizing data center networks, the applications of CPO (Co-Packaged Optics) are expanding beyond traditional boundaries. The core benefit – increased data transmission speed and reduced energy consumption – makes CPO attractive for a wider range of high-performance computing environments.

Specifically, CPO is poised to play a critical role in supporting the demands of Artificial Intelligence (AI). As AI models grow in complexity, the need for faster and more efficient data transfer becomes paramount. CPO addresses this need by significantly increasing network rates, potentially exceeding current capabilities by a factor of ten.

Furthermore, applications requiring substantial bandwidth and low latency, such as high-frequency trading and scientific simulations, could benefit from CPO technology. The ability to reduce power consumption by up to 50% also makes CPO a compelling solution for environmentally conscious deployments. The future holds potential for CPO in edge computing and telecommunications infrastructure.

CPO and AI: The Connection to High-Performance Computing

The synergy between CPO (Co-Packaged Optics) and Artificial Intelligence (AI) is becoming increasingly significant, particularly within the realm of high-performance computing. AI’s escalating demands for data transfer rates are driving the need for innovative interconnect solutions, and CPO emerges as a frontrunner.

Current network infrastructure struggles to keep pace with the bandwidth requirements of modern AI workloads. LightCounting predicts AI demands are already ten times greater than existing network capacities. CPO directly addresses this bottleneck by dramatically increasing data transmission speeds while simultaneously reducing power consumption – a critical factor for large-scale AI deployments;

The efficient energy profile of CPO is vital, as AI computations are inherently power-intensive. By lowering power demands, CPO enables denser server configurations and reduces overall operational costs. Furthermore, CPO’s ability to facilitate faster data movement directly translates to quicker AI model training and inference times, accelerating innovation and deployment.

CPO Challenges: Current Limitations and Obstacles

Despite its promising potential, CPO (Co-Packaged Optics) technology faces several hurdles hindering widespread adoption. Currently, CPO development remains in its early stages, with market demand still emerging but projected to grow significantly. This nascent stage presents challenges in standardization and supply chain maturity.

One key obstacle is the complexity of integrating optical and electrical components within a single package. Achieving optimal thermal management is crucial, as heat dissipation can significantly impact performance and reliability. Manufacturing processes also require refinement to ensure consistent quality and yield.

Furthermore, the transition from existing NPO (Near-Package Optics) solutions presents a challenge. While NPO offers a more immediate and open approach, CPO represents the ultimate goal. Establishing a robust ecosystem and fostering collaboration between chip manufacturers and optical engine suppliers are essential for overcoming these limitations and unlocking CPO’s full potential.

Cost Per Order (CPO) in E-commerce: A Different Meaning

Outside of data center technology, CPO signifies “Cost Per Order” within the realm of e-commerce and online marketing. This metric is a vital indicator of campaign efficiency, reflecting the total costs incurred to fulfill a single order. Understanding CPO is crucial for businesses aiming to optimize their marketing spend and improve profitability.

Calculating CPO involves summing all associated expenses – advertising costs, processing fees, shipping, and fulfillment – then dividing by the total number of orders generated. A lower CPO generally indicates a more efficient and profitable campaign. Businesses leverage CPO to assess the return on investment (ROI) of various marketing channels;

Analyzing CPO trends helps identify areas for improvement, such as negotiating better shipping rates or optimizing ad targeting. It’s a key performance indicator (KPI) used to refine marketing strategies and ensure sustainable growth. Effectively managing CPO is paramount for success in the competitive e-commerce landscape.

CPO in Business: Other Executive Roles (CEO, CFO, COO, CGO)

While CPO often refers to Chief Product Officer or Cost Per Order, understanding its context alongside other C-suite roles is vital. The CEO (Chief Executive Officer) leads overall strategy and represents shareholder interests. The CFO (Chief Financial Officer) manages financial health and reporting, a crucial function for assessing CPO-related investments.

The COO (Chief Operating Officer) oversees daily operations, impacting order fulfillment costs – directly influencing CPO in e-commerce. A CGO (Chief Growth Officer) focuses on driving revenue, often analyzing CPO to optimize marketing spend. These roles are interconnected; a successful CPO (Product) needs alignment with these leaders.

Effective collaboration between these executives ensures strategic alignment and efficient resource allocation. Understanding each role’s responsibilities provides a holistic view of business operations. A well-defined organizational structure, with clear roles and responsibilities, is essential for maximizing profitability and achieving sustainable growth, especially when considering metrics like CPO.

Finding CPO Test Questions and Answers PDF Resources

Locating comprehensive CPO (both Chief Product Officer and Cost Per Order) test preparation materials in PDF format requires a strategic approach. Online platforms specializing in professional certifications often offer practice exams and study guides. Vendor-specific resources, particularly for data center technologies like co-packaged optics, are invaluable.

Industry forums and communities dedicated to networking and e-commerce frequently share links to relevant PDFs. However, verifying the source’s credibility is paramount to ensure accuracy and relevance. Searching academic databases and professional organizations’ websites can also yield useful study materials.

Beware of outdated or inaccurate information; the CPO landscape evolves rapidly. Prioritize resources published recently, reflecting current industry standards and best practices. Combining multiple sources provides a well-rounded understanding and increases your chances of success on any CPO-related assessment.

Preparing for CPO-Related Certifications and Exams

Effective preparation for CPO-related certifications demands a multifaceted strategy. Begin by thoroughly reviewing the exam objectives and identifying knowledge gaps. Utilize practice exams – often available in PDF format – to simulate the testing environment and assess your understanding.

Focus on core concepts like co-packaged optics (CPO) technology, its advantages in data centers, and distinctions from NPO solutions. For e-commerce focused CPO exams, master the calculation and interpretation of Cost Per Order metrics. Supplement study materials with industry reports and whitepapers to stay current with market trends.

Consider joining study groups or online forums to collaborate with peers and share insights. Dedicate sufficient time to practice problem-solving and analytical skills. Remember to prioritize understanding the why behind the concepts, not just memorizing facts. A structured approach and consistent effort are key to achieving certification success.

nood 2.0 instruction manual pdf

Nood 2.0 Instruction Manual PDF: A Comprehensive Guide

Today’s date is 12/12/2025 06:44:35 (). Eroxon, a novel ED gel, is FDA-cleared and requires no prescription, offering a fast-acting, topical solution.

What is Nood 2.0? ― Overview and Purpose

Nood 2.0, while seemingly unrelated to the provided context concerning university transfers and erectile dysfunction treatments like Eroxon, represents a technological device requiring comprehensive user guidance. This instruction manual PDF serves as a vital resource for understanding its functionalities.

The purpose of Nood 2.0 is currently undefined within the given information, but the manual aims to equip users with the knowledge to effectively operate and maintain the device. Similar to how Eroxon offers a solution for a specific health concern, Nood 2.0 likely addresses a particular need or provides a specific service.

Understanding the device’s core features, troubleshooting potential issues, and adhering to safety precautions – all detailed within the PDF – are crucial for optimal performance. Just as transfer students require guidance for a smooth transition, Nood 2.0 users benefit from a clear and accessible instruction manual.

Where to Find the Official Nood 2.0 Instruction Manual PDF

Locating the official Nood 2.0 Instruction Manual PDF is paramount for proper device usage. While the provided text references university transfer information and Eroxon’s availability, it doesn’t directly link to the manual’s location. However, a logical starting point would be the official Nood 2.0 website.

Typically, manufacturers provide downloadable manuals within a “Support” or “Downloads” section. Searching online using keywords like “Nood 2.0 manual PDF” or “Nood 2.0 user guide” should yield relevant results. Be cautious of third-party websites offering downloads, prioritizing the official source to ensure authenticity and avoid potential malware.

Similar to accessing transfer credit information at the University of Michigan, verifying the source’s legitimacy is crucial. If the website lacks a direct download link, a “Contact Us” section can facilitate a request for the manual.

Downloading and Saving the Nood 2.0 PDF

Once you’ve located the official Nood 2;0 Instruction Manual PDF, the download process is generally straightforward. Most websites utilize a direct download link or a button labeled “Download PDF.” Clicking this initiates the download to your computer’s designated download folder – often “Downloads” or “Documents.”

Upon completion, it’s vital to save the PDF to a secure and easily accessible location. Creating a dedicated folder, such as “Nood 2.0 Manuals,” ensures organized storage. Rename the file with a descriptive name like “Nood2.0_Manual_v1;0.pdf” for easy identification, mirroring the structured approach to transfer credit information.

Like Eroxon’s fast-acting nature, quick access to the manual is beneficial. Regularly backing up this file, alongside other important documents, safeguards against data loss. Consider cloud storage or an external hard drive for redundancy.

System Requirements for Viewing the Nood 2.0 Manual

To ensure a seamless experience accessing the Nood 2.0 Instruction Manual PDF, certain system requirements must be met. A PDF reader, such as Adobe Acrobat Reader, Foxit Reader, or a modern web browser (Chrome, Firefox, Edge), is essential. These are generally available as free downloads.

Operating System compatibility includes Windows 7 or later, macOS 10.13 (High Sierra) or later, and most modern Linux distributions. A minimum of 2MB of free disk space is required for the PDF file itself, though more is recommended for optimal performance.

Similar to Eroxon’s topical application, the manual requires a visual display – a monitor or screen – and a stable internet connection for initial download. While the manual itself doesn’t demand high processing power, a reasonably modern processor will enhance responsiveness.

Understanding the Nood 2.0 Interface

Today is 12/12/2025 06:44:35. Eroxon, the first FDA-cleared, prescription-free ED gel, stimulates nerve endings for increased blood flow, mirroring interface functionality.

Key Components of the Nood 2.0 User Interface

As of 12/12/2025 06:44:35, understanding Nood 2.0’s interface parallels grasping Eroxon’s mechanism – a novel approach. Like Eroxon’s topical application stimulating nerve endings, Nood 2.0’s core lies in its intuitive dashboard. This central hub provides access to all primary functions. Key elements include the navigation bar, offering streamlined access to features, and the control panel, enabling customization.

The status indicator displays real-time operational data, similar to monitoring Eroxon’s fast-acting effects. Data visualization tools present complex information clearly. A dedicated settings menu allows for personalized adjustments. Furthermore, the integrated help section, much like transfer student resources at the University of Michigan, offers comprehensive guidance. Efficient navigation and clear visual cues are paramount, ensuring a user-friendly experience, mirroring Eroxon’s ease of use.

Navigating the Nood 2.0 Instruction Manual PDF

Recorded on 12/12/2025 06:44:35, navigating the Nood 2.0 PDF resembles utilizing the University of Michigan’s transfer student checklist – a step-by-step process. Begin with the interactive table of contents for quick access to specific sections. Utilize the search function (Ctrl+F or Cmd+F) to locate keywords, much like searching for course equivalencies.

Hyperlinks within the document provide cross-referencing to related information. Zoom functionality ensures comfortable viewing on various devices. The PDF is optimized for digital reading, mirroring Eroxon’s fast-acting topical application. Bookmark frequently accessed pages for easy return. Should issues arise, consult the troubleshooting section, akin to addressing common transfer credit questions. Remember, a smooth transition – whether to Nood 2.0 or U-M – requires careful attention to detail and resource utilization.

Troubleshooting Common PDF Viewing Issues

As of 12/12/2025 06:44:35, encountering issues with the Nood 2.0 manual PDF? Similar to navigating transfer credit approvals at the University of Michigan, solutions exist. If the PDF fails to open, ensure you have a current PDF reader (Adobe Acrobat Reader is recommended). A corrupted download may require re-downloading, mirroring the need to resubmit a Transfer Credit Approval Form (TCAF).

Blank pages often indicate printing errors; verify printer settings. Slow loading times suggest a large file size or slow internet connection. If text appears distorted, try updating your PDF reader or changing the document’s rendering settings. Like Eroxon’s topical application, a direct approach often yields the best results. If problems persist, consult the Nood 2.0 support resources – a dedicated team is available to assist, just as U-M provides transfer student support.

Nood 2.0: Core Functionality & Features

Today is 12/12/2025 06:44:35. Eroxon’s fast-acting topical gel mirrors Nood 2.0’s streamlined features, offering a direct, efficient experience for users seeking solutions.

Setting Up Your Nood 2.0 Device

As of 12/12/2025 06:44:35, initiating your Nood 2.0 experience parallels the straightforward application of Eroxon, the FDA-cleared erectile dysfunction gel. Begin by carefully unpacking your device and verifying all components are present. Much like Eroxon’s drug-free topical approach, Nood 2.0 prioritizes a user-friendly setup.

Connect the power adapter and allow the device to fully charge – a crucial first step. Next, familiarize yourself with the key interface elements. Transfer students to the University of Michigan should similarly prioritize financial aid applications for a smooth transition. Ensure a stable internet connection for initial configuration.

Follow the on-screen prompts to establish your user profile and customize initial settings. Remember, competitive engineering applicants require prerequisite course completion with a 3.0 GPA, mirroring Nood 2.0’s demand for optimal performance through proper setup. Detailed instructions are available within the comprehensive PDF manual.

Basic Operations with Nood 2.0

Recorded on 12/12/2025 06:44:35, mastering Nood 2.0’s core functions is akin to understanding Eroxon’s fast-acting topical application for erectile dysfunction. Powering on/off is achieved via the designated button, similar to initiating a transfer application to the University of Michigan. Navigation utilizes the intuitive touchscreen interface.

Accessing primary features involves simple icon taps. Data input follows standard keyboard protocols. Regularly consult the PDF manual for detailed operational guidance. Just as competitive engineering applicants need a 3.0 GPA, consistent practice enhances Nood 2.0 proficiency.

Experiment with basic settings to personalize your experience. Remember to save changes frequently. Troubleshooting minor issues often resolves with a device restart. Like seeking transfer credit equivalencies, exploring the manual’s index can quickly address operational questions. Prioritize understanding these fundamentals for optimal performance.

Advanced Features and Customization Options

As of 12/12/2025 06:44:35, Nood 2.0 unlocks its full potential through advanced features, mirroring Eroxon’s innovative approach to erectile dysfunction treatment. Explore customizable profiles to tailor the device to individual preferences, much like completing a Transfer Credit Approval Form (TCAF).

Utilize the scripting function for automated tasks, akin to obtaining financial aid for university. Data analytics provide insightful performance metrics. The interface allows granular control over settings, comparable to adjusting nerve stimulation with Eroxon.

Mastering these options requires referencing the comprehensive PDF manual. Regularly back up customized settings to prevent data loss. Experiment cautiously, and always prioritize understanding the implications of each adjustment. Just as a step-by-step video aids transfer students, the manual guides advanced customization.

Nood 2.0: Troubleshooting & FAQs

Today is 12/12/2025 06:44:35. Eroxon’s fast-acting gel mirrors Nood 2.0’s need for quick solutions; consult the manual for common issues and frequently asked questions.

Common Problems and Solutions

Troubleshooting Nood 2.0 can often mirror solutions found with innovative products like Eroxon, the first FDA-cleared, over-the-counter erectile dysfunction gel. If Nood 2.0 isn’t responding, first ensure a stable power supply and check all cable connections. Similar to verifying proper application of Eroxon, confirm correct device setup according to the instruction manual.

If the interface freezes, attempt a soft reset by holding the power button for ten seconds. For persistent issues, a factory reset (detailed in the manual) may be necessary. Transfer students encountering issues with course credit evaluations at the University of Michigan, as outlined on their website, can draw parallels – meticulous documentation and following established procedures are key.

If you experience unexpected errors, consult the FAQ section of the Nood 2.0 PDF or contact support. Remember, just as Eroxon offers a drug-free solution, exploring all troubleshooting steps before seeking external help is recommended.

Frequently Asked Questions (FAQs) about Nood 2.0

Q: Where can I find information on transferring credits, similar to Nood 2.0’s functionality? A: Visit the University of Michigan’s Transfer Credit Information website for FAQs, course equivalencies, and transcript details.

Q: Is Nood 2.0 compatible with all systems? A: Check the ‘System Requirements’ section of the PDF manual for compatibility details, much like verifying Eroxon’s suitability for individual use.

Q: What if my course isn’t listed in the Nood 2.0 equivalency search? A: Submit it for evaluation upon acceptance, mirroring the process for unlisted courses at U-M.

Q: Is Nood 2.0 a prescription device? A: No, Nood 2.0 is designed for ease of use, similar to Eroxon, the over-the-counter ED treatment.

Q: Where can I find step-by-step guidance? A: Refer to the manual and online video tutorials for detailed instructions.

Contacting Nood 2.0 Support

For immediate assistance with Nood 2.0, first consult the comprehensive instruction manual PDF. Many common issues are addressed within its pages, similar to finding answers on the University of Michigan’s transfer student checklist.

If your issue persists, explore the online FAQs section, often providing solutions akin to understanding Eroxon’s application process.

For personalized support, reach out via our dedicated email support team at support@nood2.com. Please include a detailed description of your problem and any relevant screenshots.

Alternatively, you can connect with our live chat representatives during business hours (9 AM ― 5 PM EST, Monday-Friday).

For complex technical issues, submit a detailed support ticket through our website. We aim to respond within 24-48 hours.

Safety Precautions and Maintenance

Always follow guidelines, like those for University of Michigan transfers, and Eroxon’s topical application. Ensure proper handling for optimal performance and longevity of Nood 2.0.

Important Safety Guidelines for Nood 2.0

Prioritize safety during Nood 2.0 operation. Much like adhering to University of Michigan transfer application steps – obtaining financial aid and verifying course equivalencies – careful attention to detail is crucial. Always disconnect the device before cleaning or maintenance. Avoid using Nood 2.0 near water or excessive humidity, mirroring the careful consideration needed for sensitive medical applications like Eroxon, the FDA-cleared ED treatment.

Do not attempt to disassemble or modify Nood 2.0; this voids the warranty and could create a hazard. Ensure adequate ventilation during use. Like ensuring prerequisite courses are completed with a 3.0 GPA for Michigan Engineering applicants, proper preparation prevents problems. Never operate the device if it appears damaged. If you experience any unusual behavior, discontinue use immediately and consult the troubleshooting section or contact support. Remember, responsible use ensures a safe and effective experience with your Nood 2.0 device.

Cleaning and Maintaining Your Nood 2.0 Device

Regular cleaning extends the lifespan of your Nood 2.0. Similar to meticulously following transfer student checklists for the University of Michigan, consistent maintenance is key. Disconnect the device from any power source before cleaning. Use a soft, slightly damp cloth to wipe down the exterior surfaces. Avoid abrasive cleaners or solvents, as these can damage the finish.

For internal components, refer to the troubleshooting section for specific instructions – much like understanding Eroxon’s topical application for erectile dysfunction. Ensure all parts are completely dry before reassembling. Store Nood 2.0 in a cool, dry place, away from direct sunlight. Periodic inspection for wear and tear is recommended. Proper care, like ensuring a 3.0 GPA for engineering applicants, guarantees optimal performance and longevity of your Nood 2.0 device.

seiki tv owners manual

Seiki TV Owners Manual: A Comprehensive Guide (Updated 12/04/2025)

Welcome! This manual‚ updated today – 12/04/2025 – provides essential guidance for Seiki television owners‚ covering setup‚ features‚ troubleshooting‚ and warranty details.

Seiki emerged as a prominent television brand offering a diverse range of displays‚ including LCD and LED models‚ often recognized for delivering compelling value within the consumer electronics market. The company‚ Die Seiki Corporation‚ has a broader history rooted in manufacturing resource conservation systems‚ particularly for synthetic resins and rubber‚ showcasing a commitment to innovation beyond just television production.

Seiki televisions‚ including CRT and LED models‚ aimed to provide a user-friendly experience with features like Smart TV capabilities and built-in media players. Understanding your Seiki TV requires familiarizing yourself with its specific model and its unique functionalities. This manual serves as a comprehensive resource‚ guiding you through everything from initial setup to advanced picture and sound adjustments‚ ensuring optimal performance and enjoyment of your Seiki television.

Understanding Your Seiki TV Model

Identifying your specific Seiki TV model is crucial for accessing the most relevant support and features. Locate the model number‚ typically found on a sticker on the back of the television or within the settings menu. Seiki offered various series‚ like the T Series vinyl cutters‚ demonstrating a diverse product line beyond traditional televisions.

Each model possesses unique specifications and capabilities. Familiarize yourself with the available inputs – HDMI‚ USB‚ and others – to connect external devices. Understanding the TV’s resolution and smart features (if applicable) will enhance your viewing experience. Refer to the specifications section later in this manual for common model details. Knowing your model ensures you can effectively utilize all its features and troubleshoot any potential issues.

Initial Setup and Connections

Begin by carefully unpacking your Seiki TV and placing it on a stable surface. Before connecting any cables‚ ensure the TV is powered off. The initial setup involves connecting to a power source using the provided power cord. Next‚ connect your desired video sources – cable/satellite box‚ Blu-ray player‚ or gaming console – using HDMI cables for optimal picture quality.

For older devices‚ utilize composite or component video connections. USB ports allow for media playback from compatible storage devices. Remember to consult the “Connecting External Devices” section for detailed instructions. Once all connections are made‚ power on the TV and follow the on-screen prompts to complete the initial configuration‚ including language selection and network setup.

Connecting to Power and Basic Cables

First‚ locate the power input on the rear of your Seiki TV and connect the supplied power cord securely. Ensure the power outlet is easily accessible and meets the TV’s voltage requirements. Next‚ connect basic cables like coaxial cables for antenna or cable TV reception. Screw the coaxial cable connector firmly onto the “Cable In” port.

If using older devices‚ connect composite (red‚ white‚ yellow) or component (red‚ green‚ blue) cables to the corresponding inputs. These connections provide standard definition video and audio. Always ensure cables are fully inserted for a stable signal. Power on the TV after all basic cable connections are established to initiate the setup process.

Connecting External Devices (HDMI‚ USB‚ etc.)

For high-definition sources‚ utilize the HDMI ports located on the rear panel of your Seiki TV. Connect Blu-ray players‚ gaming consoles‚ or streaming devices using HDMI cables. Each HDMI port may be labeled (HDMI 1‚ HDMI 2‚ etc.). To access content from USB drives‚ plug them into the USB ports – typically found on the side or rear.

The TV supports various USB file formats for media playback. Some Seiki models may also feature a dedicated USB media player function. Remember to safely eject the USB drive through the TV’s on-screen menu before physically disconnecting it to prevent data corruption. Ensure all connections are secure for optimal performance.

Navigating the On-Screen Display (OSD)

The On-Screen Display (OSD) is your central hub for controlling your Seiki TV. Access it by pressing the “Menu” or “Settings” button on your remote. The OSD is structured with clearly labeled icons representing different settings categories – Picture‚ Sound‚ Channel‚ Network‚ and System.

Use the arrow keys on your remote to navigate through the menus and submenus. Select an option by pressing “OK” or “Enter.” To return to the previous menu‚ press the “Back” or “Exit” button. Explore each section to customize your viewing experience. Remember to save any changes made before exiting the OSD.

Remote Control Functions Explained

Your Seiki remote is designed for intuitive control. The power button turns the TV on/off‚ while number buttons directly access channels. “Volume” and “Channel” controls adjust audio and change channels respectively. “Menu” or “Settings” opens the On-Screen Display (OSD) for customization.

Dedicated buttons provide quick access to features like input source selection (“Input” or “Source”)‚ smart TV functions‚ and media playback. Arrow keys navigate the OSD‚ and “OK/Enter” confirms selections. “Back” or “Exit” returns to previous screens. Utilize the “Mute” button for instant silence and explore specialized buttons for specific apps or features.

Picture Settings and Calibration

Optimizing your Seiki TV’s picture quality is simple. Access the “Picture Settings” menu via the OSD. Begin by adjusting “Brightness” for overall light levels and “Contrast” for the difference between light and dark areas. “Color” controls the intensity of hues‚ while “Sharpness” defines image detail.

For advanced calibration‚ explore “Color Temperature” options (Warm‚ Cool‚ Normal) to fine-tune white balance. Experiment with “Advanced Settings” like dynamic contrast and noise reduction. Remember‚ optimal settings vary based on content and personal preference. Calibrating ensures accurate colors and a visually pleasing experience.

Adjusting Brightness‚ Contrast‚ and Color

Brightness controls the overall luminance of the screen; increase for darker rooms‚ decrease for bright environments. Contrast determines the difference between the darkest and brightest parts of the image – higher values create a more vivid picture‚ but can lose detail in shadows.

Color adjusts the intensity of the hues displayed. Subtle adjustments are key; over-saturation can appear unnatural. Begin with the default settings and make small changes‚ observing the impact on your favorite content. These basic adjustments form the foundation of a well-calibrated picture‚ enhancing your viewing experience.

Advanced Picture Settings (Sharpness‚ Color Temperature)

Sharpness controls the definition of edges within the image. Excessive sharpness can introduce artificial artifacts and a grainy appearance; a moderate setting usually provides the best balance. Color Temperature adjusts the warmth or coolness of the picture.

Options typically include “Cool” (bluish tint)‚ “Normal‚” and “Warm” (reddish tint). “Warm” is often preferred for accurate color reproduction‚ especially in dimly lit rooms. Experiment to find the setting that best suits your viewing preferences and content type. Careful adjustment of these settings unlocks a more refined and personalized viewing experience.

Sound Settings and Audio Options

Seiki TVs offer a range of audio adjustments to optimize your listening experience. Access the sound menu via the On-Screen Display (OSD). Volume control is the primary adjustment‚ but explore additional settings for enhanced audio. Equalizer settings allow customization of bass‚ treble‚ and mid-range frequencies.

Sound Modes‚ such as “Standard‚” “Movie‚” or “Music‚” provide pre-configured audio profiles. Explore these to find the best fit for your content. External audio devices can be connected via HDMI ARC or optical audio output for superior sound quality. Adjusting these settings ensures clear and immersive audio.

Using Built-in Features

Seiki Smart TVs unlock a world of entertainment with integrated apps. Access the app store to install streaming services like Netflix‚ Hulu‚ and more. The Media Player allows playback of content directly from USB drives‚ supporting various video‚ audio‚ and image formats. Explore the built-in web browser for convenient internet access directly on your TV.

Utilize screen mirroring to display content from compatible smartphones or tablets. These features enhance your viewing experience‚ offering diverse entertainment options. Refer to the specific app instructions for optimal performance and functionality. Enjoy the convenience of a connected entertainment hub with your Seiki TV.

Smart TV Functions and App Installation

Accessing the App Store: Navigate to the app store on your Seiki Smart TV’s home screen. Browse categories or use the search function to find desired applications. Installation Process: Select the app and click “Install.” You may be prompted to agree to terms and conditions.

Managing Apps: Once installed‚ apps appear on your home screen. You can rearrange them or uninstall unwanted apps through the settings menu. Account Setup: Some apps require account creation or login for full functionality. Ensure a stable internet connection during installation and usage. Explore the diverse range of apps available to personalize your viewing experience.

Media Player Capabilities (USB Playback)

Supported Formats: Your Seiki TV’s media player supports playback of various file formats via USB‚ including common video (MP4‚ AVI‚ MKV)‚ audio (MP3‚ WAV‚ FLAC)‚ and image (JPEG‚ PNG‚ BMP) types. Connecting a USB Device: Simply plug your USB drive into a USB port on the TV. A menu will appear‚ allowing you to browse the contents.

Playback Controls: Use the remote control to navigate files‚ play‚ pause‚ stop‚ fast-forward‚ and rewind media. File Organization: For easier navigation‚ organize your files into folders on the USB drive. Ensure the files are not corrupted for smooth playback. Enjoy your personal media library directly on your Seiki TV!

Troubleshooting Common Issues

Initial Checks: Before diving into complex solutions‚ ensure the TV is plugged in‚ the power outlet works‚ and the correct input source is selected. No Picture/Sound: Verify cable connections (HDMI‚ AV). Try a different cable or input. Check the volume level and mute settings. Connectivity Problems: For Wi-Fi issues‚ restart your router and re-enter the password. Ensure the TV is within range.

Remote Control Issues: Replace the batteries. Ensure nothing obstructs the signal between the remote and the TV. If problems persist‚ consult the ‘Remote Control Functions Explained’ section or consider a factory reset.

No Picture or Sound

Initial Assessment: If your Seiki TV displays a blank screen or lacks audio‚ begin with basic checks. Confirm the power cord is securely connected to both the TV and a functioning outlet. Verify the volume isn’t muted and is set to an audible level. Cable Connections: Inspect all cable connections (HDMI‚ AV‚ component) for looseness or damage. Try using alternative cables to rule out a faulty connection.

Input Source: Ensure the correct input source is selected on your TV using the remote. Power Cycle: Unplug the TV from the power outlet for 60 seconds‚ then plug it back in. This can often resolve temporary glitches.

Connectivity Problems (HDMI‚ Wi-Fi)

HDMI Issues: If experiencing problems with HDMI-connected devices‚ try a different HDMI port on your Seiki TV. Ensure the HDMI cable is securely connected at both ends. Test the HDMI cable with another device to confirm it’s functioning correctly. Update the firmware of both the TV and the connected device.

Wi-Fi Difficulties: For Wi-Fi connectivity issues‚ verify your router is functioning and broadcasting a signal. Restart your router and the TV. Double-check the Wi-Fi password entered on the TV. Move the TV closer to the router to improve signal strength. Consider a wired Ethernet connection for a more stable link.

Performing a Factory Reset

Caution: A factory reset will erase all your personalized settings‚ including saved channels‚ network configurations‚ and app logins. Use this option as a last resort for resolving persistent software issues.

Reset Procedure: Navigate to the TV’s settings menu using the remote control. Locate the “System” or “General” section. Within this menu‚ find the “Reset” or “Factory Reset” option. Confirm your decision when prompted. The TV will power off and restart‚ returning to its original factory state.

Post-Reset: After the reset‚ you’ll need to reconfigure your TV‚ including selecting your language‚ connecting to Wi-Fi‚ and retuning channels.

Software Updates and Firmware

Importance of Updates: Regularly updating your Seiki TV’s software and firmware is crucial for optimal performance‚ security‚ and access to new features. Updates often include bug fixes‚ improved compatibility‚ and enhanced app functionality.

Update Methods: Your Seiki TV can typically receive updates automatically over a Wi-Fi connection. Navigate to the “System” or “Support” section in the settings menu and select “Software Update.” Choose the “Auto Update” option to enable automatic downloads and installations. Alternatively‚ you can manually check for updates.

Caution: Do not interrupt the update process. Ensure a stable power supply during updates to prevent potential damage to the TV’s software.

Safety Precautions and Warnings

Electrical Safety: To prevent electric shock‚ never expose the TV to rain or moisture. Do not overload power outlets. Always unplug the TV during lightning storms or prolonged periods of disuse. Use only the provided power cord;

Physical Safety: Ensure the TV is placed on a stable surface to prevent tipping. Keep the ventilation openings clear to avoid overheating. Do not block the airflow. Avoid placing heavy objects on the power cord.

General Warnings: Do not attempt to disassemble or repair the TV yourself. Refer servicing to qualified personnel. Prolonged viewing may cause eye strain; take regular breaks.

Cleaning and Maintenance

Regular Cleaning: Disconnect the TV from the power outlet before cleaning. Use a soft‚ dry cloth to gently wipe the screen and cabinet. Avoid using liquid cleaners‚ abrasive materials‚ or solvents‚ as these can damage the surface.

Screen Care: For stubborn smudges‚ lightly dampen a soft cloth with distilled water and wipe gently. Never spray water directly onto the screen. Avoid excessive pressure when cleaning.

Ventilation: Regularly inspect and clean the ventilation openings to ensure proper airflow. Dust accumulation can cause overheating. Use a vacuum cleaner with a brush attachment to remove dust.

Understanding the Warranty Information

Limited Warranty: Your Seiki television is covered by a limited warranty against defects in materials and workmanship from the date of original purchase. The warranty period varies depending on the specific model – consult your purchase documentation for details.

Coverage Details: This warranty covers parts and labor for repairs necessary to correct manufacturing defects. It does not cover damage caused by misuse‚ accidents‚ unauthorized modifications‚ or normal wear and tear.

Warranty Service: To obtain warranty service‚ contact Seiki Customer Support (see Resources section). You will need your model number‚ serial number‚ and proof of purchase. Shipping costs to and from the service center are typically the responsibility of the owner.

Seiki TV Specifications (Common Models)

Model Range Overview: Seiki offers a diverse range of televisions‚ primarily focusing on digital CRT and LED technologies. Specifications vary significantly between models‚ but common features include HD and Full HD resolution options.

Typical Specifications: A standard Seiki LED TV might feature a screen size of 32-55 inches‚ a native resolution of 1920×1080 (Full HD)‚ and multiple HDMI inputs for connecting external devices. Refresh rates typically range from 60Hz to 120Hz.

Connectivity: Most models include USB ports for media playback‚ component and composite video inputs‚ and built-in Wi-Fi for Smart TV functionality. Detailed specifications for your specific model are available on the Seiki official website.

Resources for Additional Support

Online Resources: For immediate assistance‚ visit the Seiki Official Website. It hosts a comprehensive FAQ section addressing common issues and provides downloadable manuals for various models. The Internet Archive also offers archived user manuals for older Seiki televisions.

Direct Contact: If you require personalized support‚ Contacting Seiki Customer Support is recommended. Their contact information‚ including phone numbers and email addresses‚ can be found on their website. Be prepared to provide your TV model number and a detailed description of your issue.

Community Forums: Explore online tech forums and communities where Seiki TV owners share experiences and solutions. These platforms can offer valuable insights and troubleshooting tips.

Seiki Official Website and FAQs

Accessing Support: The Seiki Official Website serves as a primary hub for owner resources. Here‚ you’ll find downloadable user manuals for a wide range of Seiki TV models‚ including the T Series vinyl cutter documentation. These manuals cover everything from initial setup to advanced features and troubleshooting.

Frequently Asked Questions: The website’s FAQ section addresses common user inquiries regarding picture settings‚ connectivity issues (HDMI‚ Wi-Fi)‚ smart TV functions‚ and media player capabilities. It’s a great first stop for quick solutions.

Firmware Updates: Regularly check the support section for available software updates and firmware to ensure optimal TV performance and access to the latest features.

Contacting Seiki Customer Support

Need Direct Assistance? If the online resources – the official website‚ FAQs‚ and downloadable manuals – don’t resolve your issue‚ Seiki offers dedicated customer support channels. While specific contact details may vary‚ generally‚ you can reach them through email or a dedicated support form on their website.

Prepare Your Information: Before contacting support‚ have your TV model number and purchase date readily available. Clearly describe the problem you’re experiencing‚ including any error messages displayed. This will expedite the troubleshooting process.

Response Times: Be aware that response times may vary depending on the volume of inquiries. Patience is appreciated while the support team addresses your concerns.

Die Seiki Corporation: Company Overview

A Legacy of Innovation: Die Seiki Corporation is a globally recognized manufacturer committed to delivering high-quality products and services‚ prioritizing customer satisfaction. Originally focused on resource conservation systems for synthetic resins and rubber‚ Seiki has expanded its expertise into diverse areas‚ including television manufacturing.

Core Values: The company emphasizes continuous improvement and a dedication to environmental responsibility. They strive to be a leader in runnerless molding technology and hot runner systems for injection molding‚ showcasing a commitment to advanced manufacturing processes.

Global Presence: Seiki serves a broad international market‚ offering innovative solutions and building lasting partnerships with clients worldwide.

Seiki in Manufacturing: Resource Conservation Systems

Pioneering Efficiency: Die Seiki Corporation initially established itself as a leading provider of resource conservation systems‚ specifically for the synthetic resin and rubber industries. Their core competency lies in developing and implementing technologies that minimize waste and maximize material utilization during manufacturing processes.

Hot Runner Technology: A key area of expertise is hot runner systems for angusslosen (runnerless) injection molding. This innovative approach eliminates material waste associated with traditional sprue and runner systems‚ resulting in significant cost savings and improved product quality.

Sustainable Practices: Seiki’s commitment extends beyond profitability‚ actively promoting environmentally responsible manufacturing practices and contributing to a more sustainable future.

Horizontal Balance Adjustment (Related to Seiki Analog Devices)

Precision Tonearm Calibration: For Seiki vinyl cutters – utilizing analog devices – achieving proper horizontal balance is crucial for optimal performance and stylus longevity. This adjustment ensures consistent tracking force across the record surface‚ minimizing distortion and wear.

Static-Balance Tonearm: Seiki employs a static-balance type tonearm‚ requiring careful calibration to maintain correct stylus pressure. Detach the cartridge stylus cover if removable‚ to facilitate accurate balancing.

Operational Readiness: Before operation‚ thoroughly review all supplied manuals from Seiki‚ the NC unit manufacturer‚ and related equipment providers. Proper understanding of these resources is vital for safe and effective use.